Posts: 112
Threads: 6
Joined: Feb 2016
Reputation:
0
Location: Surrey
Car Model/Spec: 306 Estate, TU Auto
Thanks: 0
Given 6 thank(s) in 5 post(s)
12-06-2016, 08:30 AM
(This post was last modified: 12-06-2016, 08:44 AM by Nexus.)
Hi all,
I've done a fair old bit in keeping things in order with my 306, taking before and after shots of certain jobs over time. The car is slightly modified, its an automatic so the engine is completely stock besides a decent air filter, iridium plugs and premium oil changes every 5k. Also only use premium fuels.
So here's a history of things done. If you would info on cost/sources of any parts just let me know. 
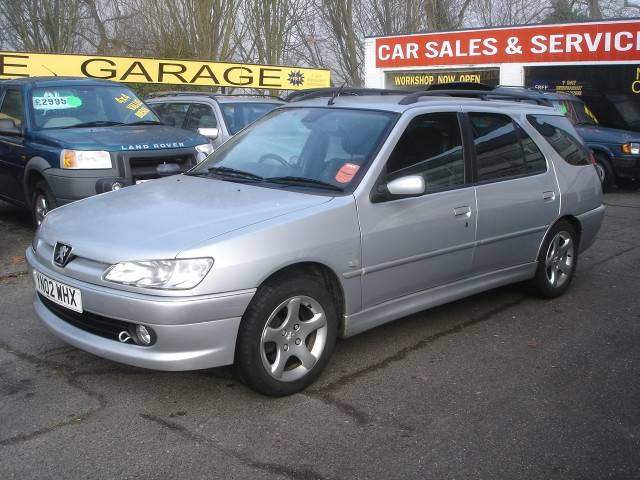
I was looking for a new car and I'd always had a thing for Peugeot 306's. So what, the interior is a bit dated although they do look smart and the metallic paintwork/bodywork on a lot of them seem to hold well looking at sellers ads. Seeing as I was moving house at the time, an Estate made sense. I'm still glad with my decision and I'm planning to keep it for a while longer too. It had a few things that needed seeing to, mostly electrical such as the rear wiper motor and the passenger door c/l jamming. This was my biggest 'upgrade' at the time so frankly I didn't care about something so trivial.
Minor modifications started mainly when looking into strut braces, I wanted to sharpen up the steering without being intrusive and of course, keeping it cheap.
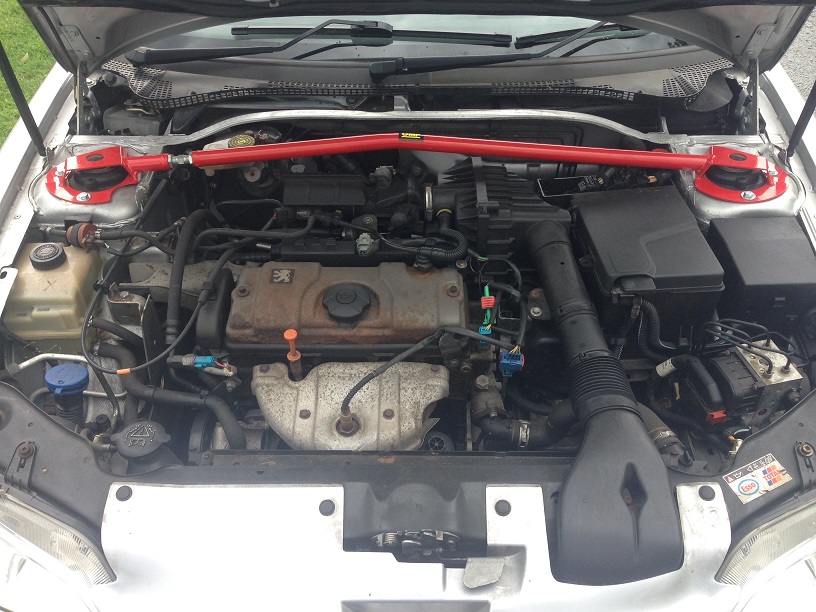
With some new bolts and washers, this pretty much fitted straight on and I was quite surprised with the improvement it gave. Turn ins were more precise and the front no longer felt like a boat swaying all over the place. Of course, now I'm looking at the engine bay thinking how crap it looks! I dont like rusty parts! Something needs to be done. The habit has begun. 

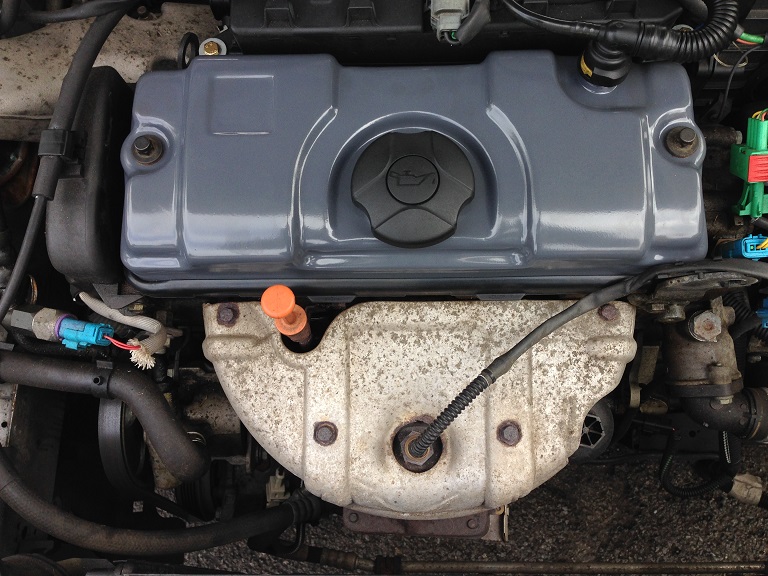
Brand new rocker cover ordered in from the main dealer, plus a new gasket. This was dropped in to a local industrial park to be powder coated - I'm not spending money on a brand new one only to find it tarnished or rusty after six months. Protection was needed, and looks good too. Shortly after this was fitted, the exhaust manifold heat shield followed suit. Standard hex button screws were used to replace the old worn ones as seen below.
Posts: 112
Threads: 6
Joined: Feb 2016
Reputation:
0
Location: Surrey
Car Model/Spec: 306 Estate, TU Auto
Thanks: 0
Given 6 thank(s) in 5 post(s)
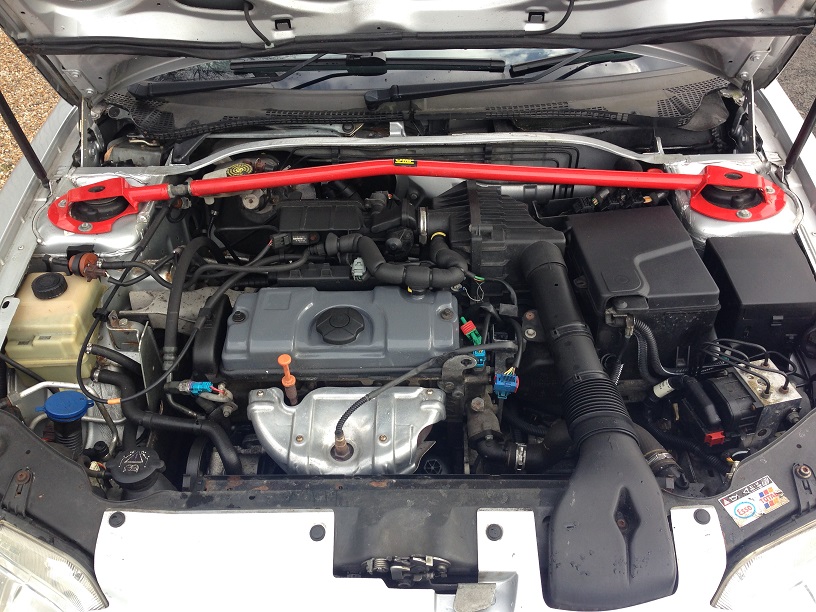
I somehow managed to snap the oil breather hose while trying to squeeze the new rocker cover in to place, my own fault as I was being lazy for not removing the whole thing and the breather hose plastic seems to be very cheap/brittle. Queue ordering genuine part and a hefty hole in my pocket. At least the new one came covered in a protective bit of foam. The difference should be easily noticeable in this pic and the previous ones.
Here's the finished product. Now I'm eyeing up that rusty looking radiator.  Not yet though, I'll do that later.
Posts: 112
Threads: 6
Joined: Feb 2016
Reputation:
0
Location: Surrey
Car Model/Spec: 306 Estate, TU Auto
Thanks: 0
Given 6 thank(s) in 5 post(s)
12-06-2016, 03:25 PM
(This post was last modified: 12-06-2016, 03:28 PM by Nexus.)
Another thing on the list was tidying up the underside, I've already been through a couple of cheap/nasty exhausts so decided to get something stainless. The spare wheel carrier and spare wheel itself was in pretty poor condition - Still got the original spare tyre, a 14yr old Continental. Took one look at the thing and decided it had to go.
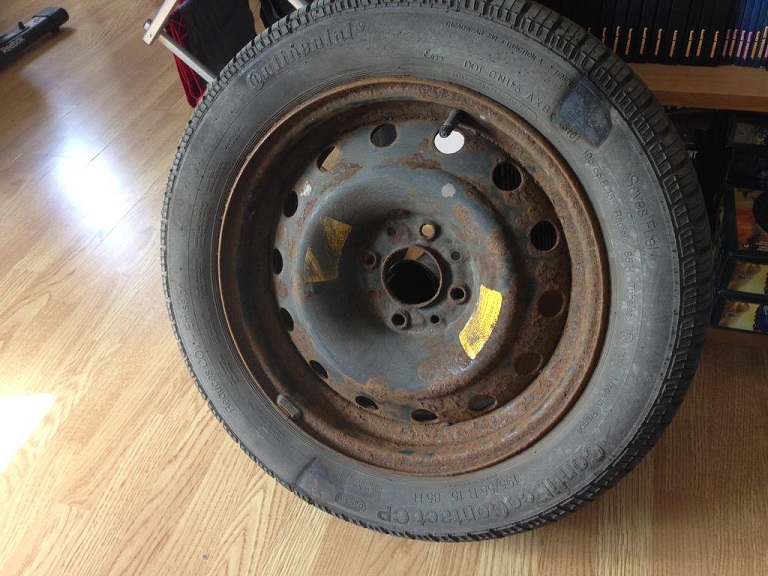
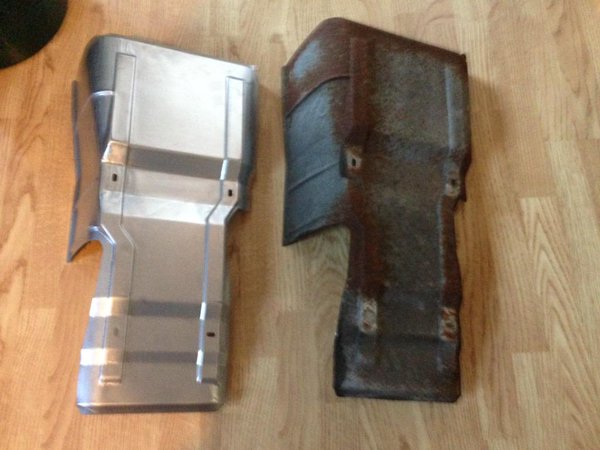
The spare wheel carrier was cleaned up with a wire brush and coated with Hammerite (Probably due another coat tbh) and bought a new hook as the old was rusty and seized. Brand new steel wheel and a half decent budget Nankang ordered in. When the stainless steel Cat-Back was fitted, I decided to source a new genuine heat shield which really does look awesome fitted alongside the new stainless backbox.
Old Vs. New heat shield:
New spare, painted carrier and heatshield + Backbox.
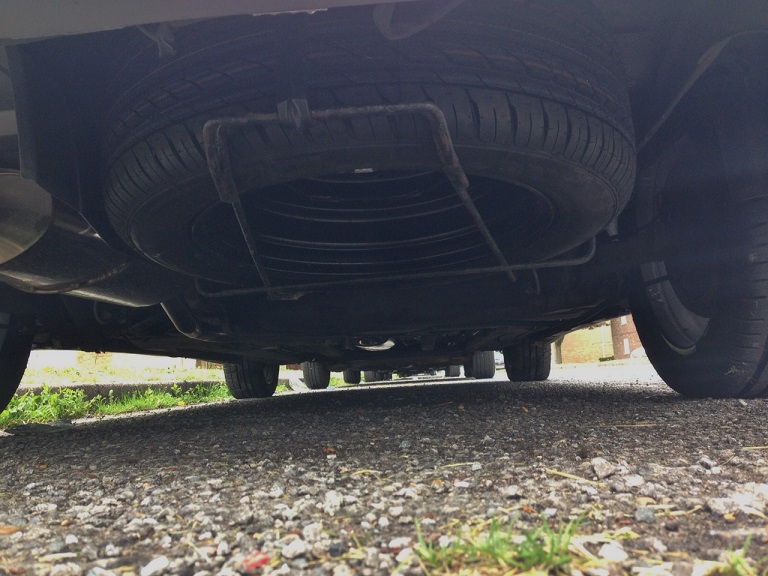
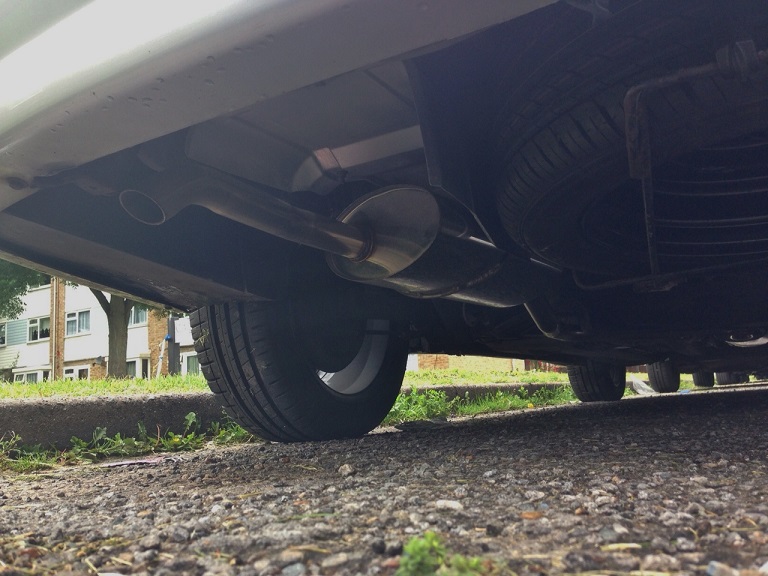
And looking back, from the front. Nice and clean. 

Posts: 908
Threads: 70
Joined: May 2013
Reputation:
10
Location: Bedford
Car Model/Spec: HDi Estate
Thanks: 4
Given 9 thank(s) in 9 post(s)
13-06-2016, 09:49 AM
(This post was last modified: 13-06-2016, 09:50 AM by tigerstyle.)
Silver estate! Best 306s ever!
Last pic though, got beam camber?
Posts: 112
Threads: 6
Joined: Feb 2016
Reputation:
0
Location: Surrey
Car Model/Spec: 306 Estate, TU Auto
Thanks: 0
Given 6 thank(s) in 5 post(s)
23-07-2016, 06:34 PM
(This post was last modified: 24-07-2016, 10:01 AM by Nexus.)
So I said I was going to change the radiator at some point - I managed to get a hold of a genuine Nissens Aluminium radiator at a stupidly low price. This is a Nissens 61317A radiator which is an absolute perfect fit for a phase 3 TU5JP engined 1.6 Automatic.

This has a 'newer style' bottom hose fitting with a thin metal cir-clip No screwing of threads, literally just push fit and secured with clip. IMPORTANT: After changing the radiator I found I had a leak from the bottom hose when refitting, this was remedied by replacing the bottom hose O-Ring which is a genuine item from Peugeot under part number 1343Z4. Unfortunately they have a minimum order of a pack of ten although they do only cost £0.96p each. You could possibly find these online elsewhere, for around £2 each individually. If you find yourself in need of a replacement bottom hose I believe the part number for a newer style hose (cir-clip style) is 1351Z4 which at the time of writing this is still available through Peugeot at £87+Vat. You can however find aftermarket hoses online for around £30+PP.
Also to add that you can get a genuine new top hose for roughly £9.00 from Peugeot - Part number 1343Y7. A new plastic thermostat housing/seal with a fixed thermostat was also fitted for £6.00 from most local auto factors.

I did notice that this particular radiator had an additional feed on the inlet side of the radiator, this was basically blanked off using a Peugeot 206/307 bottom hose blanking sleeve and a jubilee clip. I don't have a part number for it but a simple search via a well known search engine should get you something compatible.

I know there is a guides sections elsewhere on the forum although information is pretty scarce online so I'm hoping any of this information will help other people out there. If you need any info on where I got my parts or advice on how to fit anything yourself just ask and I'll let you know of my experiences / tools required etc.
Here my old radiator for comparison:
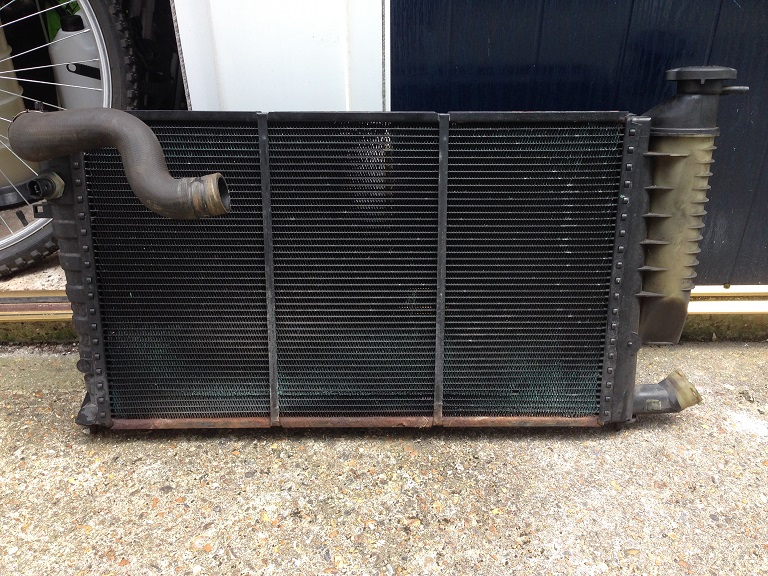
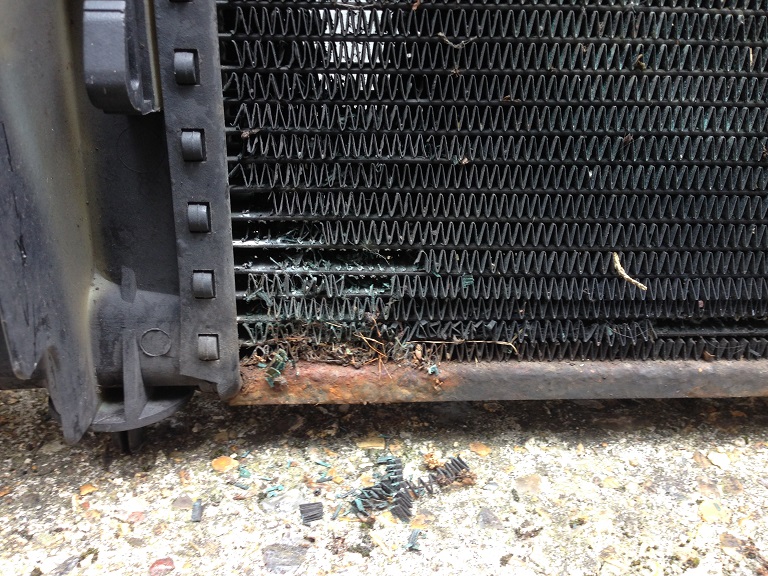
Pretty wrecked! The cooling fins were literally disintegrating upon my fingertips when touched.
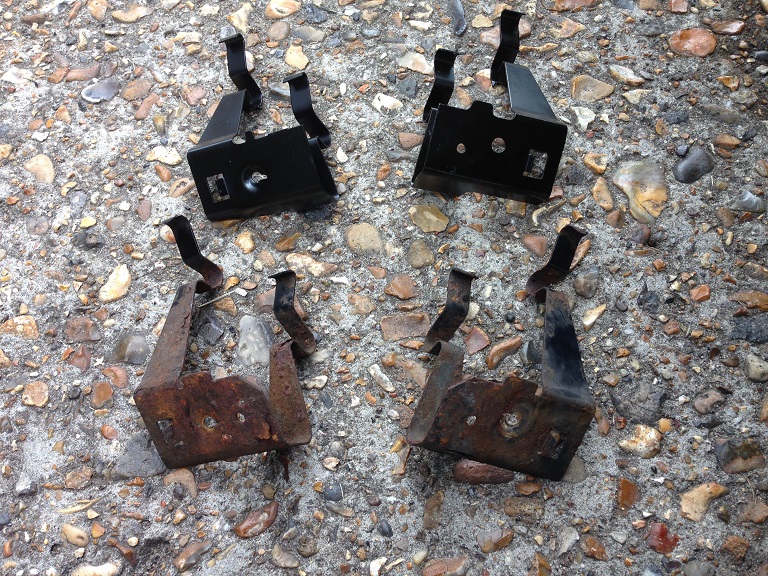
I also got some new radiator clamps / holders below, for the top of the rad. These are: Passenger Side Part Number 132736 (discontinued!) and Drivers Side Part Number 132735. These were a minimum order of a pack of two (That's two of the same clip, which seemed a bit daft but ordered them nonetheless).
Posts: 157
Threads: 14
Joined: Mar 2014
Reputation:
3
Location: Wirral
Car Model/Spec: 1.4 306 & 1.5 focus
Thanks: 0
Given 5 thank(s) in 5 post(s)
Useful information there [emoji106] mines all stripped out at the moment too looks like your old rad the one i had before had a split through it so after a nissens and twin slimline fans, i haven't ordered a new one yet, where did you get the rad from?
Posts: 112
Threads: 6
Joined: Feb 2016
Reputation:
0
Location: Surrey
Car Model/Spec: 306 Estate, TU Auto
Thanks: 0
Given 6 thank(s) in 5 post(s)
(23-07-2016, 08:02 PM)P-Courty Wrote: Useful information there [emoji106] mines all stripped out at the moment too looks like your old rad the one i had before had a split through it so after a nissens and twin slimline fans, i haven't ordered a new one yet, where did you get the rad from?
I'll send you a PM!
Posts: 112
Threads: 6
Joined: Feb 2016
Reputation:
0
Location: Surrey
Car Model/Spec: 306 Estate, TU Auto
Thanks: 0
Given 6 thank(s) in 5 post(s)
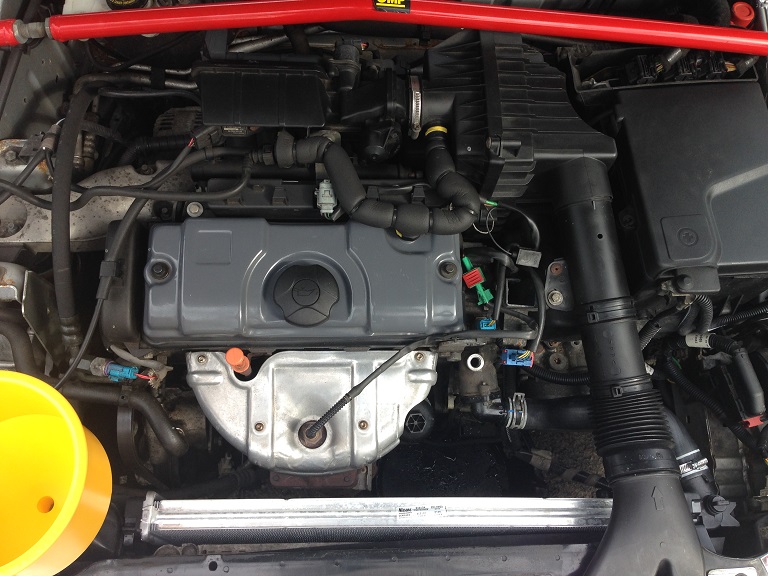
No leaks from the radiator, been doing some town driving with literally just fresh water in the system before committing to proper coolant. I -did- have a go at doing the old Coke bottle header tank but frankly, trying to tape the bottle to the radiator and it resulting in a good seal was a disaster. More water over the floor than in the rad.
I decided to buy one of those Spill Free funnels. Plenty of different adapter's and a nice tight seal, in this instance also doubling as a header tank. It was a bit of the expensive side but I'm already glad I bought it, especially if you plan to do several car. Drained the system of water and went ahead with putting in proper red coolant and following the correct bleeding procedure. I'm yet to take it out for a proper drive before rechecking and topping up if necessary.
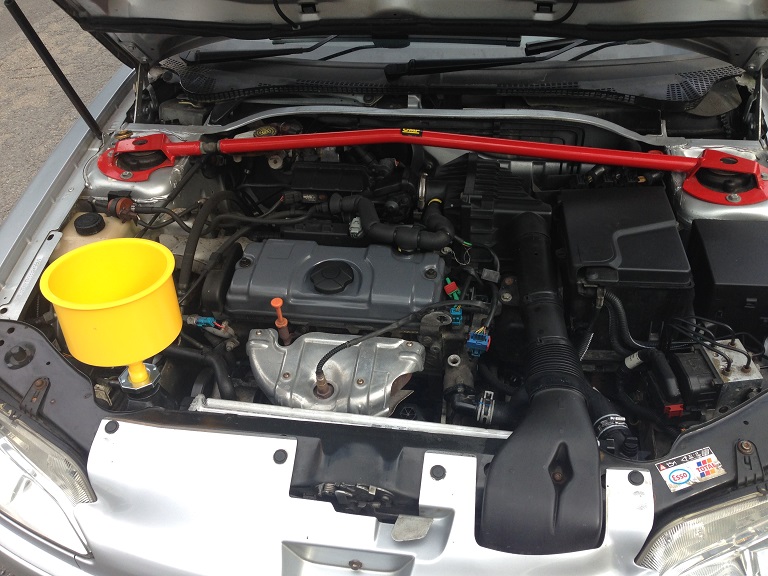
And a top down view of the new radiator - Those with a keen eye might notice that the left hand radiator clip isn't aligned properly. Although unsightly, this is just the way it is and always has been - Even with a brand new clip and rad fitted.
Posts: 112
Threads: 6
Joined: Feb 2016
Reputation:
0
Location: Surrey
Car Model/Spec: 306 Estate, TU Auto
Thanks: 0
Given 6 thank(s) in 5 post(s)
18-11-2016, 10:36 PM
(This post was last modified: 18-11-2016, 10:50 PM by Nexus.)
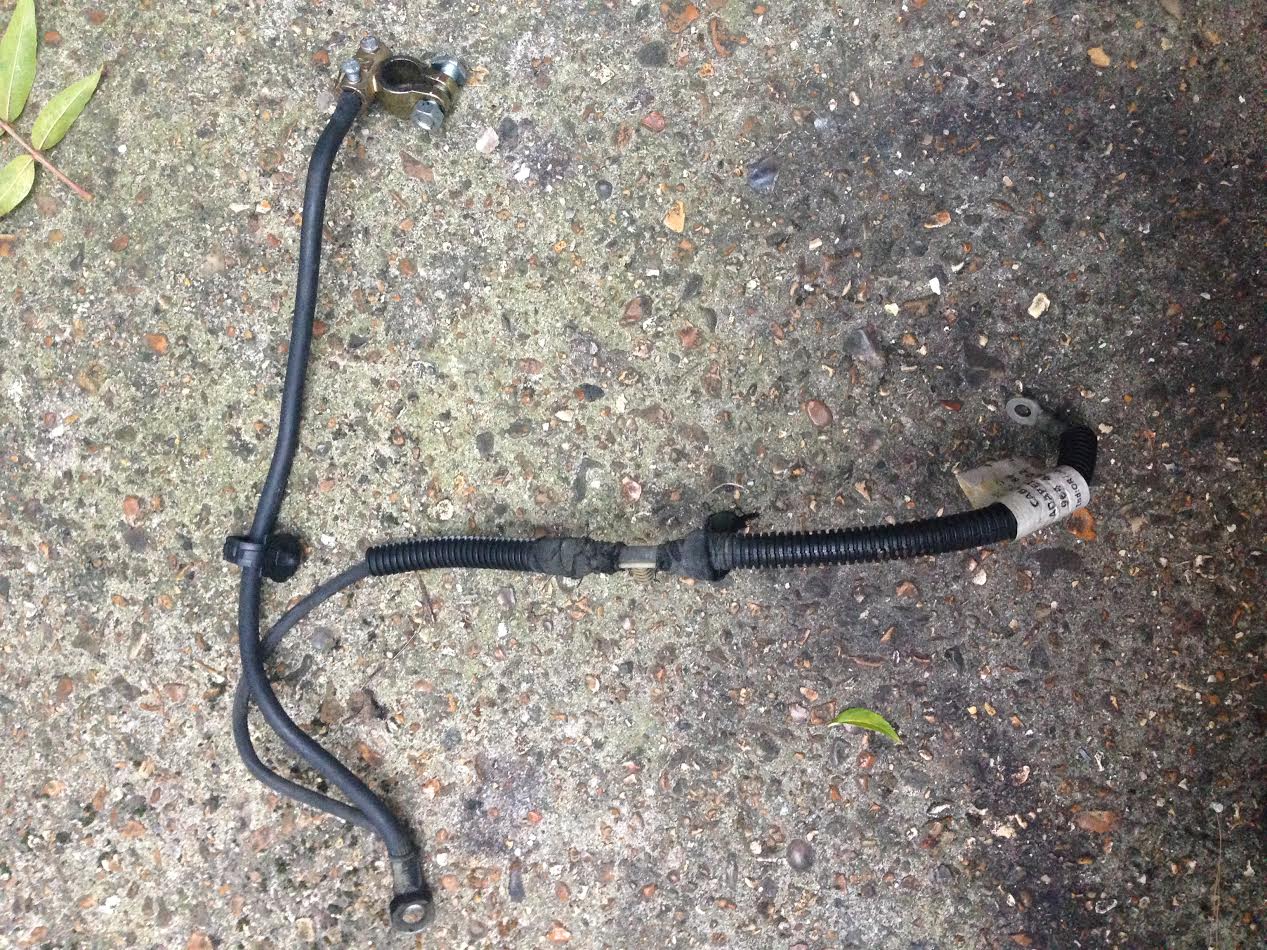
I've had a problem on cold mornings with the engine suddenly hunting and idling at 2k. There could be plenty of reasons though a little digging I recall I've got a bodged negative lead on the battery. New one for £12 and fitted in 15 minutes seems to have cured it and no more idle problems.
Old one:
New one fitted, and bolt locations:

Gearbox location is below and just in front of the air filter box. Ideally you should remove the air filter housing to access it properly. I couldn't remove the housing due to my strut brace however with some wiggling I managed to push it aside enough to get down underneath with a spanner.
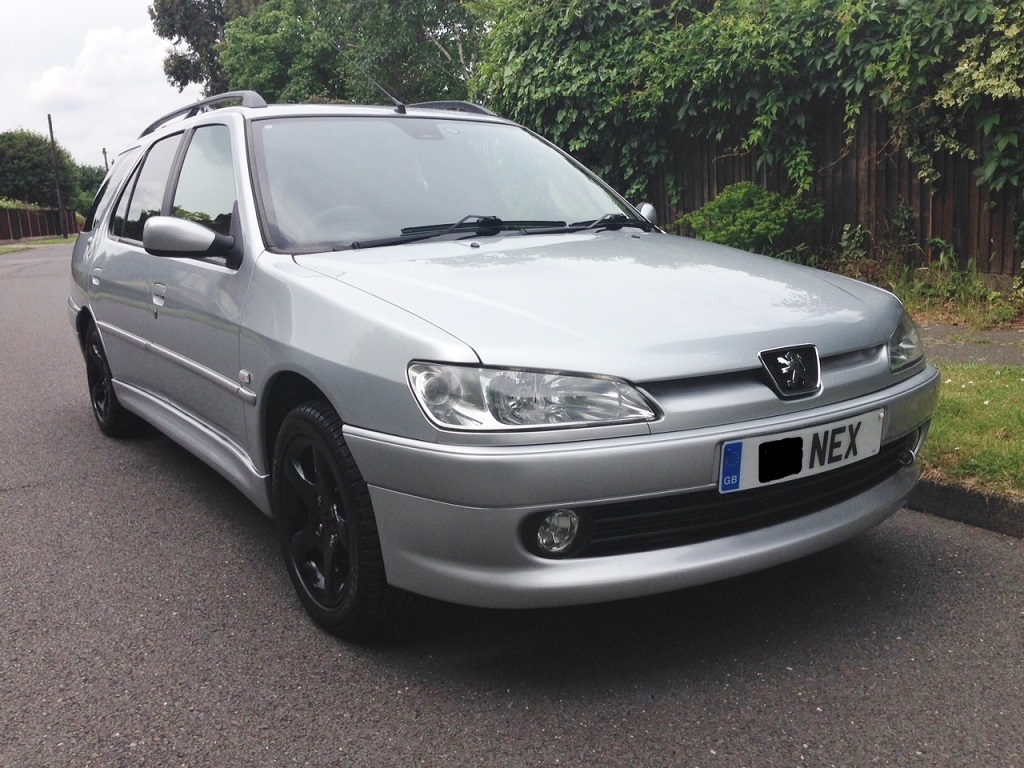
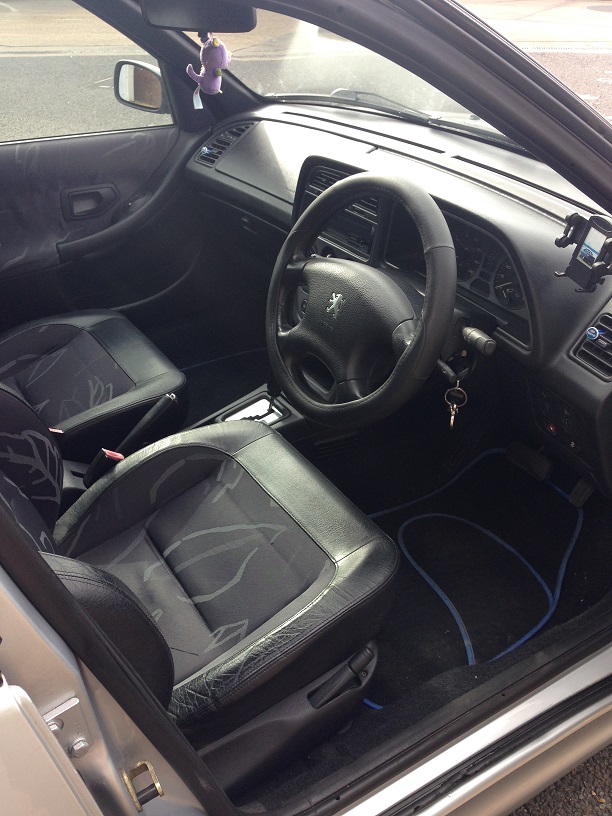
A few generic pics:

Meridian Half Leather Interior
Posts: 3,419
Threads: 120
Joined: Jan 2014
Reputation:
35
Location: Powys / Herefordshire
Car Model/Spec: Rallye/S16 & 175 megane


Thanks: 147
Given 40 thank(s) in 40 post(s)
Nice and clean, simple mods, well maintained and run on premium tyres & fuel... Lovely 306 you have there 
![[Image: 17b33c2a-8471-4313-992e-0a4b324cf926_zps2e63812a.jpg]](http://i143.photobucket.com/albums/r143/matt-taylor/17b33c2a-8471-4313-992e-0a4b324cf926_zps2e63812a.jpg)
Team Cyril
Posts: 112
Threads: 6
Joined: Feb 2016
Reputation:
0
Location: Surrey
Car Model/Spec: 306 Estate, TU Auto
Thanks: 0
Given 6 thank(s) in 5 post(s)
(19-11-2016, 08:26 AM)Matt-Rallye Wrote: Nice and clean, simple mods, well maintained and run on premium tyres & fuel... Lovely 306 you have there 
Thanks, I'm currently looking to get the suspension overhauled with Bilstein B4 all round as well as: Lemforder Wishbones, Ball joints, Track Rods + Ends, Arb bushes. Already put on Lemforder Drop Links about 100 miles back.
I bought a 21mm ARB however I read that the estate is quite possibly already 20-21mm? Regardless I'm looking to get it powder coated so if I don't need it it might end up on here.
Posts: 112
Threads: 6
Joined: Feb 2016
Reputation:
0
Location: Surrey
Car Model/Spec: 306 Estate, TU Auto
Thanks: 0
Given 6 thank(s) in 5 post(s)
So I eventually got round to taking the second-hand anti roll bar to the finishers, here it is fresh in its old form with peeling paint and looking dirty:

And now refurbished, shot blasted and powder coated in Traffic Red with new Lemforder bushes. I also got a set of clamps which I cleaned up by leaving to soak in white vinegar overnight. This cleaned off the tarnished rusty exterior leaving a nice original silver shine. Shouldn't really need painting.

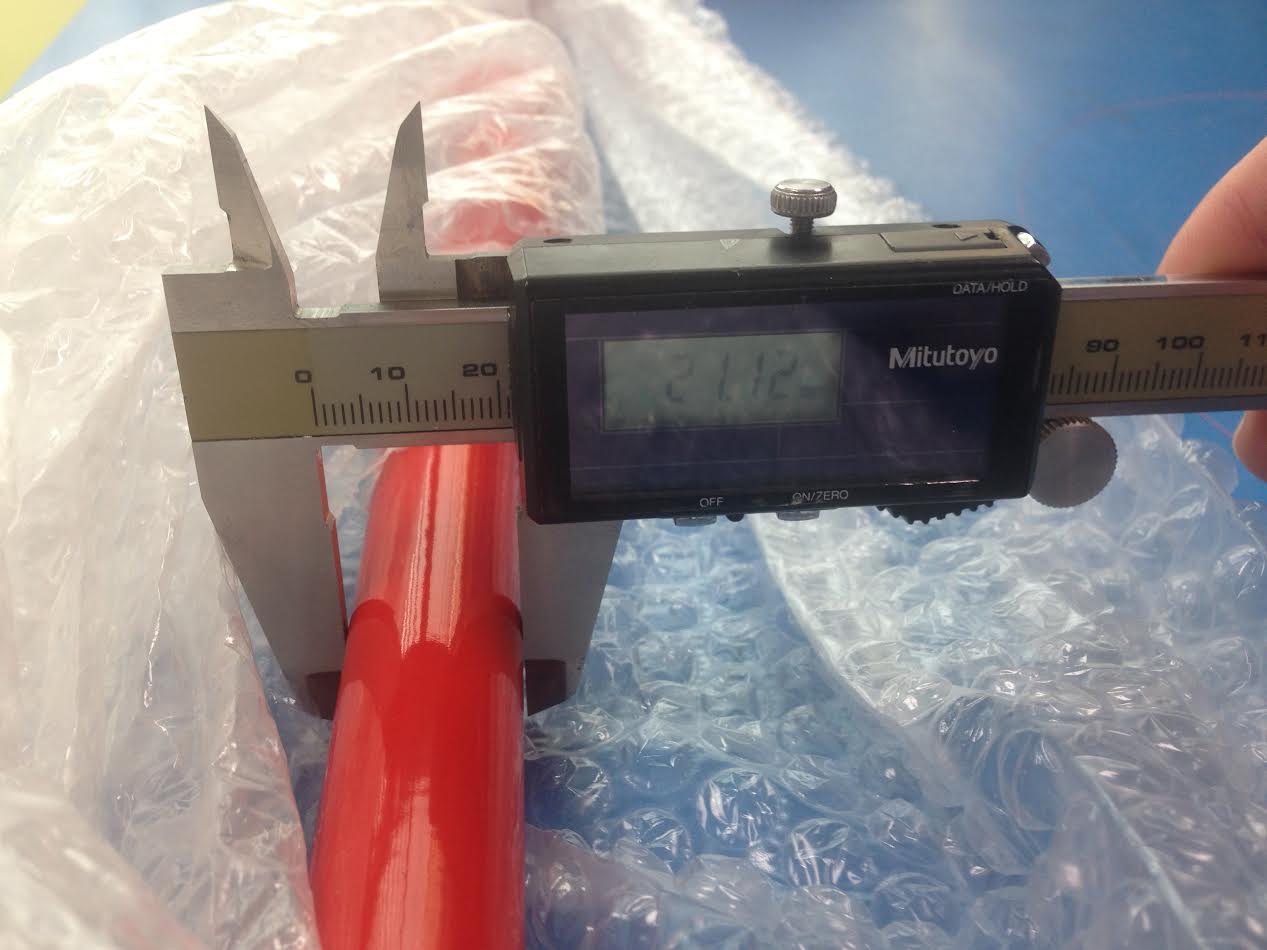
Pretty impressed with the final finish, really nice shine. Next on the list is wishbones and balljoints - Basically I'm collecting all the parts I need to refurbish my suspension and I've also decided to go with Bilstein B6's and Eibachs. I have also bought new Lemforder track rods and track rod ends.
Posts: 1,778
Threads: 213
Joined: Jul 2013
Reputation:
2
Location: The North
Car Model/Spec: HDI
Thanks: 52
Given 16 thank(s) in 16 post(s)
Some really good work going on here!
Wonder how easy it would be to fit the TU5JP4 in this (more performance and better MPG) or the TU5J4 from a 106 GTI/Saxo VTS, think someone has fitted the latter in a 306 before.
Posts: 112
Threads: 6
Joined: Feb 2016
Reputation:
0
Location: Surrey
Car Model/Spec: 306 Estate, TU Auto
Thanks: 0
Given 6 thank(s) in 5 post(s)
(10-12-2016, 06:07 PM)MY95 Wrote: Some really good work going on here!
Wonder how easy it would be to fit the TU5JP4 in this (more performance and better MPG) or the TU5J4 from a 106 GTI/Saxo VTS, think someone has fitted the latter in a 306 before.
Thanks! I like my 306 and I don't really have any intentions of parting with it - Should anything go seriously wrong engine or transmission wise I would quite possibly look at putting something bigger in it. Its an automatic at the moment so obviously my options are slim to none but that'll be a battle for another day.
Posts: 1,778
Threads: 213
Joined: Jul 2013
Reputation:
2
Location: The North
Car Model/Spec: HDI
Thanks: 52
Given 16 thank(s) in 16 post(s)
(10-12-2016, 07:42 PM)Nexus Wrote: (10-12-2016, 06:07 PM)MY95 Wrote: Some really good work going on here!
Wonder how easy it would be to fit the TU5JP4 in this (more performance and better MPG) or the TU5J4 from a 106 GTI/Saxo VTS, think someone has fitted the latter in a 306 before.
Thanks! I like my 306 and I don't really have any intentions of parting with it - Should anything go seriously wrong engine or transmission wise I would quite possibly look at putting something bigger in it. Its an automatic at the moment so obviously my options are slim to none but that'll be a battle for another day.
No worries, what mpg do you get out of it being an auto?
Wouldn't have thought putting a manual and the TU5JP4 in from a 206 etc would be too difficult.
Posts: 112
Threads: 6
Joined: Feb 2016
Reputation:
0
Location: Surrey
Car Model/Spec: 306 Estate, TU Auto
Thanks: 0
Given 6 thank(s) in 5 post(s)
10-12-2016, 09:51 PM
(This post was last modified: 10-12-2016, 09:56 PM by Nexus.)
(10-12-2016, 09:23 PM)MY95 Wrote: No worries, what mpg do you get out of it being an auto?
Wouldn't have thought putting a manual and the TU5JP4 in from a 206 etc would be too difficult.
Not entirely sure to be honest! I do way too many short distance trips and the only long distance was a recent trip up to York and went on holiday to Snowdonia earlier this year. I usually fill up every 350 miles on the speedo trip clock and have about 1/4 tank still left. Probably visit the petrol station about once every three weeks so Mpg has never been something I've been bothered about as I don't use the car for commuting.
The fuel gauge/sender unit is complete rubbish, I'll get five miles down the road on a full tank and the gauge will drop about 15%.
Posts: 112
Threads: 6
Joined: Feb 2016
Reputation:
0
Location: Surrey
Car Model/Spec: 306 Estate, TU Auto
Thanks: 0
Given 6 thank(s) in 5 post(s)
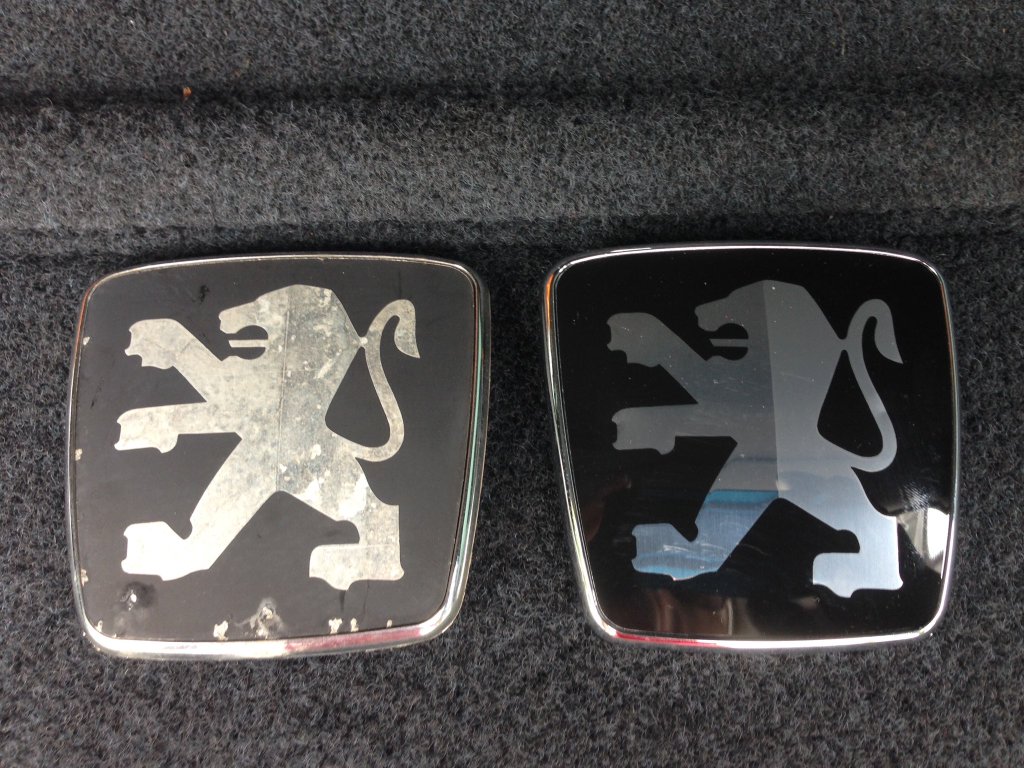
Old and new Estate Tailgate badge.
Posts: 3,419
Threads: 120
Joined: Jan 2014
Reputation:
35
Location: Powys / Herefordshire
Car Model/Spec: Rallye/S16 & 175 megane


Thanks: 147
Given 40 thank(s) in 40 post(s)
Have you thought about the phase 1&2 meridian half leather interior? I think it you be a smashing upgrade for this and work really well with the neat and tidy theme you've got going on 
Love the meticulous attention to detail! Keep up the good work 
![[Image: 17b33c2a-8471-4313-992e-0a4b324cf926_zps2e63812a.jpg]](http://i143.photobucket.com/albums/r143/matt-taylor/17b33c2a-8471-4313-992e-0a4b324cf926_zps2e63812a.jpg)
Team Cyril
Posts: 112
Threads: 6
Joined: Feb 2016
Reputation:
0
Location: Surrey
Car Model/Spec: 306 Estate, TU Auto
Thanks: 0
Given 6 thank(s) in 5 post(s)
(12-12-2016, 10:23 PM)Matt-Rallye Wrote: Have you thought about the phase 1&2 meridian half leather interior? I think it you be a smashing upgrade for this and work really well with the neat and tidy theme you've got going on 
Love the meticulous attention to detail! Keep up the good work 
Thanks! Ok so apart from the tinted windows and glossy cyclones, I'm -trying- to keep everything in a fairly original state. My ethos is preventative maintenance, if something looks tatty or rusty I'll replace it before its completely seized or failed. For a fifteen year old car, things are getting tired so may as well refresh all the steering and suspension components. Tomorrow I'm arranging to get it in for a transmission fluid change, its on 97,000 miles and more than likely due a full flush (Been having low fluid symptoms lately and dash warning).
I've got the half leather interior already but the drivers chair is a little.. lets say saggy! I'd be interested in getting a new drivers seat with less bum miles on it.
Posts: 112
Threads: 6
Joined: Feb 2016
Reputation:
0
Location: Surrey
Car Model/Spec: 306 Estate, TU Auto
Thanks: 0
Given 6 thank(s) in 5 post(s)
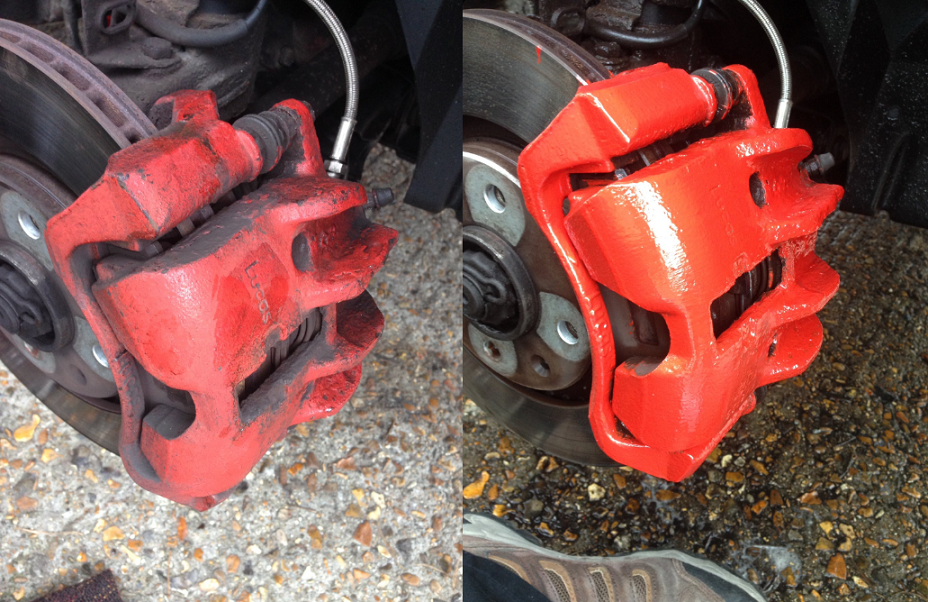
Fresh lick of paint, originally painted two years back. E-tech caliper paint.
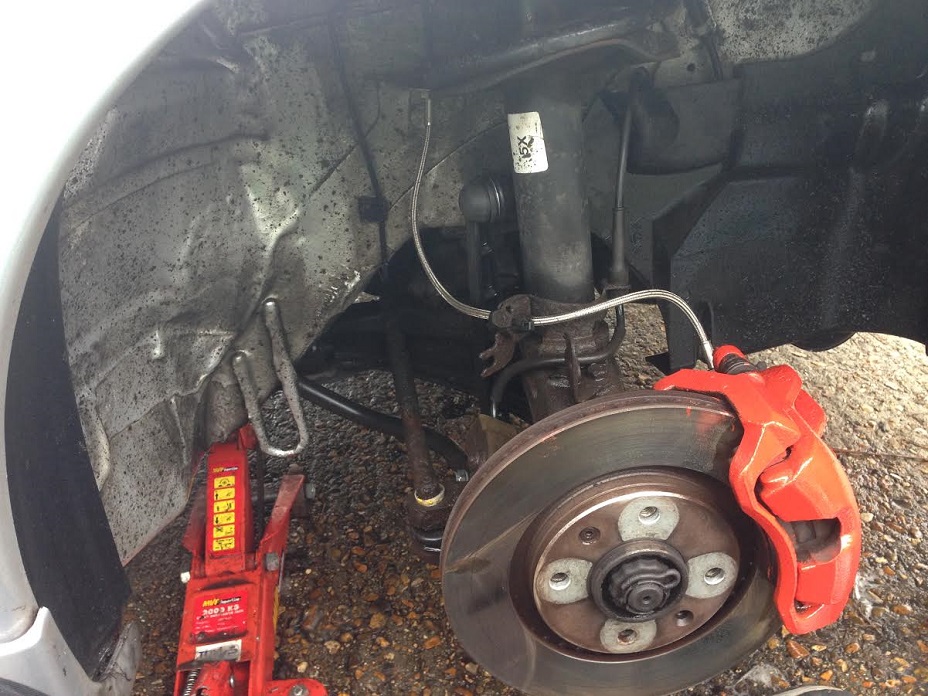
Gave the arch a bit of a clean with some all purpose cleaner but there's still a lot of caked in grime. Track rod and end is a bit crusty, glad to be renewing them.
Posts: 112
Threads: 6
Joined: Feb 2016
Reputation:
0
Location: Surrey
Car Model/Spec: 306 Estate, TU Auto
Thanks: 0
Given 6 thank(s) in 5 post(s)
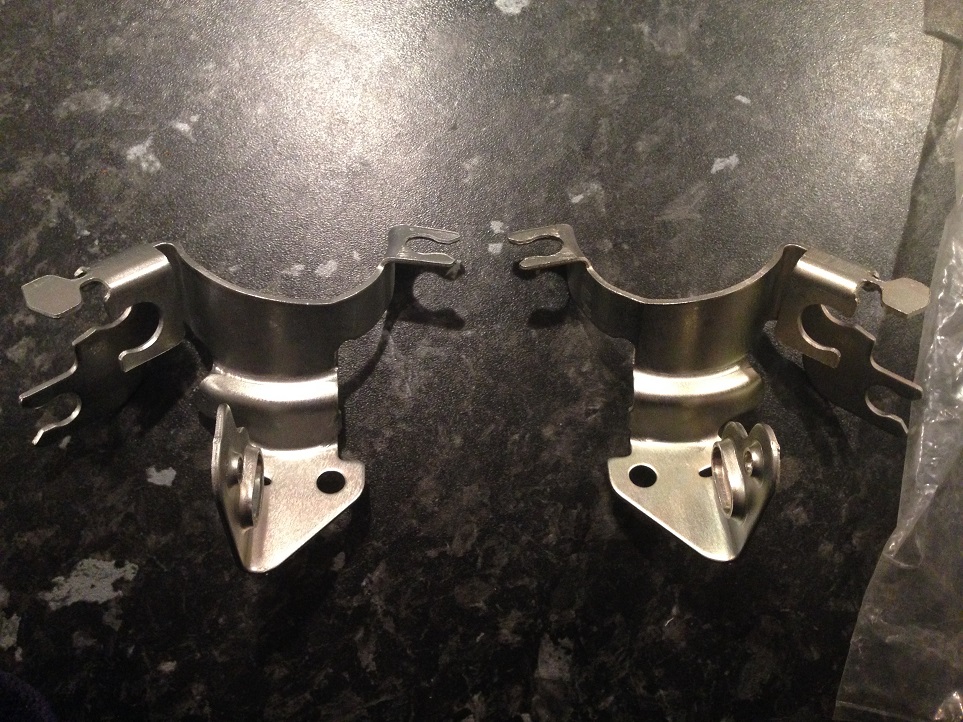
Bought a pair of brake line/abs line supports for the front hubs. Genuine pug item still in original bag. These should definitely compliment quite nicely the yellow B6 Shocks on the way plus the braided lines once fitted. You'll see on my previous post the old cruddy looking ones.
Posts: 3,419
Threads: 120
Joined: Jan 2014
Reputation:
35
Location: Powys / Herefordshire
Car Model/Spec: Rallye/S16 & 175 megane


Thanks: 147
Given 40 thank(s) in 40 post(s)
(21-12-2016, 09:32 PM)Nexus Wrote: Bought a pair of brake line/abs line supports for the front hubs. Genuine pug item still in original bag. These should definitely compliment quite nicely the yellow B6 Shocks on the way plus the braided lines once fitted. You'll see on my previous post the old cruddy looking ones.
Where did you get those? i have been looking for a set for powdercoating!
![[Image: 17b33c2a-8471-4313-992e-0a4b324cf926_zps2e63812a.jpg]](http://i143.photobucket.com/albums/r143/matt-taylor/17b33c2a-8471-4313-992e-0a4b324cf926_zps2e63812a.jpg)
Team Cyril
Posts: 112
Threads: 6
Joined: Feb 2016
Reputation:
0
Location: Surrey
Car Model/Spec: 306 Estate, TU Auto
Thanks: 0
Given 6 thank(s) in 5 post(s)
(22-12-2016, 09:12 AM)Matt-Rallye Wrote: (21-12-2016, 09:32 PM)Nexus Wrote: Bought a pair of brake line/abs line supports for the front hubs. Genuine pug item still in original bag. These should definitely compliment quite nicely the yellow B6 Shocks on the way plus the braided lines once fitted. You'll see on my previous post the old cruddy looking ones.
Where did you get those? i have been looking for a set for powdercoating!
Spoox Motorsport, £7.43 each side.  Use their search function for product codes BR444 & BR443. I'll edit this post later with the Peugeot/Citroen numbers as well. Its crossing my mind to get them powdered too! Hehe.
Posts: 112
Threads: 6
Joined: Feb 2016
Reputation:
0
Location: Surrey
Car Model/Spec: 306 Estate, TU Auto
Thanks: 0
Given 6 thank(s) in 5 post(s)
04-01-2017, 08:43 PM
(This post was last modified: 06-02-2017, 07:16 PM by Nexus.)
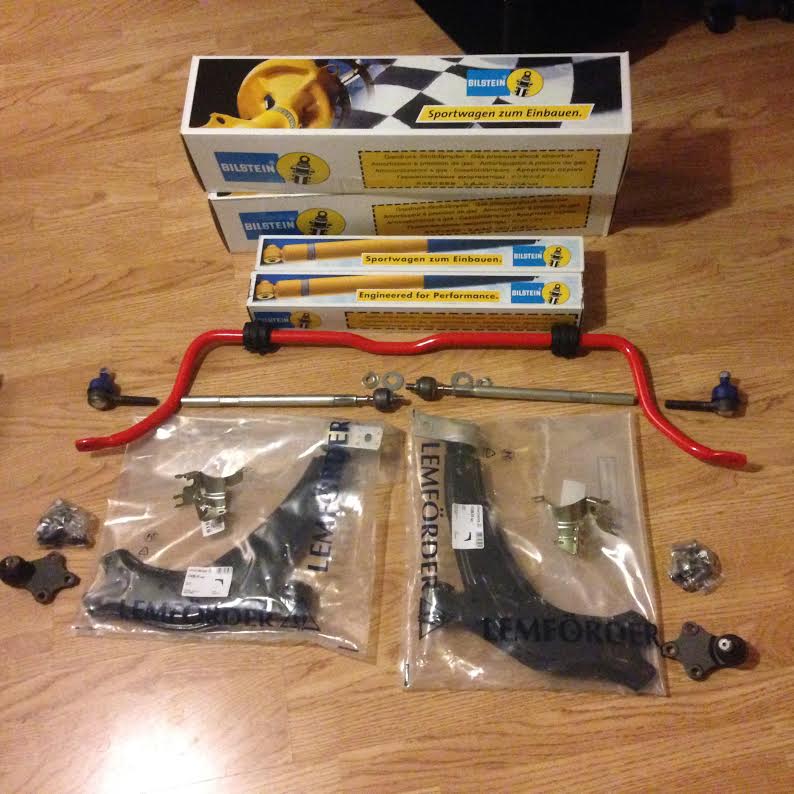
Almost ready, just waiting for the Eibach springs to arrive.  Will likely have the top mounts/bearings done too, when the old bits are taken off.
Posts: 112
Threads: 6
Joined: Feb 2016
Reputation:
0
Location: Surrey
Car Model/Spec: 306 Estate, TU Auto
Thanks: 0
Given 6 thank(s) in 5 post(s)
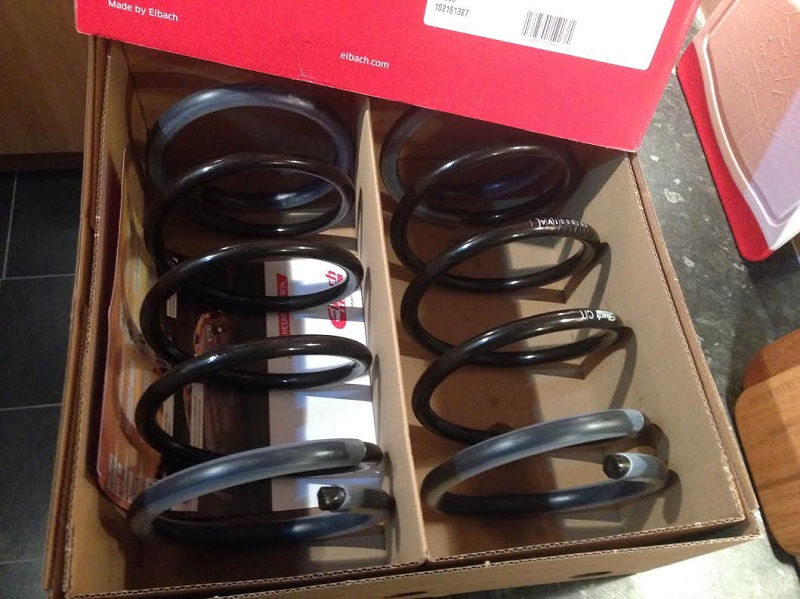
Eibach Pro's are finally here - 4 week wait but got them for £95.00. Also got a genuine 5031-60 Top Mount Kit for £5.. Yes, £5.00 and sealed. Unfortunately I still had to order a second one for the other side, which was bloody expensive. Might as well keep both sides the same quality and not mix brands right?
So next Tuesday is the big day, getting it all done at a Peugeot place I've been to before. looking forward to taking it on some nice drives to bed it in a bit. Yeah, I really honestly would like to get it done myself however its not possible where I live at the moment - Doing work out on the open street.
Peugeot 306 1.6 Petrol Auto Estate 2002
Front B6 Shock Left 22-247612
Front B6 Shock Right 22-247629
2x Rear B6 Shock 24-020749
Eibach Pro Kit EIBE7010-120
1x genuine Peugeot 21mm Anti Roll Bar (powder coated)
2x genuine Peugeot Top Mount Kit 5031-60 (not pictured)
2x genuine Peugeot Brake Line/Abs Line Bracket
Eurocarparts:
Lemforder Wishbone Left 645545045
Lemforder Wishbone Right 645545055
2x Lemforder 18mm Balljoint with bolts 617735065
2x Lemforder Track Rods 606735045
2x Lemforder T/R Ends 606545025
2x Lemforder Anti Roll Bar Bushes 614735135
(Drop links replaced within 2-2.5k miles ago)
Posts: 13,881
Threads: 476
Joined: Dec 2011
Reputation:
81
Location: Ipswich
Car Model/Spec: 306 Rallye
Thanks: 4
Given 104 thank(s) in 102 post(s)
ah so many new parts!  Ive got a full bilstein setup to put on too. Cant wait!
Posts: 127
Threads: 15
Joined: Jul 2013
Reputation:
0
Location: North London
Car Model/Spec: GTi6 Track-Lite
Thanks: 0
Given 5 thank(s) in 5 post(s)
Top work! There's something therapeutical about looking through these type of attention to detail builds haha!
Posts: 112
Threads: 6
Joined: Feb 2016
Reputation:
0
Location: Surrey
Car Model/Spec: 306 Estate, TU Auto
Thanks: 0
Given 6 thank(s) in 5 post(s)
16-02-2017, 02:21 PM
(This post was last modified: 16-02-2017, 02:32 PM by Nexus.)
Posts: 112
Threads: 6
Joined: Feb 2016
Reputation:
0
Location: Surrey
Car Model/Spec: 306 Estate, TU Auto
Thanks: 0
Given 6 thank(s) in 5 post(s)
Not sure how noticeable this is, the lowering before and after.

And one more, taken today. Just love how shiny those gloss black cyclones are. 

Posts: 13,881
Threads: 476
Joined: Dec 2011
Reputation:
81
Location: Ipswich
Car Model/Spec: 306 Rallye
Thanks: 4
Given 104 thank(s) in 102 post(s)
looks good buddy. Its subtly lower. 
|


 Not yet though, I'll do that later.

![[Image: 17b33c2a-8471-4313-992e-0a4b324cf926_zps2e63812a.jpg]](http://i143.photobucket.com/albums/r143/matt-taylor/17b33c2a-8471-4313-992e-0a4b324cf926_zps2e63812a.jpg)

