18-05-2013, 06:24 PM
(This post was last modified: 18-05-2013, 10:44 PM by londondan86.)
This is a guide for converting rear manual windows to electric
I did this on my p3 estate but the principles should be the same on p1/2
You will need:
• Both rear electric window regulators
• Centre console switch
• Window safety cut out switch
• 2 new rear door cards (or put up with the hole from the window winder)
• Relay
• Drill with 6mm hss bit
• 6 M6 bolts and nuts
• Flat head screw driver
• Needle nose pliers
• T? Torx bit
• 10mm socket
Step 1 - remove the door card
Pretty straight forward really, 1 torx screw inside the door pull then it is just clips around the bottom. Remove window winders, these do just pull off but are very stiff so I just let the door card do it once it was loose. The plastic surround for the door handle is just clipped in and also needs to be removed. Carefully get the flat head screwdriver in there at the bottom and lever it off. You then have to lift it up and over the door lock pin.
Step 2 - Removing the manual winder mechanism
With the door card off you will be confronted with lots of stick foam pads which need to be removed to get access to the glass and wiring, these can be carefully peeled back and reused but I got impatient and just ripped the things off and used duck tape when I had finished!
Loosely put the winder handle back on and wind the window down to the bottom to reveal the securing pin. You need to remove the metal securing clip from the back in order to release the pin.
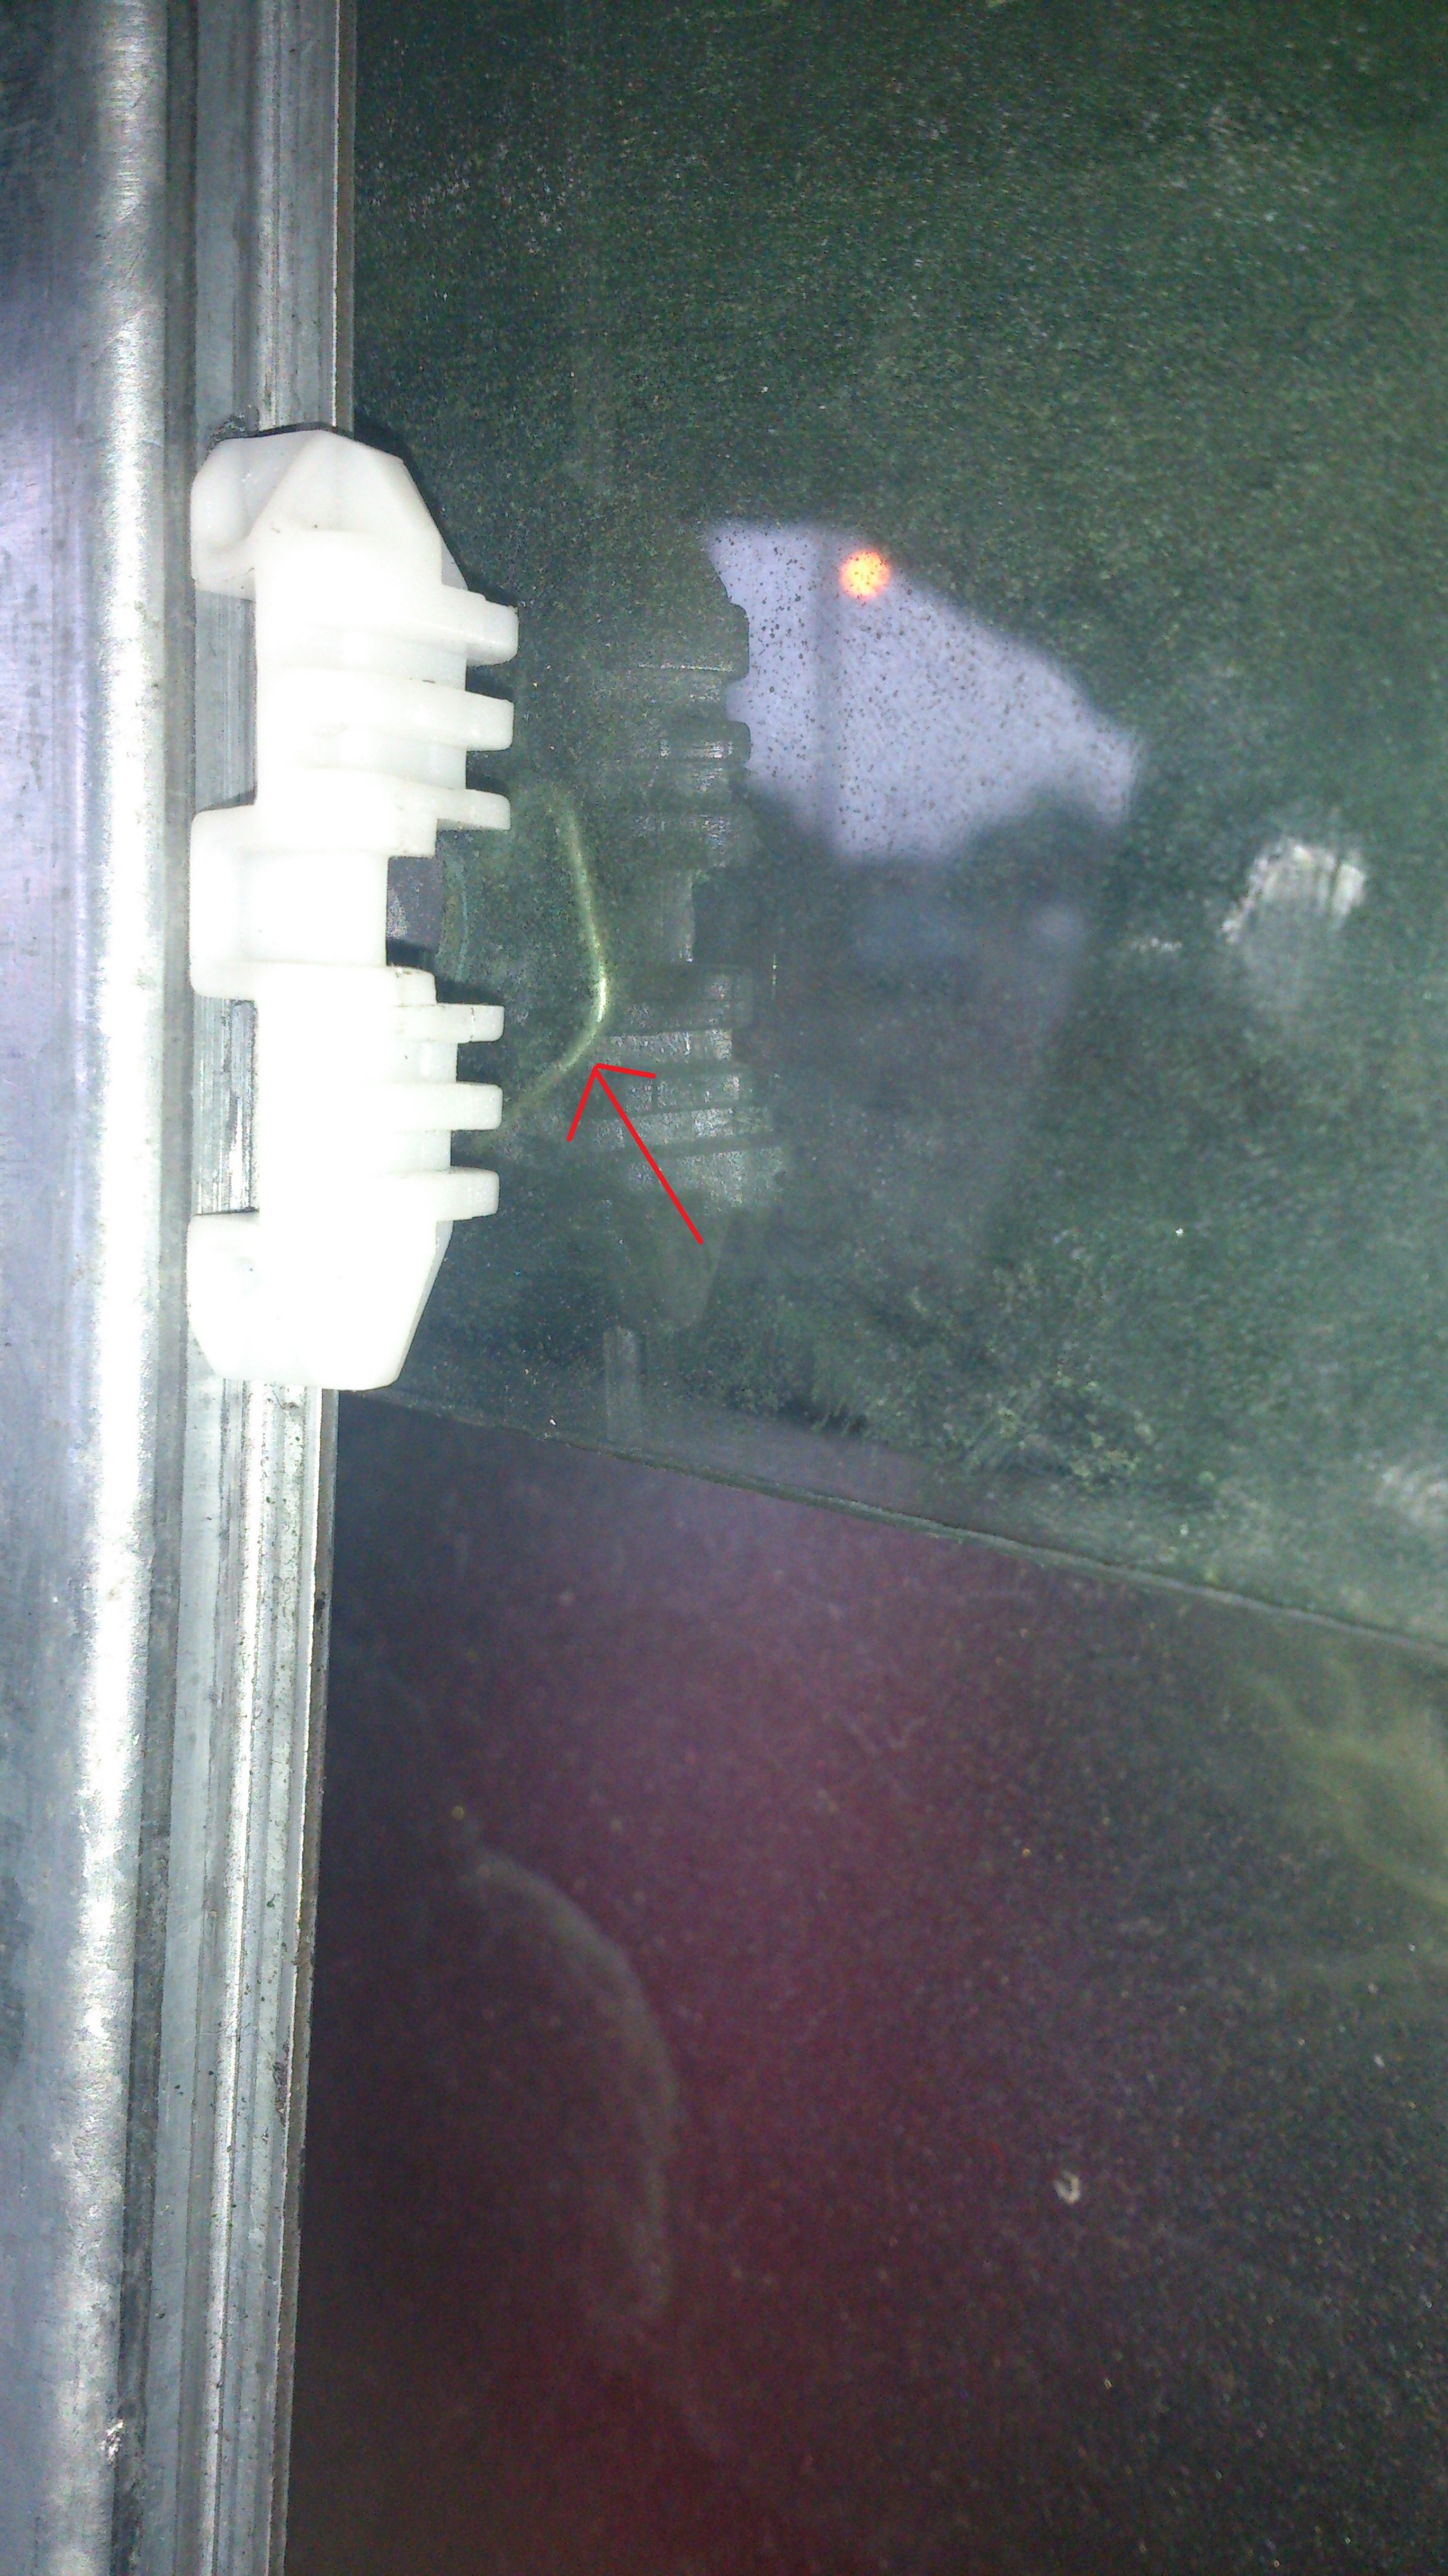

This is the one of the most fiddly parts of the job and took me a while but be patient. Once this is removed you will find that the glass will come off the pin but don't actually remove it yet. Use one hand to support the bottom of the glass and the other to wind the window back to the top, once there secure the glass with cardboard so it doesn't drop back down.
Undo the 2 10mm brass colour nuts that secure the slider to the door and wiggle it free.
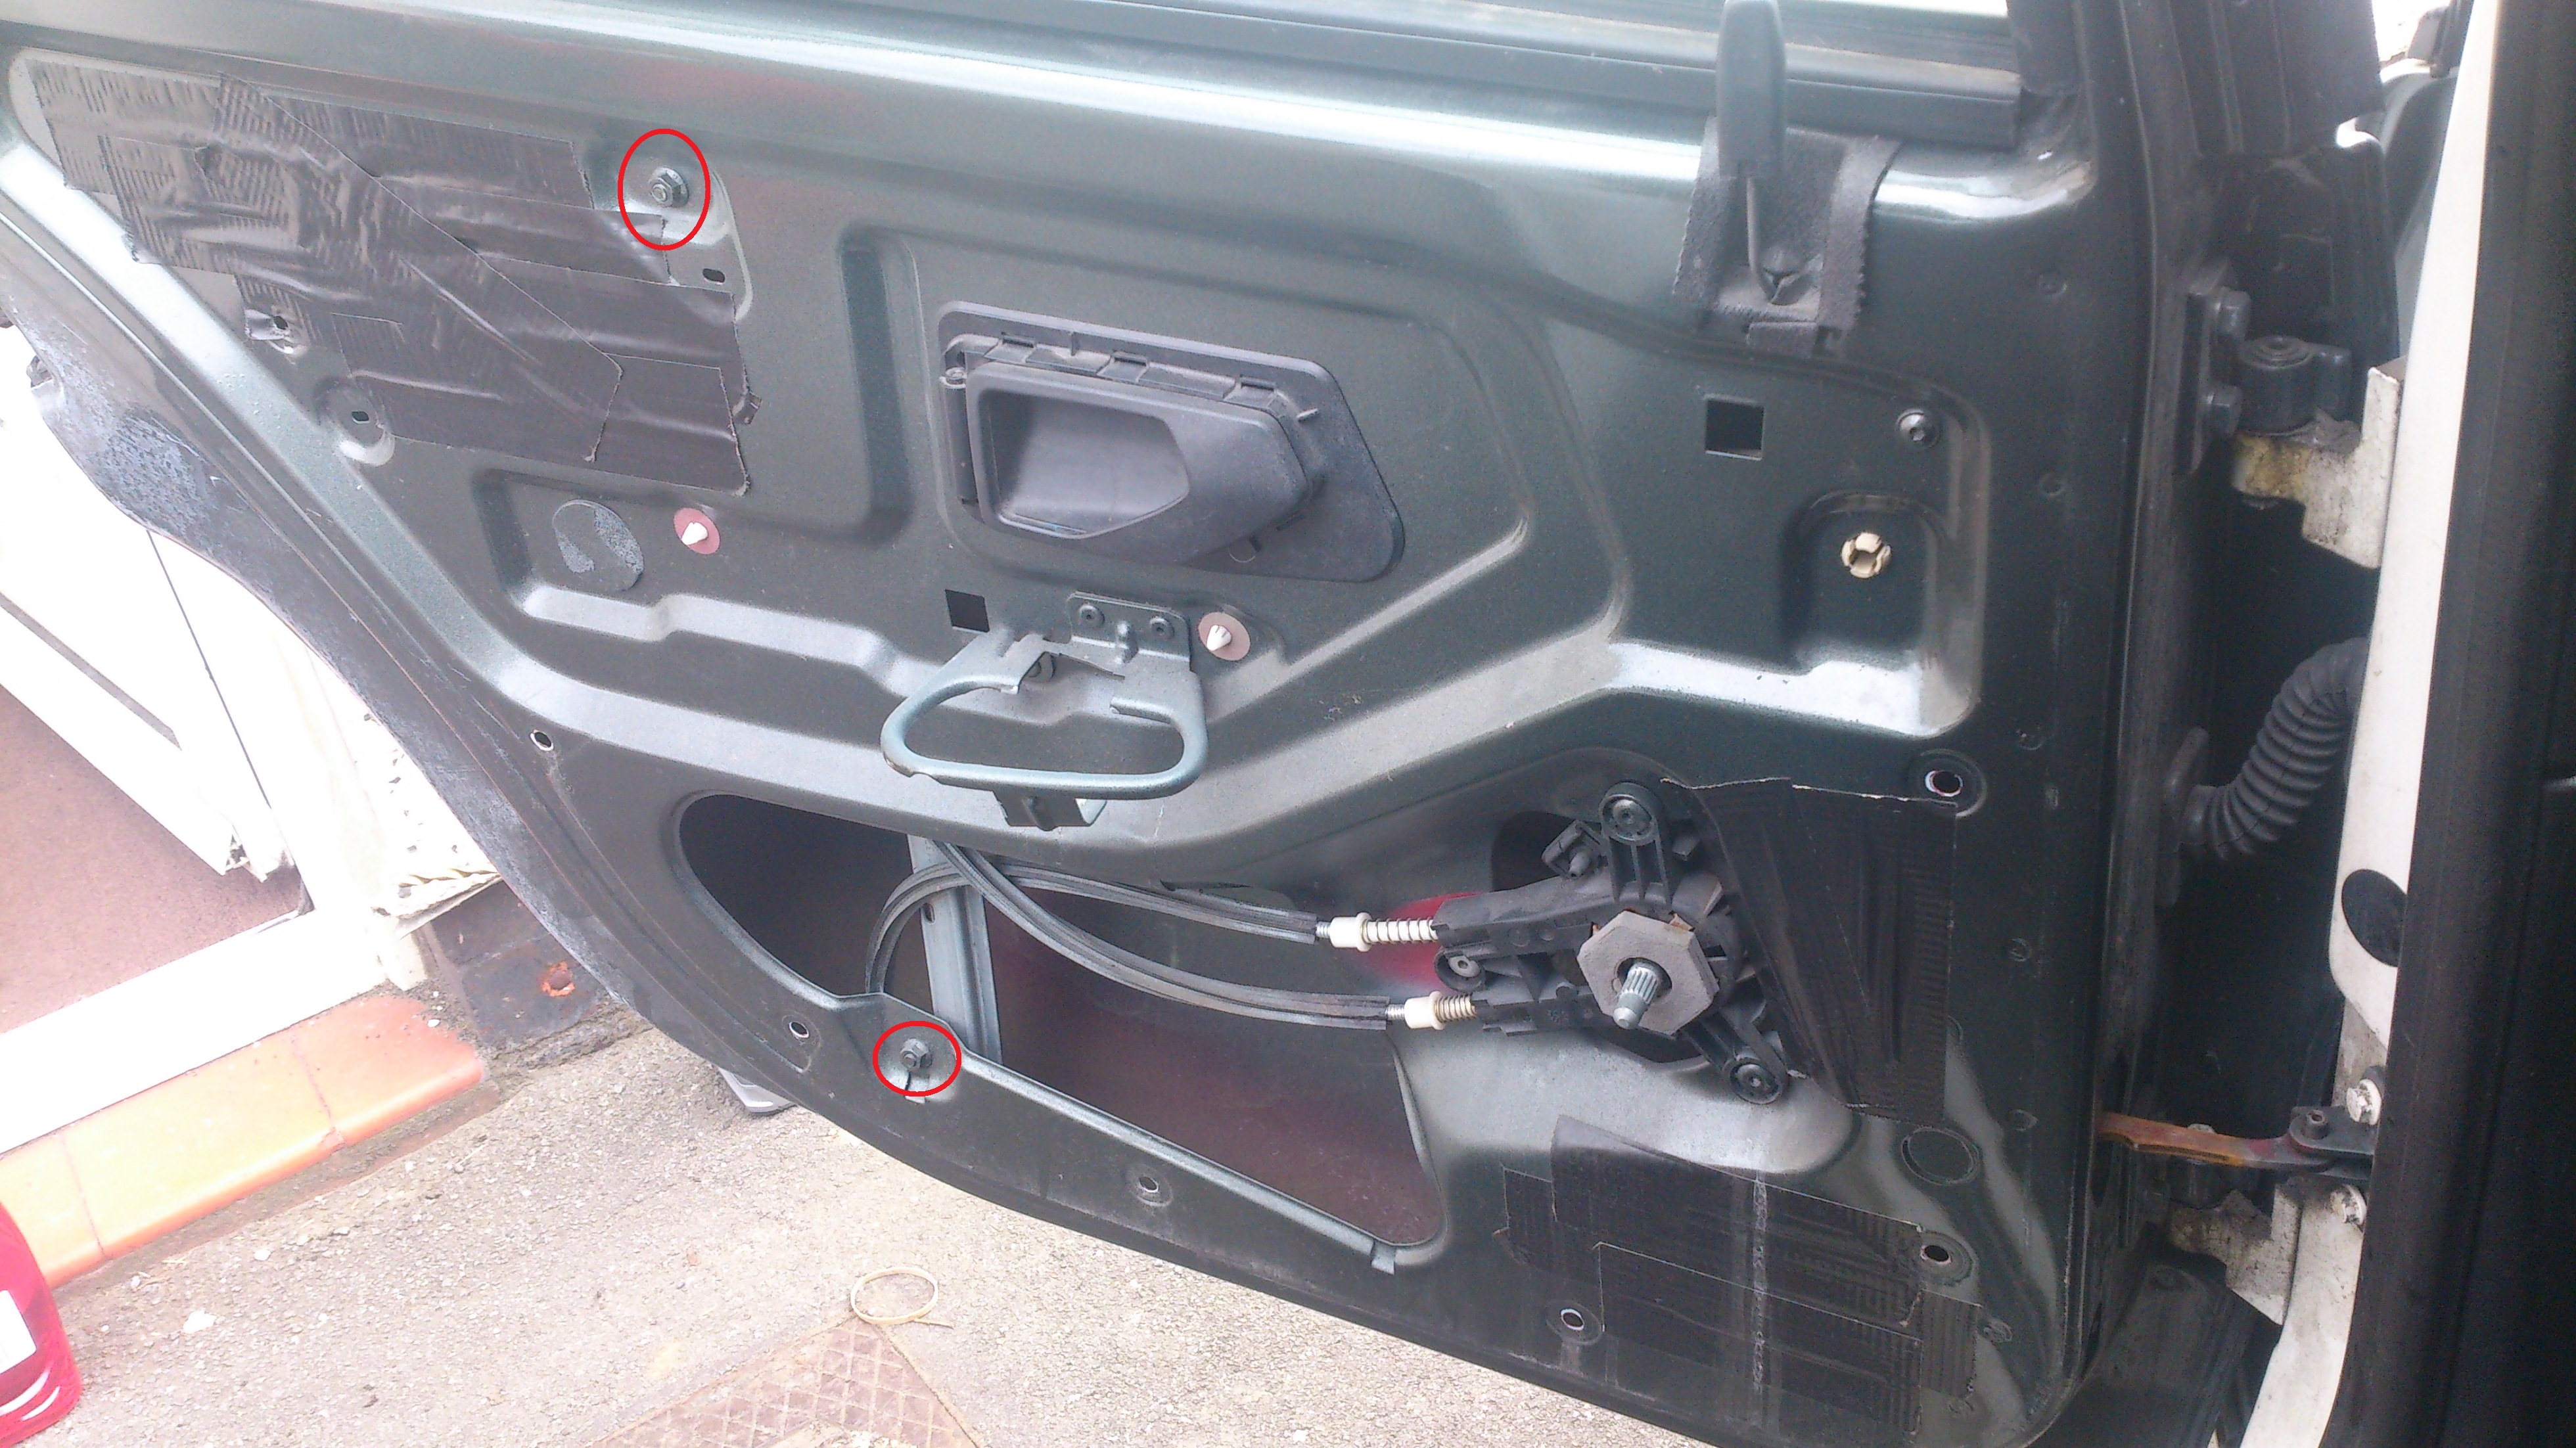
Next you need to drill out the 3 rivets that hold the manual winder to the car.
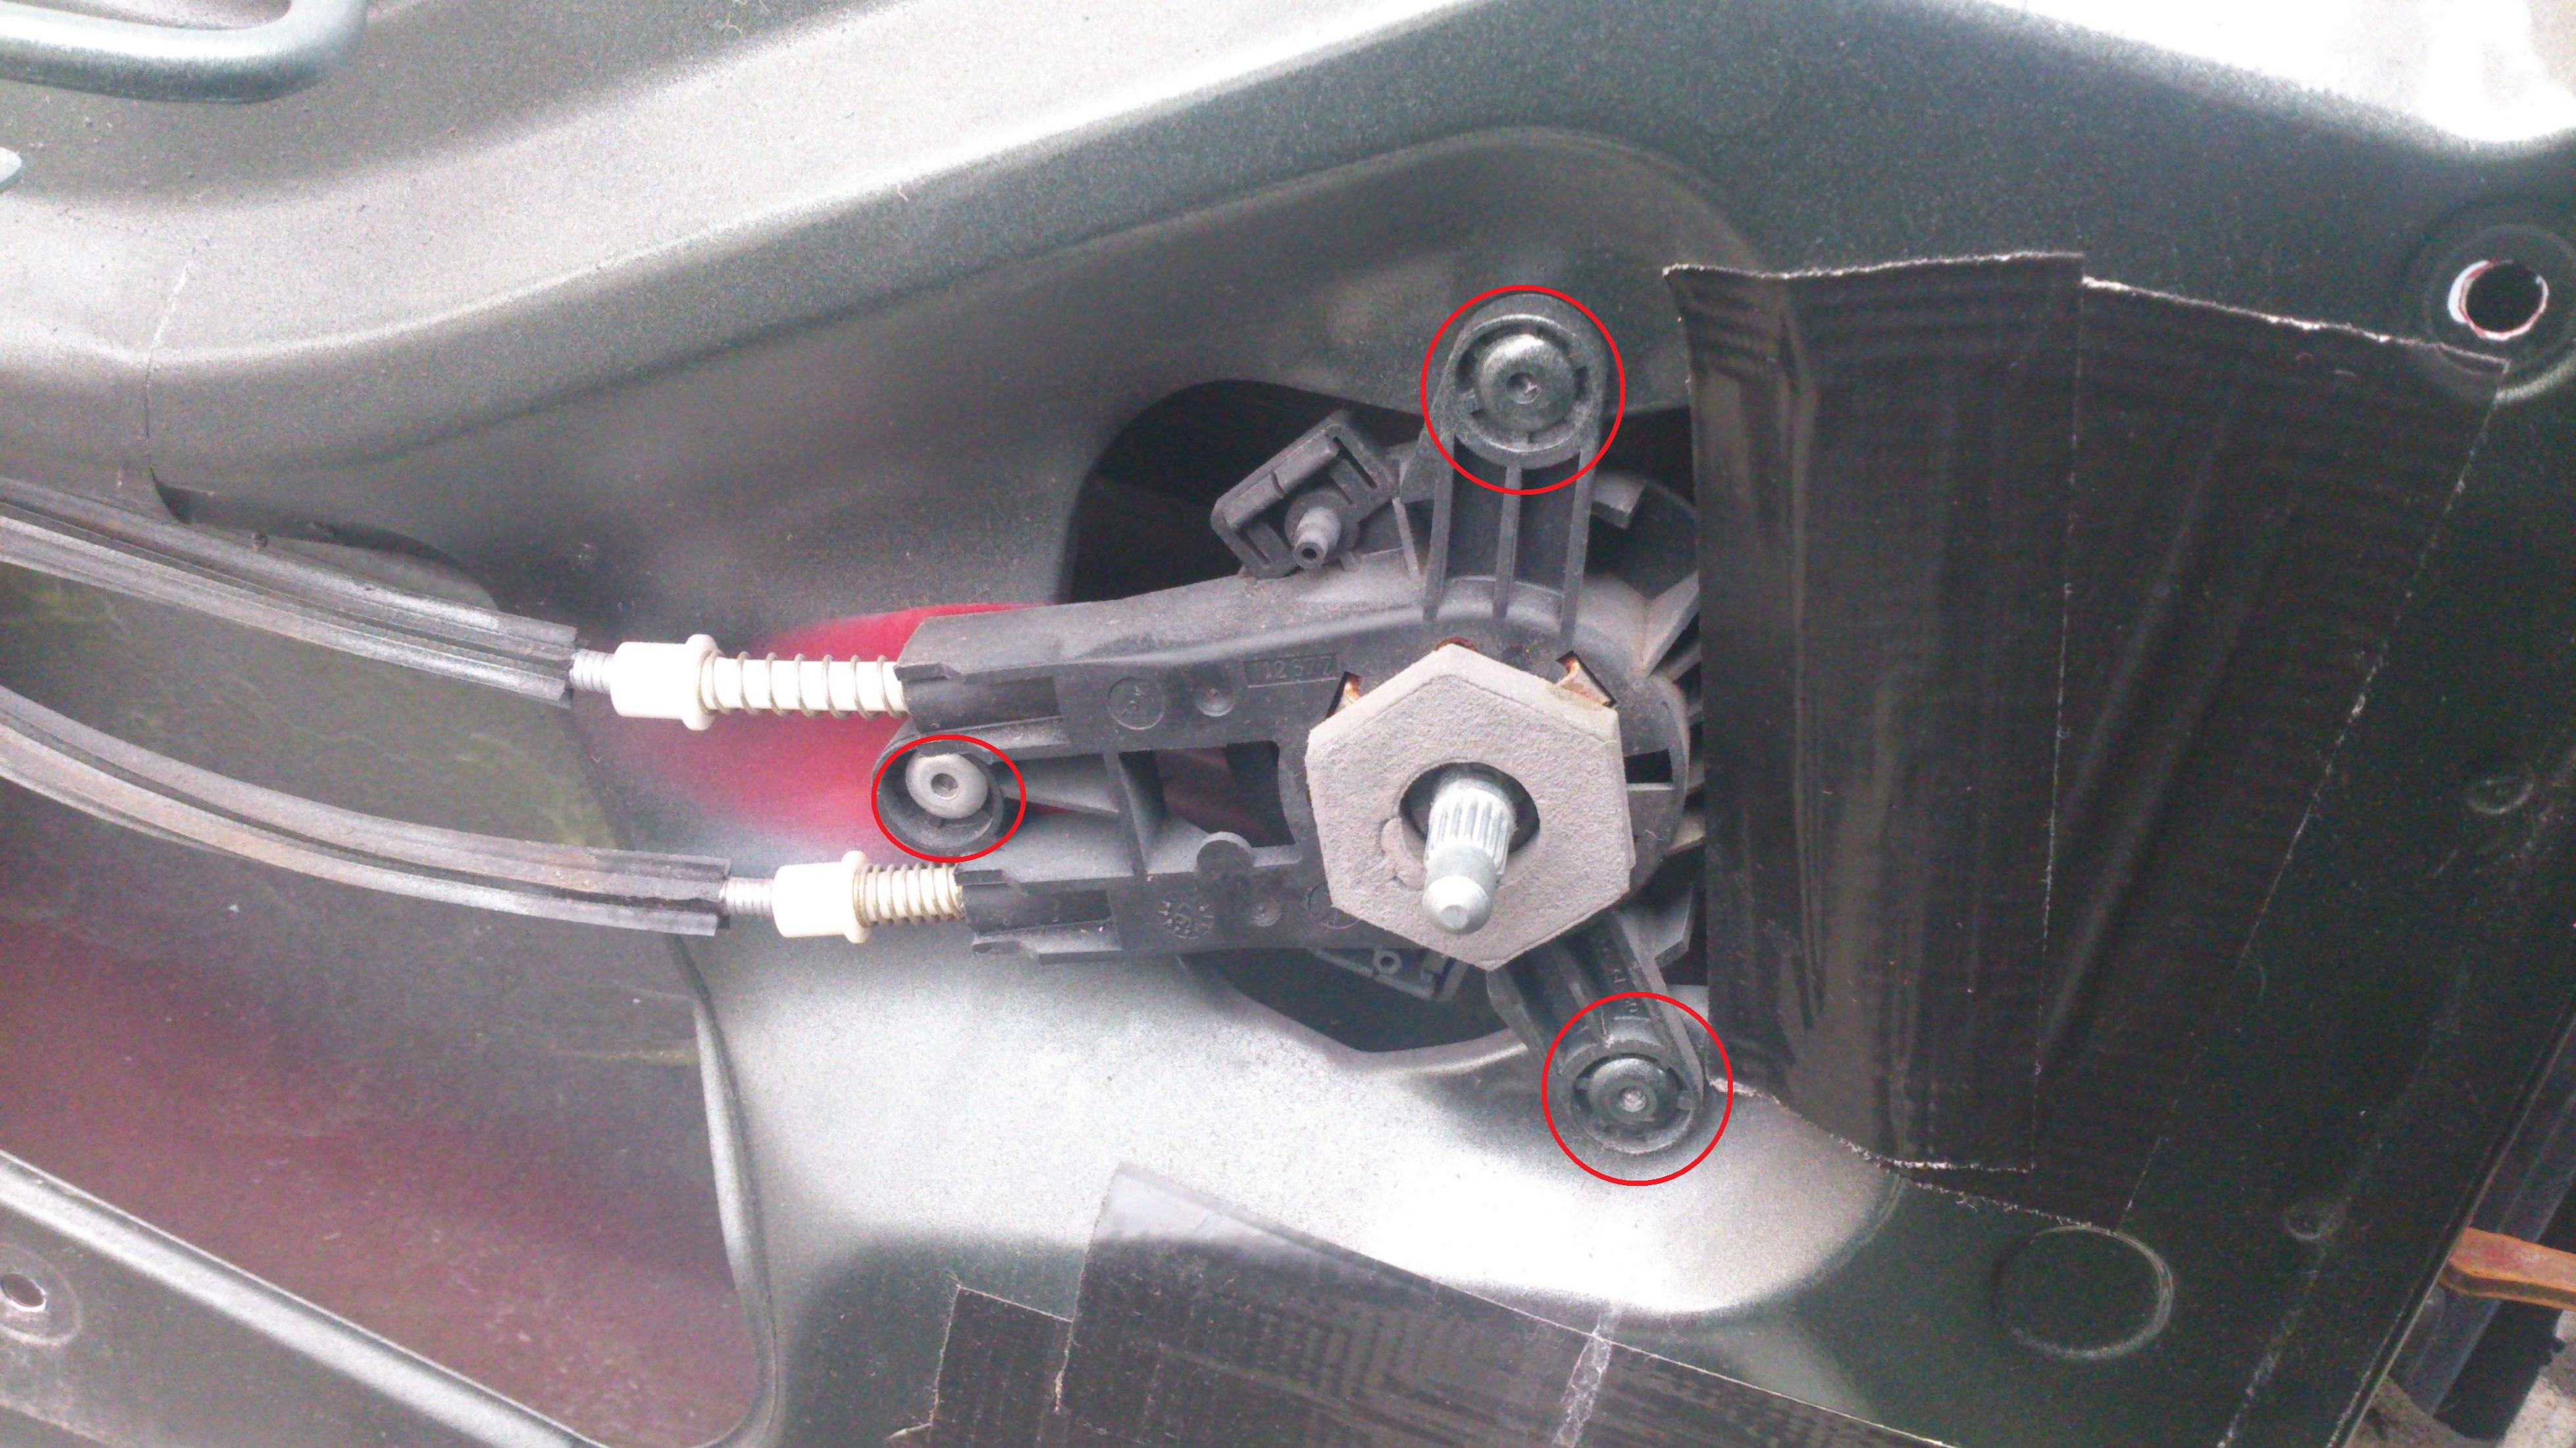
Step 3 - Fit the electric motor regulators
This is pretty much the reversal of step 2. Check that the wires you have taped up inside the door are the same as the ones on the motor you have, on mine one door had the p3 grey plug and the other door had the p2 plug so I had to do another trip to the scrappy to get the correct plug (may be worth checking this before you go and source your parts or just cut the wires from the donor car anyway just to be safe)
Next insert the sliders into the door and attach the brass bolts back on.
Mount the motor using your M6 nuts/bolts
Push the white securing pin back through the glass and replace the metal clip, the is the last fiddly bit and caused lots of scrapes and pain!!
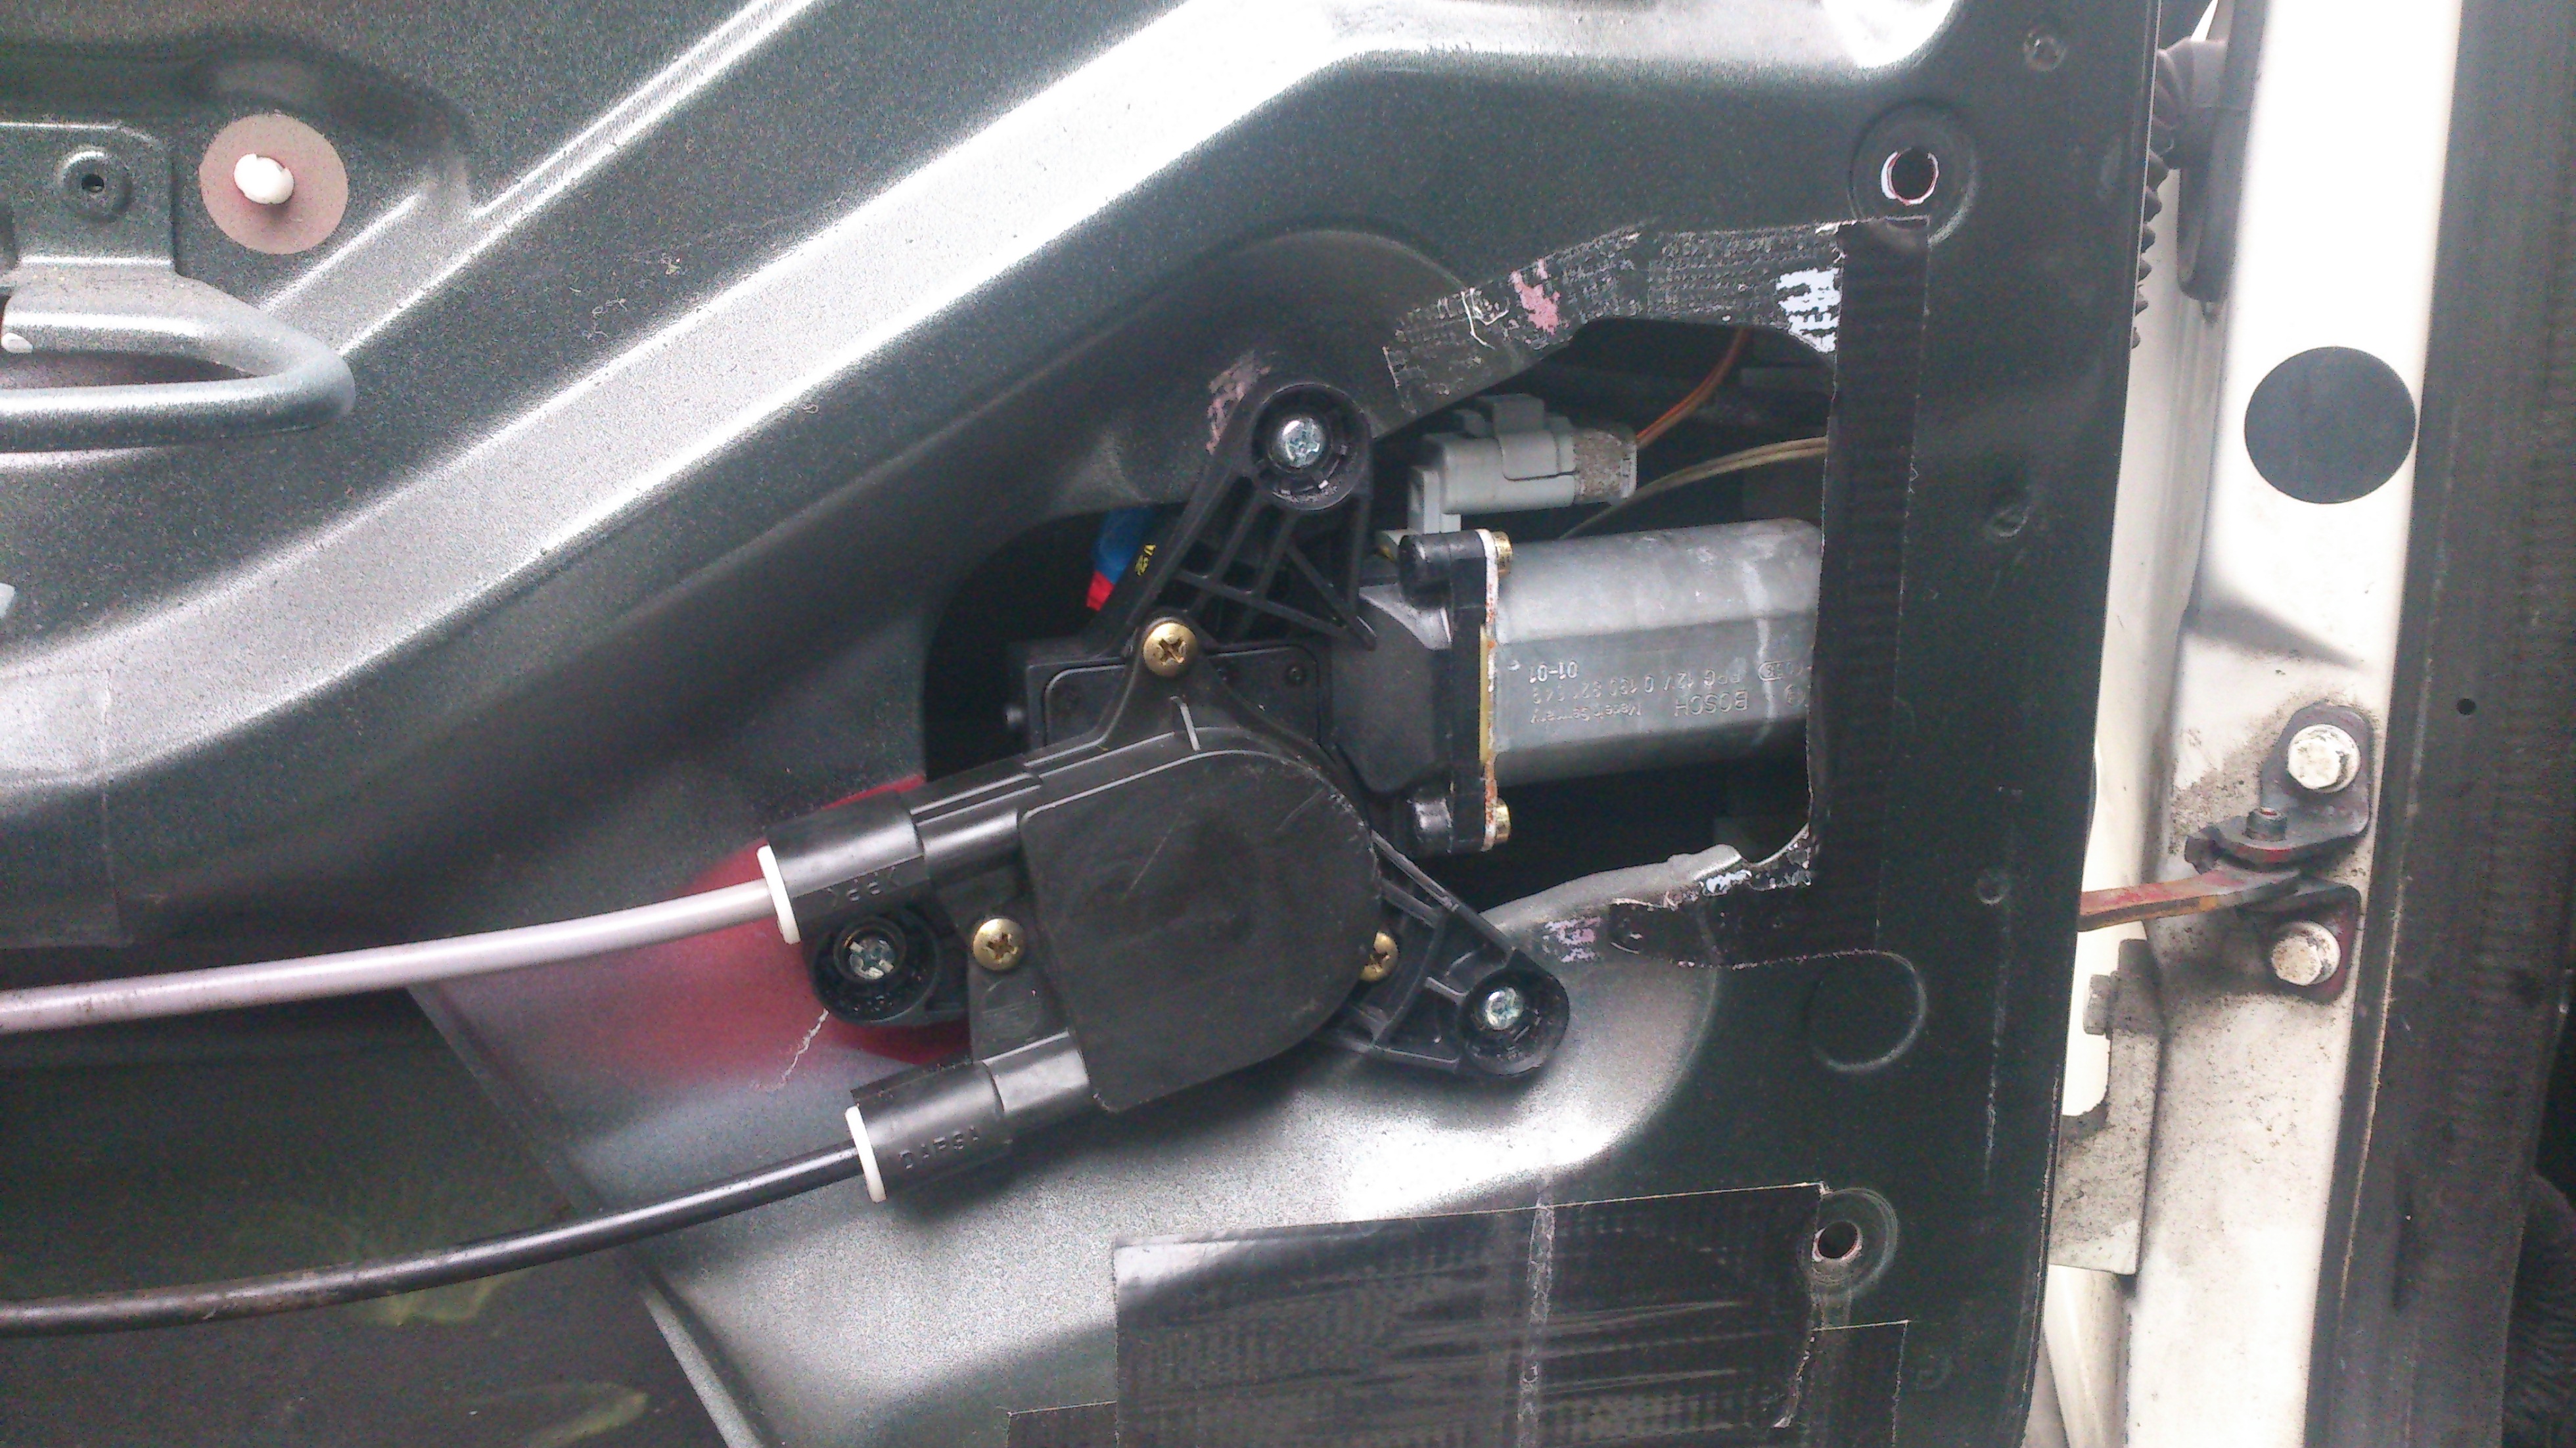
Step 4 - Repeat for the other door
As above!!!!
Step 5 - Fit the switches in the centre console
You will probably have a little pot thing in there at the moment, just get your flat head in there and pop it out. You will see the yellow and blue plugs taped up under there for the switches, un tape them and fit them to the switch and clip the whole unit in.

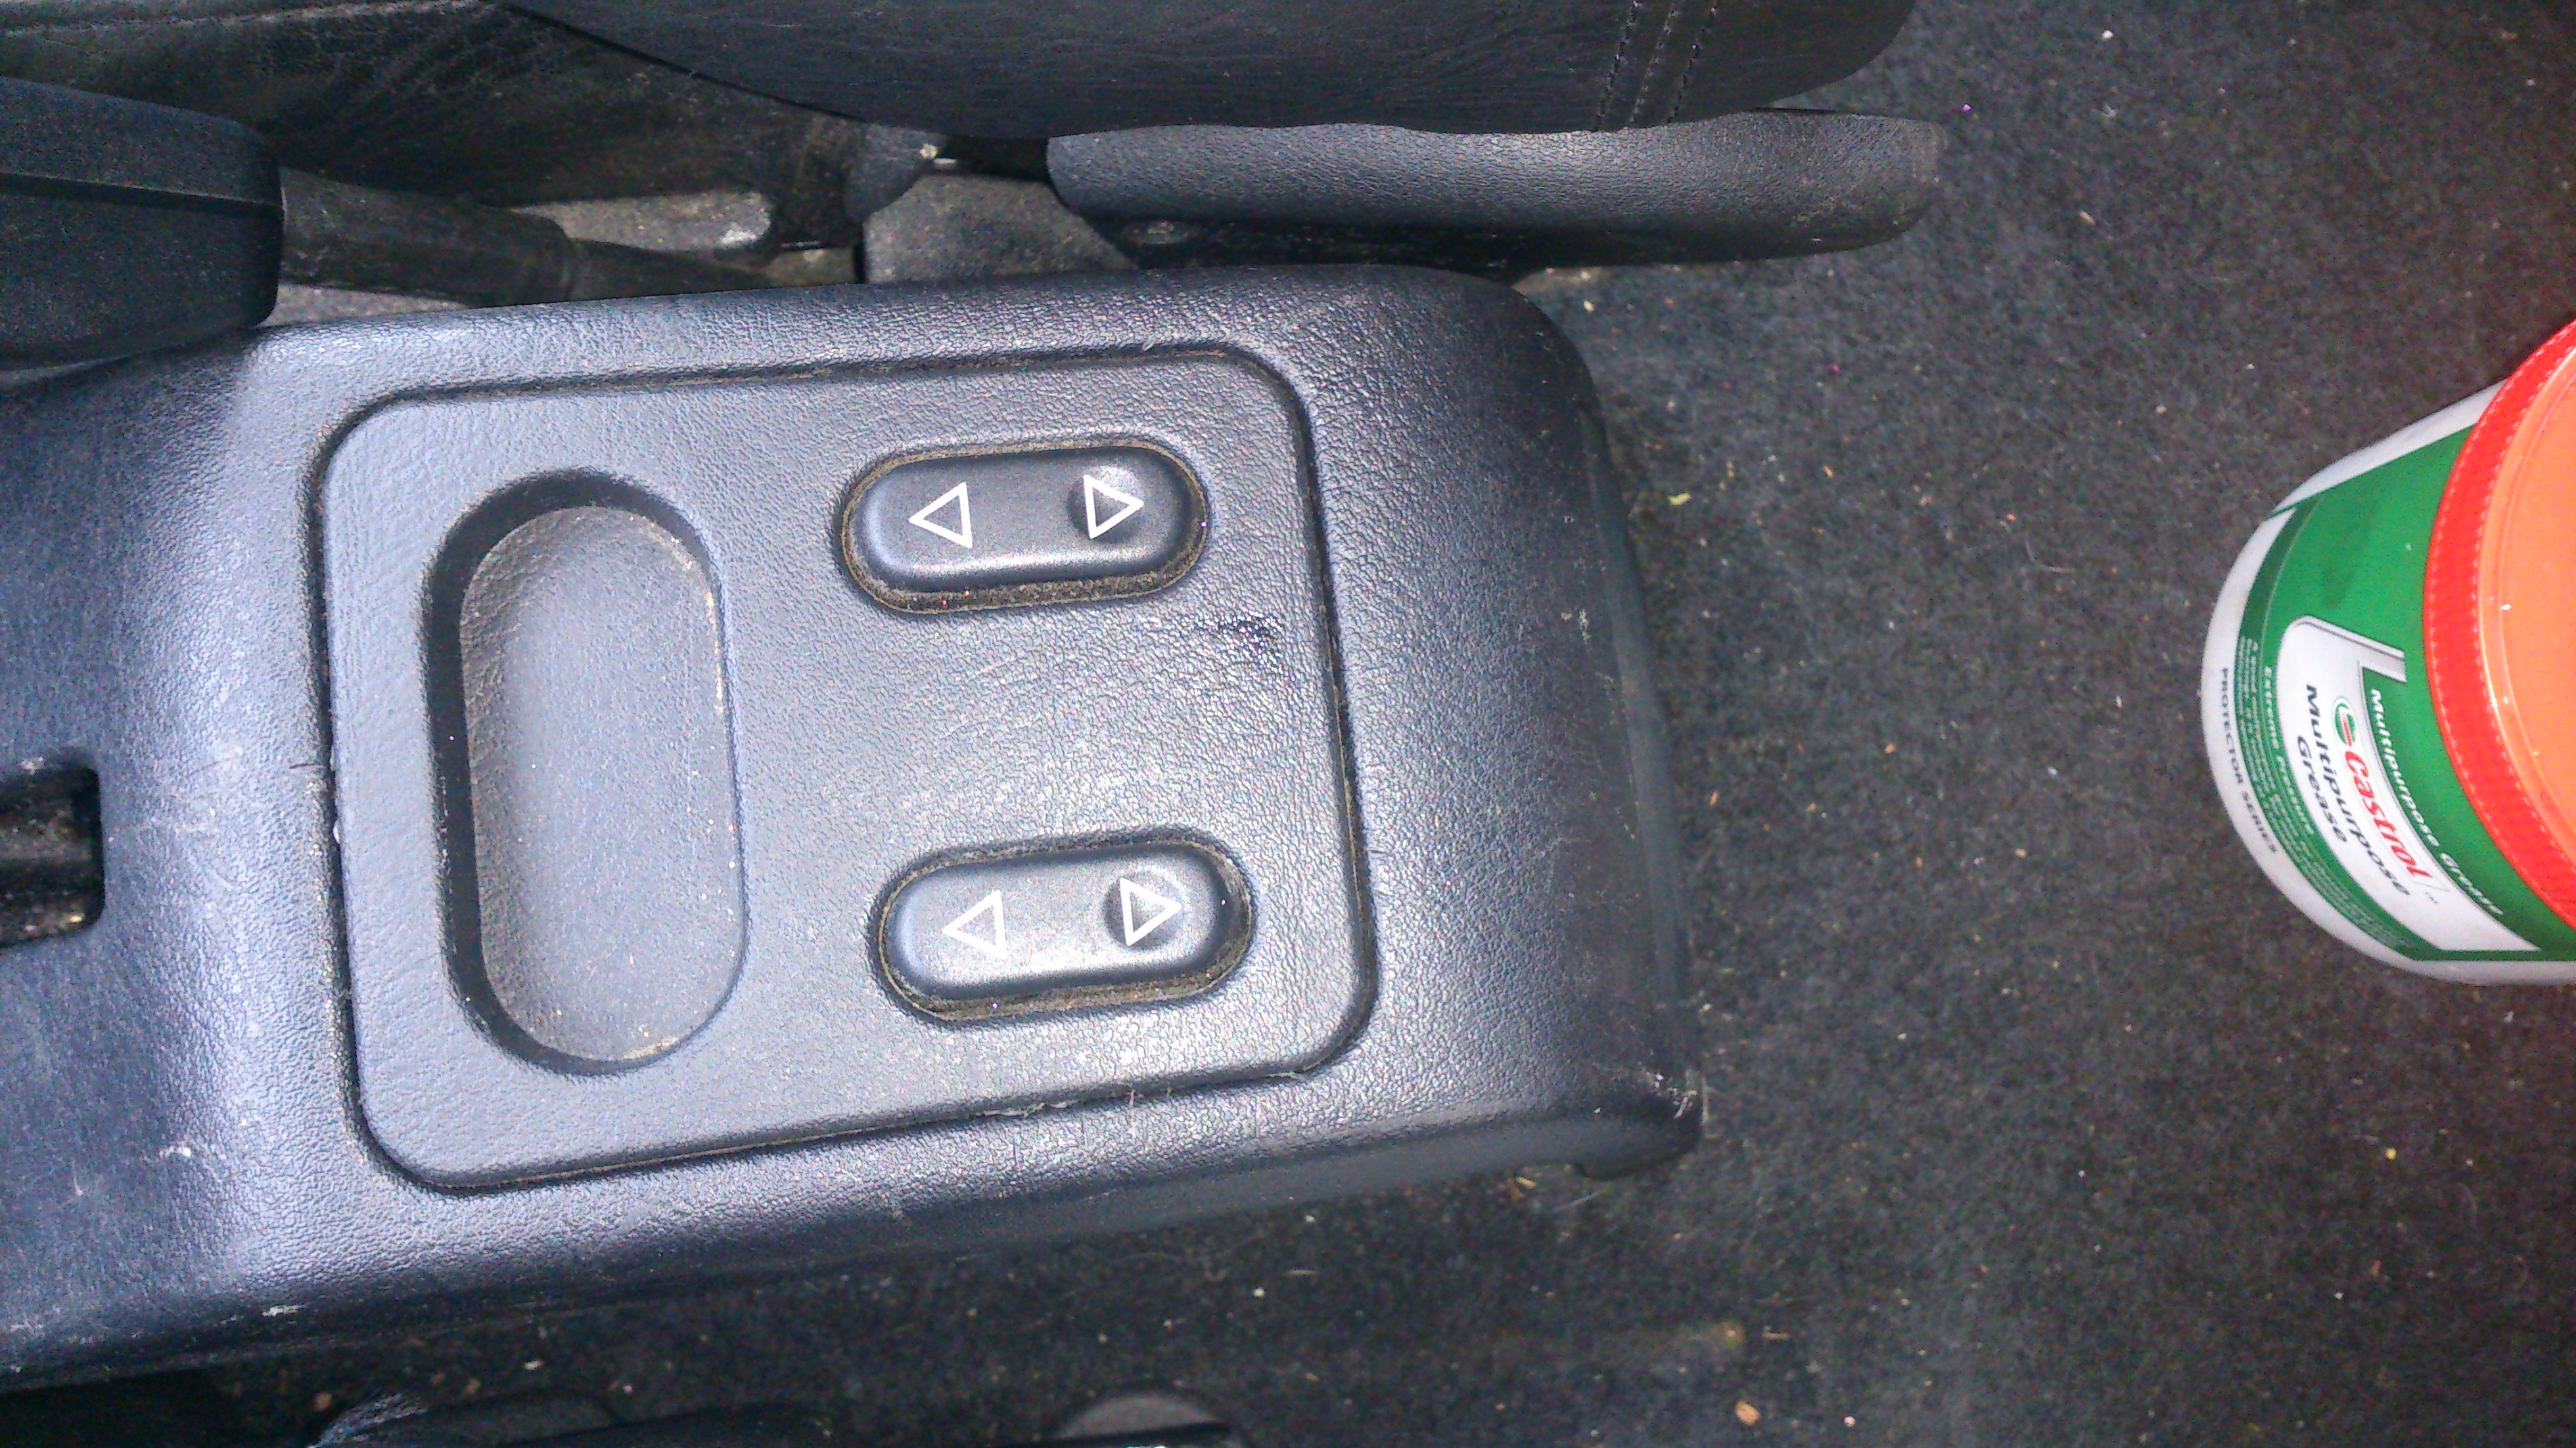
Step 6 - Fit the window cut out switch
This goes by the headlight adjuster switch and passenger airbag key thingy. Pop out the whole panel and locate the plug. Push the switch in and connect it up
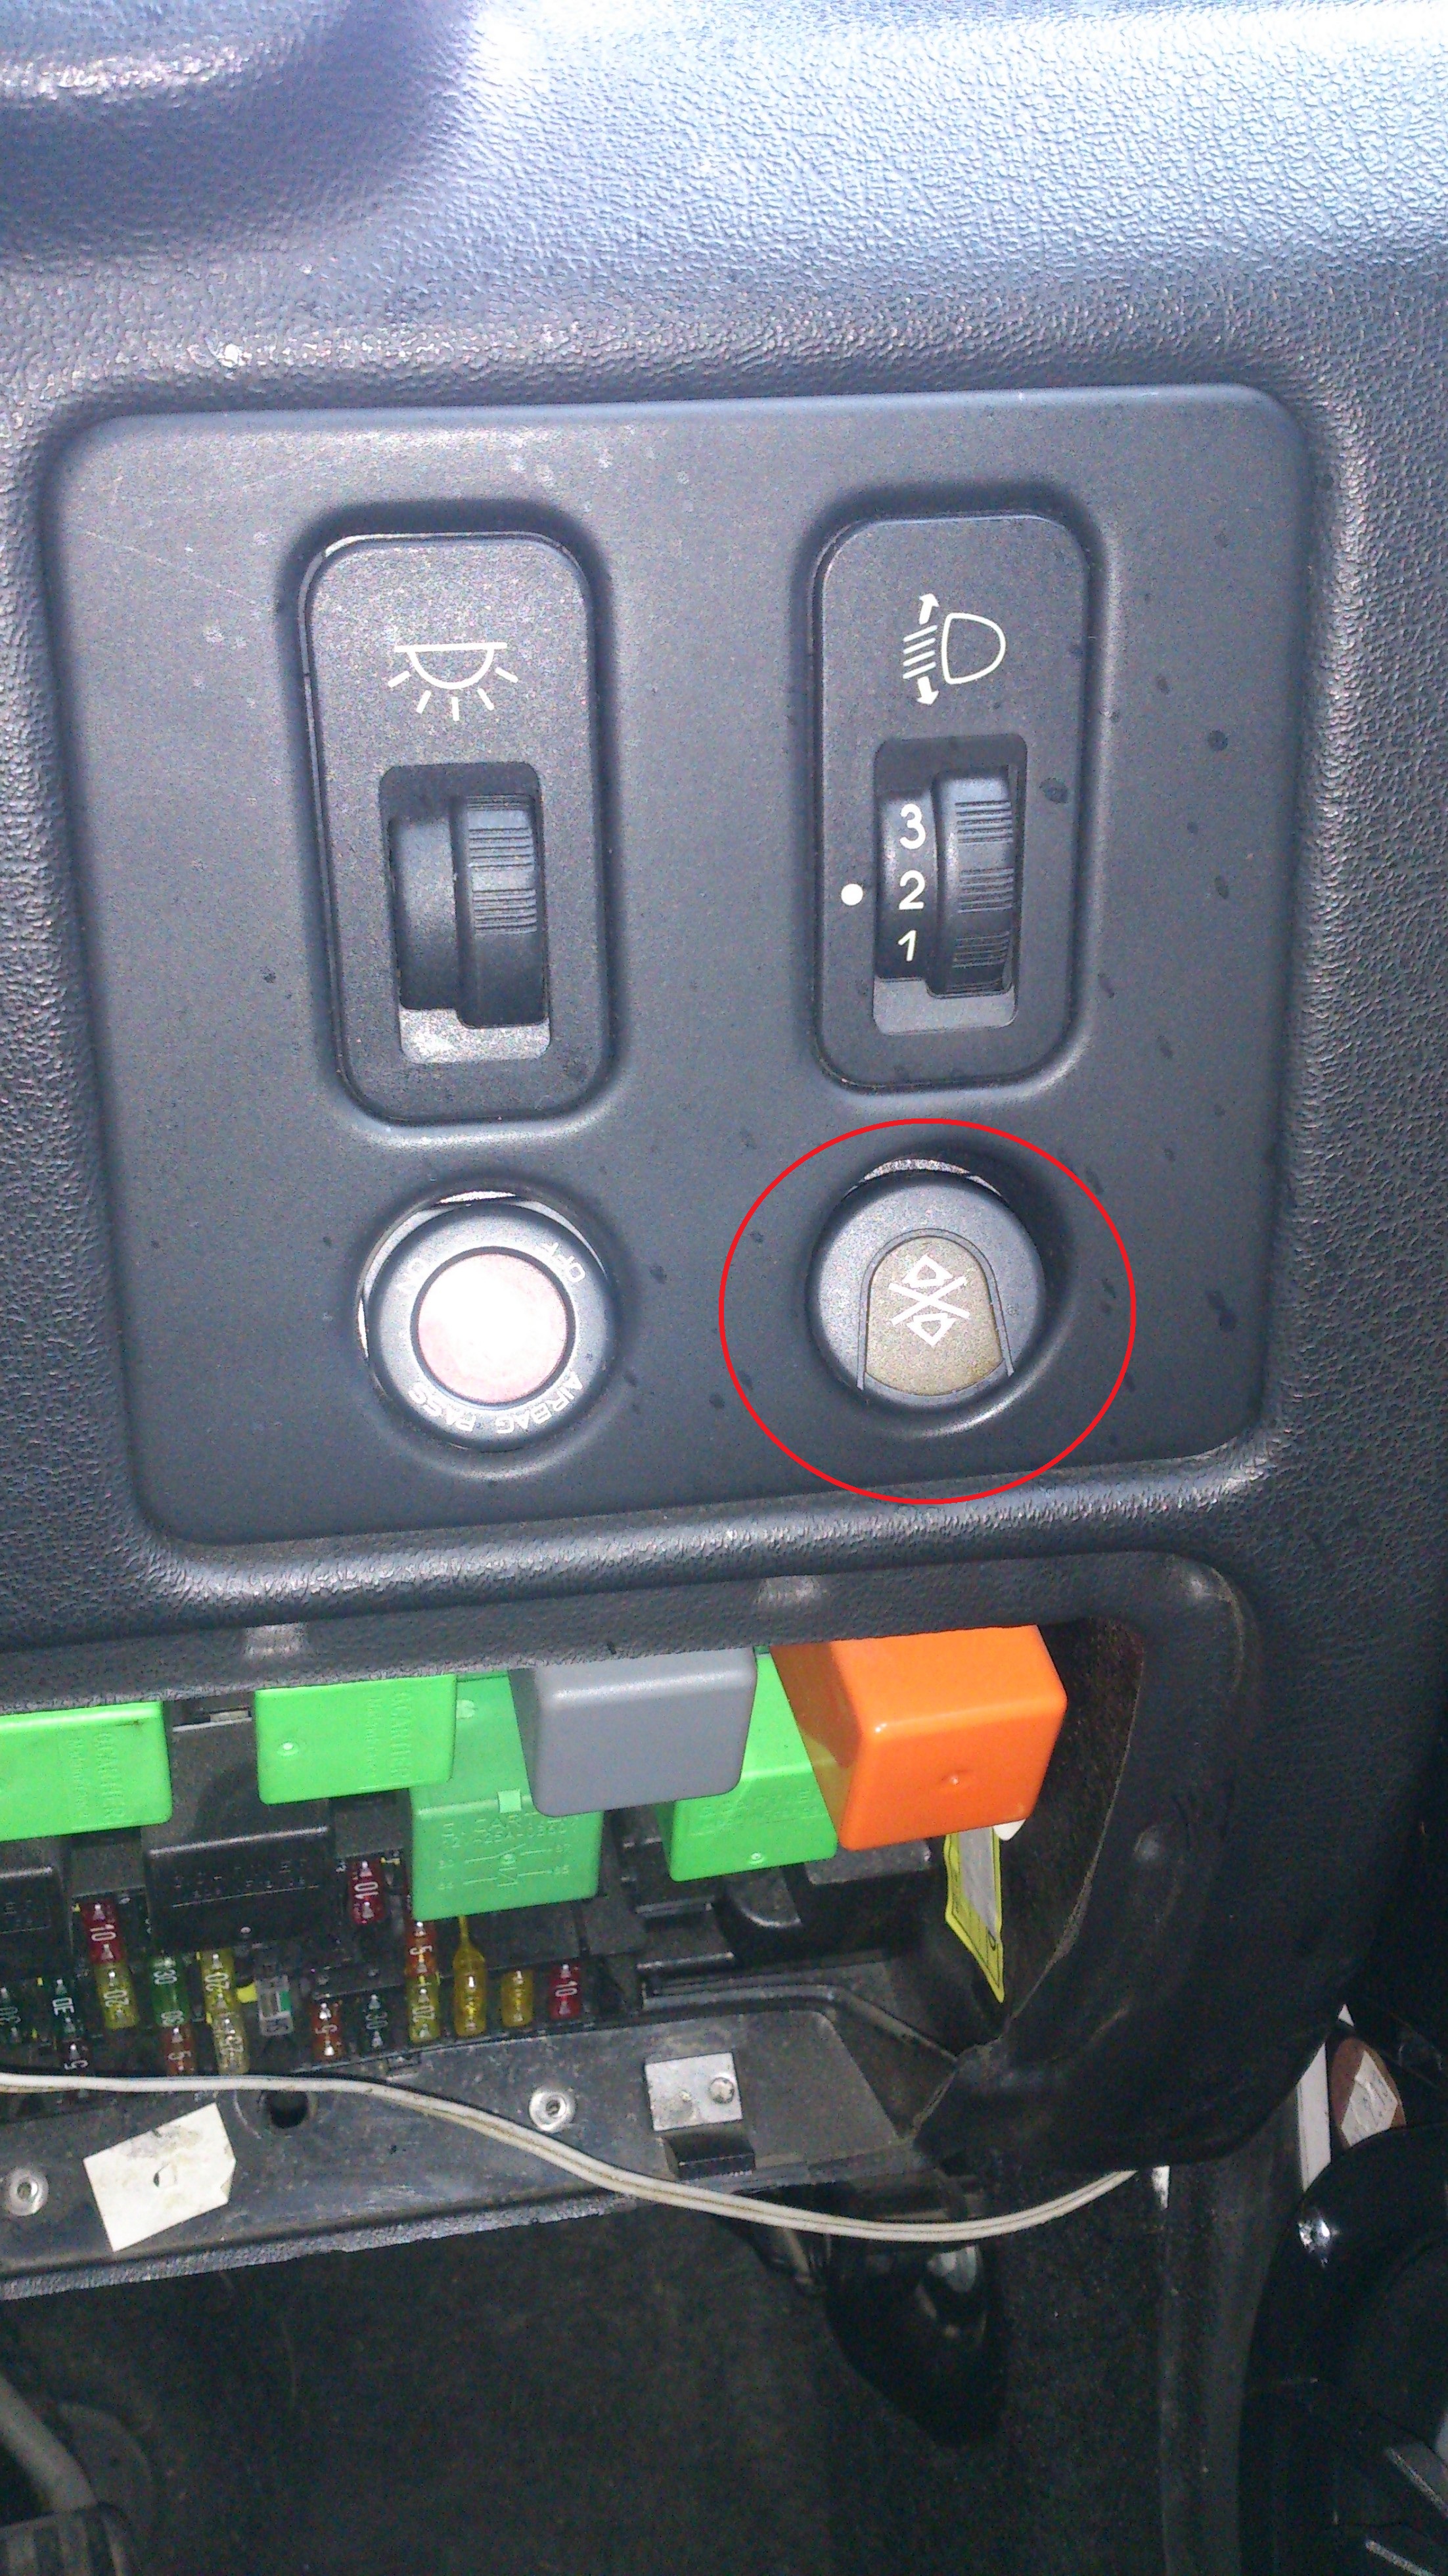
Step 6 - Fit the relay
This is a green relay and goes in the empty slot under the fuse box (p3) I only had one missing in mine but others may need to check the Haynes as to which one is needed.
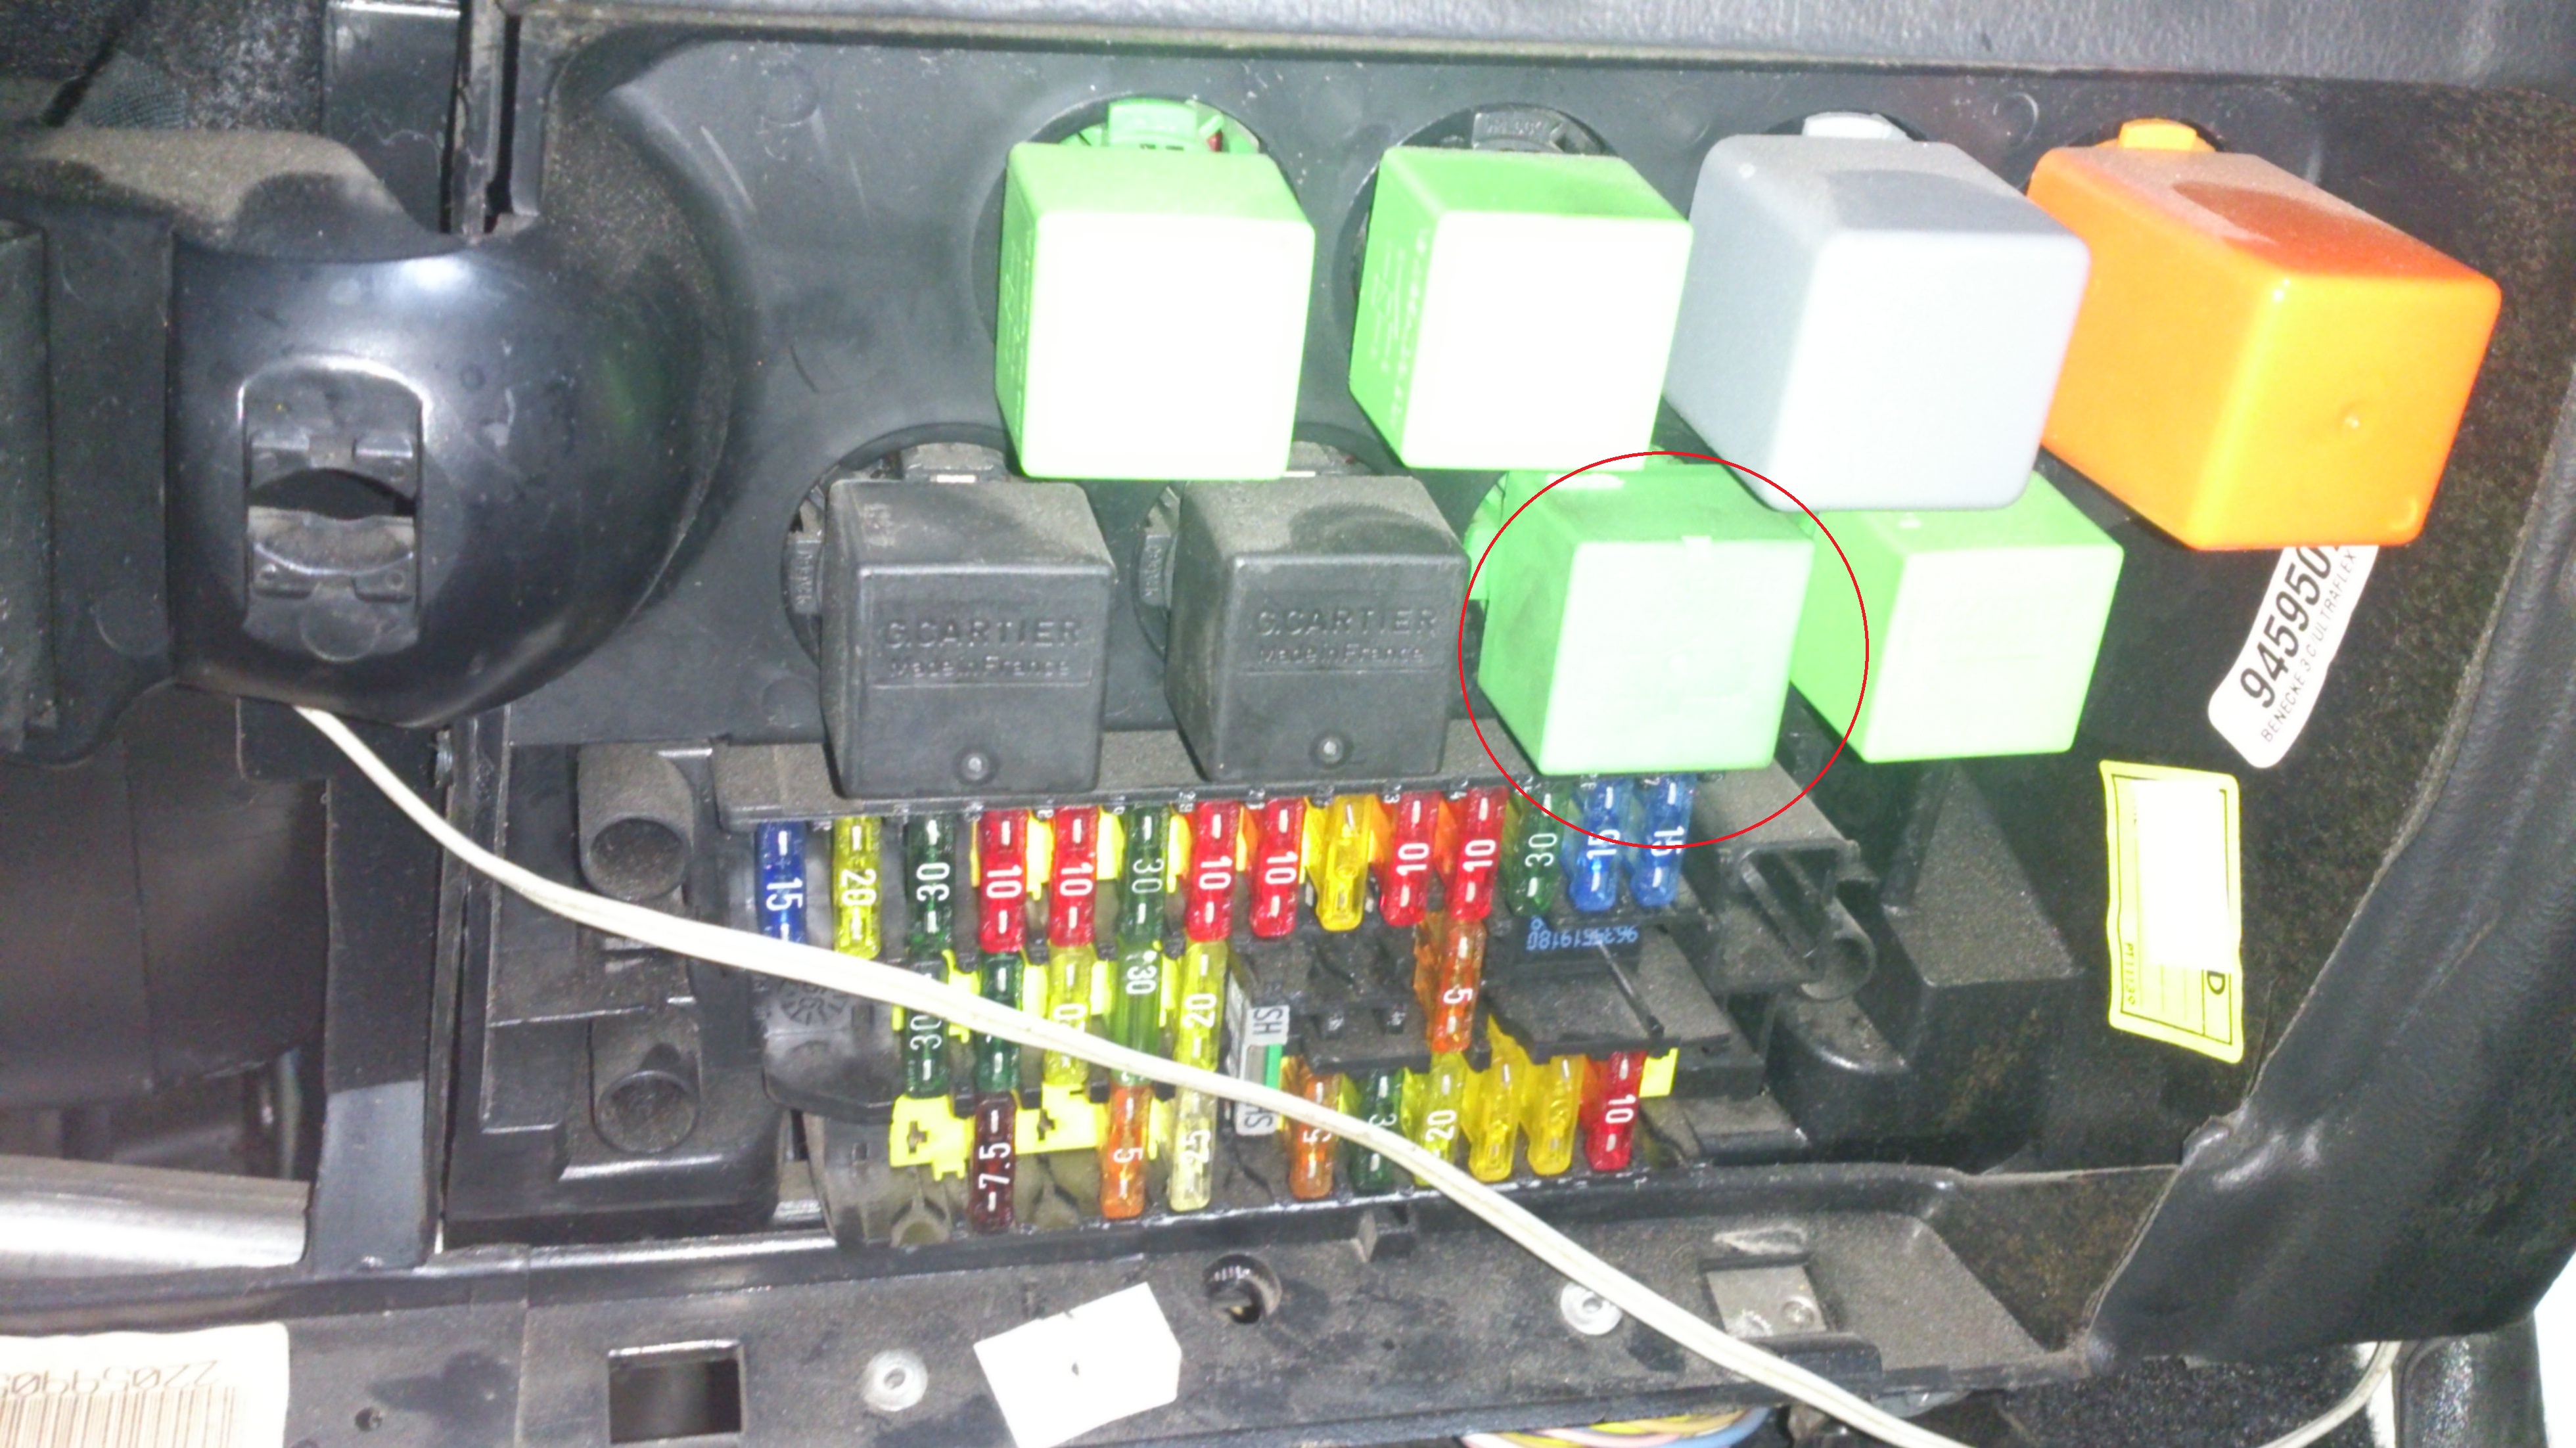
Step 7 - Test
Before refitting the door cards, switch on the ignition and fully test the system, check that both windows go all the way down and back up and check the cut off switch.
Step 8 - Refit everything & Enjoy!
As with any guide, this is the way I have done it, there may be shorter ways of getting bits into place so any suggestions please post!!
I did this on my p3 estate but the principles should be the same on p1/2
You will need:
• Both rear electric window regulators
• Centre console switch
• Window safety cut out switch
• 2 new rear door cards (or put up with the hole from the window winder)
• Relay
• Drill with 6mm hss bit
• 6 M6 bolts and nuts
• Flat head screw driver
• Needle nose pliers
• T? Torx bit
• 10mm socket
Step 1 - remove the door card
Pretty straight forward really, 1 torx screw inside the door pull then it is just clips around the bottom. Remove window winders, these do just pull off but are very stiff so I just let the door card do it once it was loose. The plastic surround for the door handle is just clipped in and also needs to be removed. Carefully get the flat head screwdriver in there at the bottom and lever it off. You then have to lift it up and over the door lock pin.
Step 2 - Removing the manual winder mechanism
With the door card off you will be confronted with lots of stick foam pads which need to be removed to get access to the glass and wiring, these can be carefully peeled back and reused but I got impatient and just ripped the things off and used duck tape when I had finished!
Loosely put the winder handle back on and wind the window down to the bottom to reveal the securing pin. You need to remove the metal securing clip from the back in order to release the pin.
This is the one of the most fiddly parts of the job and took me a while but be patient. Once this is removed you will find that the glass will come off the pin but don't actually remove it yet. Use one hand to support the bottom of the glass and the other to wind the window back to the top, once there secure the glass with cardboard so it doesn't drop back down.
Undo the 2 10mm brass colour nuts that secure the slider to the door and wiggle it free.
Next you need to drill out the 3 rivets that hold the manual winder to the car.
Step 3 - Fit the electric motor regulators
This is pretty much the reversal of step 2. Check that the wires you have taped up inside the door are the same as the ones on the motor you have, on mine one door had the p3 grey plug and the other door had the p2 plug so I had to do another trip to the scrappy to get the correct plug (may be worth checking this before you go and source your parts or just cut the wires from the donor car anyway just to be safe)
Next insert the sliders into the door and attach the brass bolts back on.
Mount the motor using your M6 nuts/bolts
Push the white securing pin back through the glass and replace the metal clip, the is the last fiddly bit and caused lots of scrapes and pain!!
Step 4 - Repeat for the other door
As above!!!!
Step 5 - Fit the switches in the centre console
You will probably have a little pot thing in there at the moment, just get your flat head in there and pop it out. You will see the yellow and blue plugs taped up under there for the switches, un tape them and fit them to the switch and clip the whole unit in.
Step 6 - Fit the window cut out switch
This goes by the headlight adjuster switch and passenger airbag key thingy. Pop out the whole panel and locate the plug. Push the switch in and connect it up
Step 6 - Fit the relay
This is a green relay and goes in the empty slot under the fuse box (p3) I only had one missing in mine but others may need to check the Haynes as to which one is needed.
Step 7 - Test
Before refitting the door cards, switch on the ignition and fully test the system, check that both windows go all the way down and back up and check the cut off switch.
Step 8 - Refit everything & Enjoy!
As with any guide, this is the way I have done it, there may be shorter ways of getting bits into place so any suggestions please post!!


 might see if the bits are there on the DT though . .
![[Image: 306Green5DrSig.png]](http://i1011.photobucket.com/albums/af232/burnmw/Pug/306Green5DrSig.png)

![[Image: siggy1.jpg]](http://i653.photobucket.com/albums/uu252/crissy_boy/Cars/siggy1.jpg)


![[Image: pcav.jpg]](http://img849.imageshack.us/img849/5716/pcav.jpg)