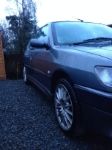
Well add another to the list of project Rallye's....
For those of you who didn't see my recent thread about buying a Rallye here is is ---> http://306oc.co.uk/forum/showthread.php?tid=34851
I'm not going to kid myself into thinking I'm going to create a showroom stunner however I hope I will do the car well enough for it to last well into the future... Thankfully mine doesn't appear to be anywhere near as rusty as some seem to be from what I see in other threads...
Now one thing I must say is how the hell do all of you guys doing build threads find time to do everything and take plenty of photos as you go?
I’m quite lucky that I have had the use of a ramp at my dad’s work to enable me to carry out a lot of this work... (the oldest ramp that rarely gets used)
![[Image: 20161029_163734_zpscn5bonji.jpg]](http://img.photobucket.com/albums/v299/MCHSavage/My%20Rallye/20161029_163734_zpscn5bonji.jpg)
First port of call was to gather materials, heres some:
![[Image: 20161030_154233_zpss1rj2pzf.jpg]](http://img.photobucket.com/albums/v299/MCHSavage/My%20Rallye/20161030_154233_zpss1rj2pzf.jpg)
I didn’t photo all of it but it was various Bilt Hamber products inc the Hydrate 80, deox gel, I did use the electrolyte zinc by bilt hamber in the more prone areas but at the price it is (£19) I resorted to cheaper zinc spray for the less prone areas... clear bilt hamber waxoil... also various implements of weaponry to attack the car
So we removed the cat back exhaust, the heatsheilds, wheels, arch liners beam, and various bits and bobs in addition such as the spare wheel carrier and various brackets...
![[Image: 20161029_135206_zpswaxl92ys.jpg]](http://img.photobucket.com/albums/v299/MCHSavage/My%20Rallye/20161029_135206_zpswaxl92ys.jpg)
2 of the exhaust studs broke so they were ground flat and new studs spot welded on then appropriately doused in zinc spray..
tbc
following on
We attacked everything remotely rusty with an air drill with a sanding attachment using 3M Rocloc sanding disks (they’re very good)... and underseal/seamsealer/stonechip that was damaged was inspected with a scraper to see if it had lifted allowing moisture in and if it had we ground it back until the metal and underseal were good gave 2 coats of the hydrate 80, a dusting of zinc and then either blew over with red or has been left to revisit with a black smooth stonechip of some sort (which I’m yet to source)
Anyway a few pics (again I don’t know how the rest of you either A remember to take them and B find the time)
Heatsheilds (1 of them was past it in my eyes as had rotted through so I sourced a set bar the backbox shield)I cleaned them all up with a wire brush, degreased and then ground anything rusty back to good metal VERY time consuming!!! Didn’t photo them all...
![[Image: 20161029_163724_zpsjgqllzr9.jpg]](http://img.photobucket.com/albums/v299/MCHSavage/My%20Rallye/20161029_163724_zpsjgqllzr9.jpg)
![[Image: 20161029_163716_zpsqtffp1lj.jpg]](http://img.photobucket.com/albums/v299/MCHSavage/My%20Rallye/20161029_163716_zpsqtffp1lj.jpg)
![[Image: 20161030_114347_zpssdk3mfuj.jpg]](http://img.photobucket.com/albums/v299/MCHSavage/My%20Rallye/20161030_114347_zpssdk3mfuj.jpg)
Also silly little brackets like this:
![[Image: 20161029_155400_zpsofnoxlse.jpg]](http://img.photobucket.com/albums/v299/MCHSavage/My%20Rallye/20161029_155400_zpsofnoxlse.jpg)
and cleaned
![[Image: 20161029_161236_zpscldzwdto.jpg]](http://img.photobucket.com/albums/v299/MCHSavage/My%20Rallye/20161029_161236_zpscldzwdto.jpg)
it was zinc'd then refitted and since dusted with red...


![[Image: New%20GTi6%20Filmstrip%20sig2_zpsu8ocrldg.jpg]](http://img.photobucket.com/albums/v299/MCHSavage/New%20GTi6%20Filmstrip%20sig2_zpsu8ocrldg.jpg)
![[Image: 20160914_164627_zpsmullyyjw.jpg]](http://img.photobucket.com/albums/v299/MCHSavage/My%20Rallye/20160914_164627_zpsmullyyjw.jpg)
![[Image: 20161013_184618_zps4kxmnzk6.jpg]](http://img.photobucket.com/albums/v299/MCHSavage/My%20Rallye/20161013_184618_zps4kxmnzk6.jpg)
![[Image: 20161030_104733_zpsv7ssj1pd.jpg]](http://img.photobucket.com/albums/v299/MCHSavage/My%20Rallye/20161030_104733_zpsv7ssj1pd.jpg)

![[Image: 20161029_135013_zpsbes2a0wg.jpg]](http://img.photobucket.com/albums/v299/MCHSavage/My%20Rallye/20161029_135013_zpsbes2a0wg.jpg)
![[Image: 20161030_113042_zpso9f9vul1.jpg]](http://img.photobucket.com/albums/v299/MCHSavage/My%20Rallye/20161030_113042_zpso9f9vul1.jpg)
![[Image: 20161029_135022_zps5soyq4xx.jpg]](http://img.photobucket.com/albums/v299/MCHSavage/My%20Rallye/20161029_135022_zps5soyq4xx.jpg)
![[Image: 20161029_135028_zpsfvcikthu.jpg]](http://img.photobucket.com/albums/v299/MCHSavage/My%20Rallye/20161029_135028_zpsfvcikthu.jpg)
![[Image: 20161029_135035_zpszds53okn.jpg]](http://img.photobucket.com/albums/v299/MCHSavage/My%20Rallye/20161029_135035_zpszds53okn.jpg)
![[Image: 20161030_110532_zpsdxclir1f.jpg]](http://img.photobucket.com/albums/v299/MCHSavage/My%20Rallye/20161030_110532_zpsdxclir1f.jpg)
![[Image: 20161030_113034_zpsktdtdwz0.jpg]](http://img.photobucket.com/albums/v299/MCHSavage/My%20Rallye/20161030_113034_zpsktdtdwz0.jpg)
![[Image: 20120704_212316.jpg]](http://i789.photobucket.com/albums/yy175/DanHargrave/20120704_212316.jpg)
![[Image: received_662398507261527_zpsghruasvf.jpeg]](http://img.photobucket.com/albums/v299/MCHSavage/My%20Rallye/received_662398507261527_zpsghruasvf.jpeg)


![[Image: 17b33c2a-8471-4313-992e-0a4b324cf926_zps2e63812a.jpg]](http://i143.photobucket.com/albums/r143/matt-taylor/17b33c2a-8471-4313-992e-0a4b324cf926_zps2e63812a.jpg)
![[Image: 20161030_110613_zpszk32vyfm.jpg]](http://img.photobucket.com/albums/v299/MCHSavage/My%20Rallye/20161030_110613_zpszk32vyfm.jpg)
![[Image: 20161030_110602_zps8izworun.jpg]](http://img.photobucket.com/albums/v299/MCHSavage/My%20Rallye/20161030_110602_zps8izworun.jpg)