Posts: 7,825
Threads: 465
Joined: Dec 2011
Reputation:
114
Location: Cullompton Devon
Car Model/Spec: Vauxhall


Thanks: 1
Given 98 thank(s) in 92 post(s)
22-08-2013, 02:23 PM
(This post was last modified: 22-08-2013, 03:44 PM by cully.)
some may know how poor the rang is on the Ph2 key fob, as i have a ph3 i get pissy with the ir system as i cant unlock the car on approach
small thing and that
with this guide i hope to be able to show you how to convert the central locking to RF for better range.
Beware this is a work in progress and some pictures wont work yet
objective.
nice flip key fob
working Immobiliser
remote locking
working dead locks
Extras maybe
Boot popper or other auxillary output
i have bought a Keyless entry remote system off of ebay
http://www.ebay.co.uk/itm/360621012598
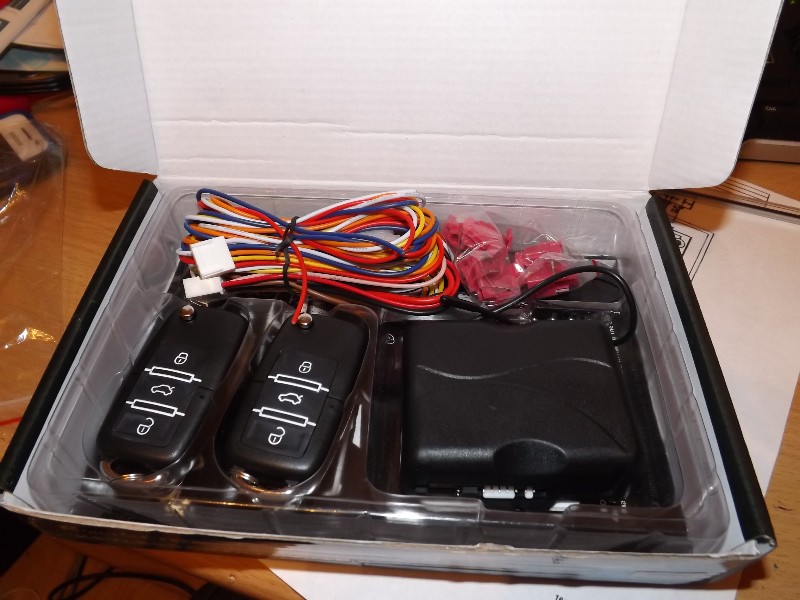
the good thing with this kit is you can request the key blank and branding for the peugeot key and fob branding sticker
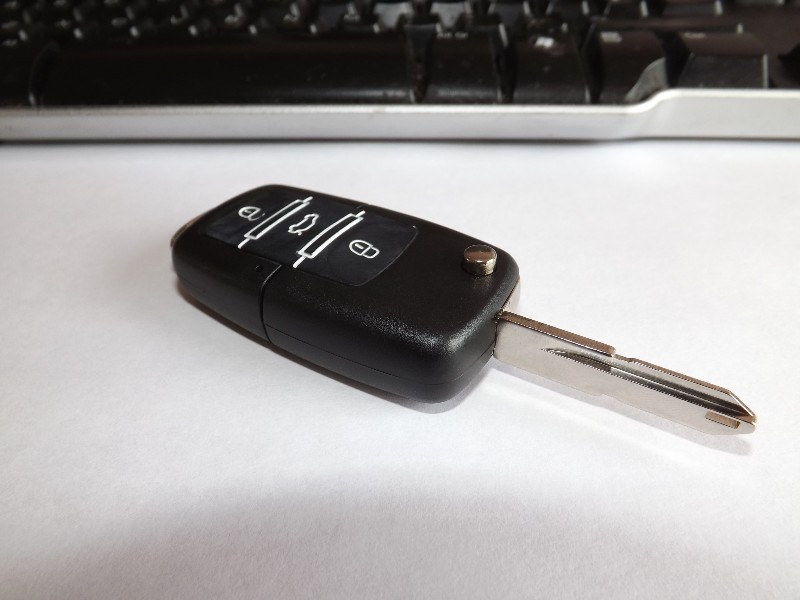
the kit came i read the instruction well i didn't at first! but i had to in the end 
ive never worked on a central locking system before but i have good electrical knowlage so my first job was to uncover all the box's in the car i am going to be connecting too
first box is the Central locking control box, in my Ph2 is is under the shelf drivers side under the rear bench seat
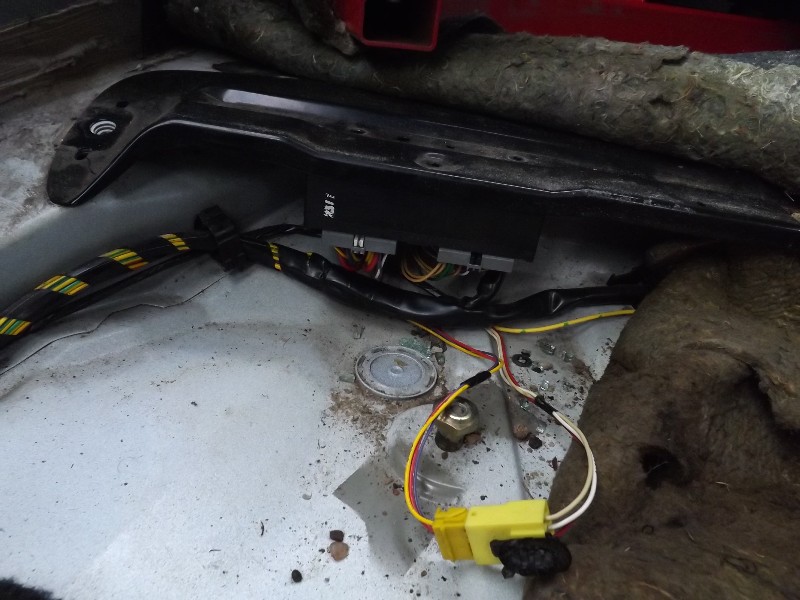
second box is the alarm box this box is located drivers side rear quater panel just above the front seatbelt recoil unit
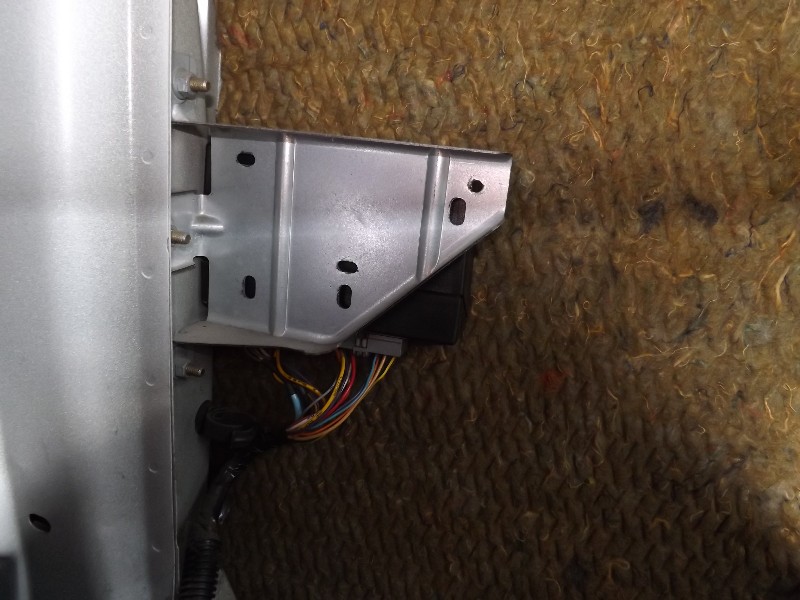
If you unscrew each of the box's you can gain enough wire to work on each easyer
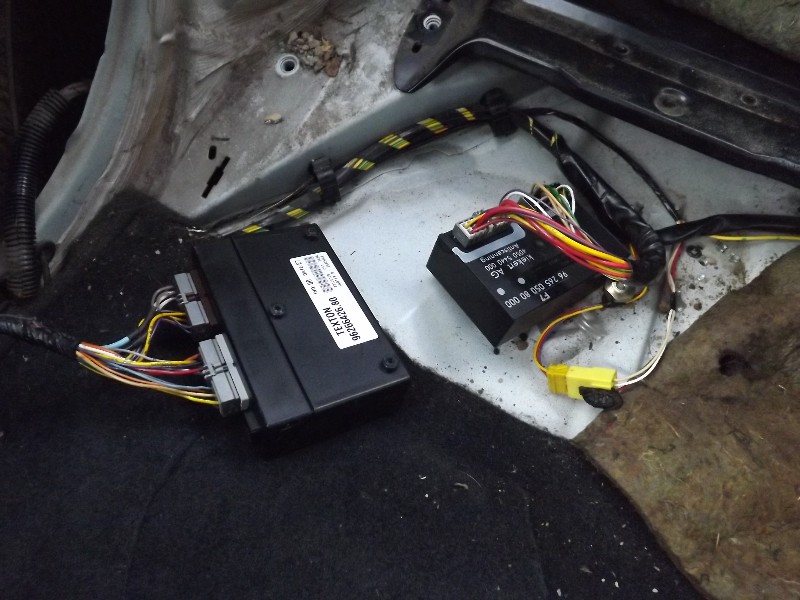
now i had all the box's exposed it was time to find out how the c/locking worked and what wires did what
this is where i had to go back and read the kits manual twice
as although ebay seller said instructions included that was a load of rubbish as there was nothing in the manual for peugeot at all!
on reading the manual again i learned
while this is installing a new remote centrol locking control box, this box only triggers the original equipment box to lock and unlock the original system
so the IR system with the original key will still work if you want
so effectivly this unit could be used on any car say if you lost the R/CL fob but still had the keyand immo chip.
The manual did explain how to check/test for which type of central locking system the car has
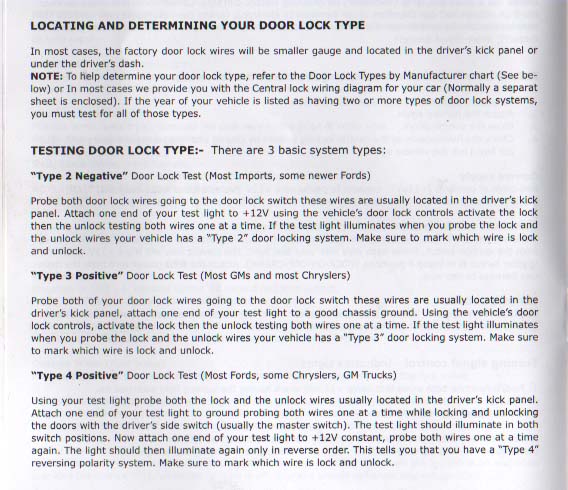
so after following the instructions
i came to the conclusion the 306 PH2 use's a negative trigger system
Posts: 7,825
Threads: 465
Joined: Dec 2011
Reputation:
114
Location: Cullompton Devon
Car Model/Spec: Vauxhall


Thanks: 1
Given 98 thank(s) in 92 post(s)
so now i know the car is a negative trigger ive got to start piecing different drawings from the book together
first is the main wiring drawing for the unit
with a bit of luck i wont need most of the wires but we will have to wait and see
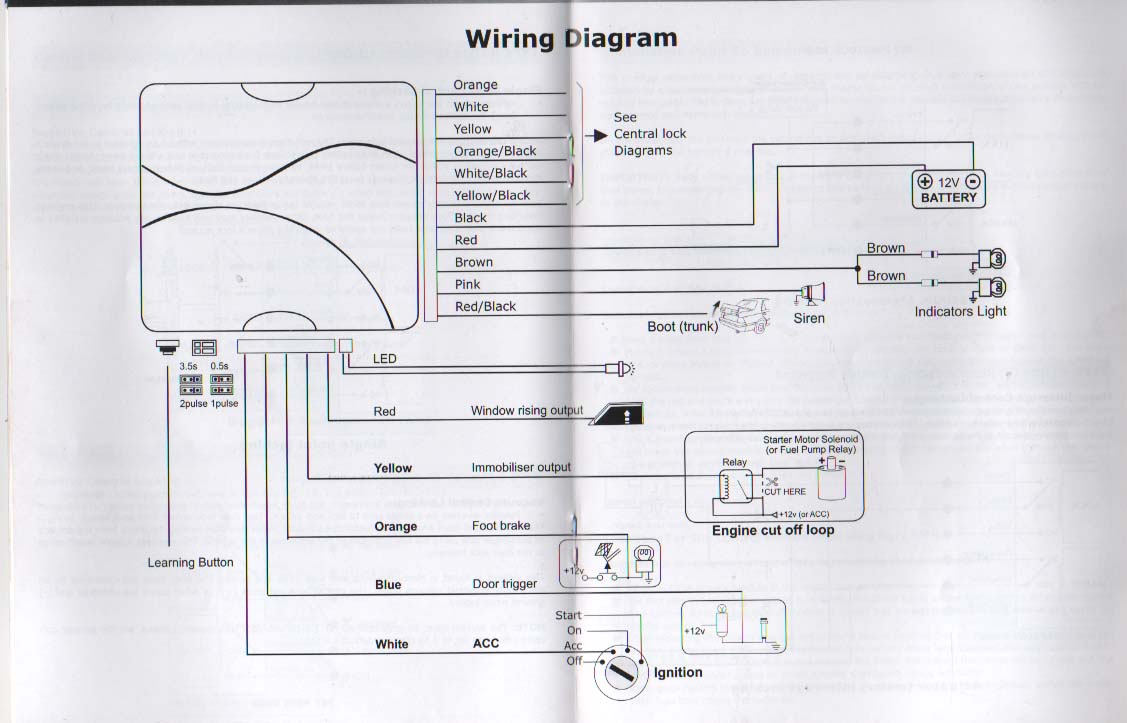
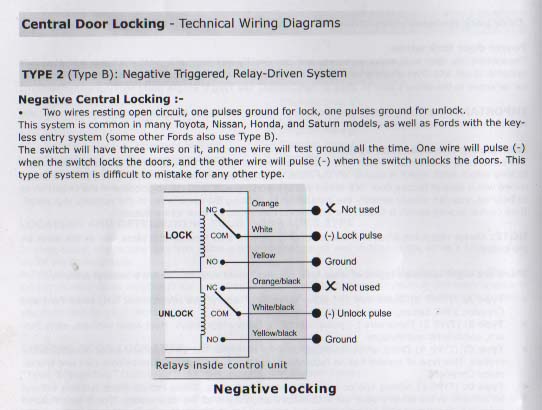
second is the central lock part of the main drawing this has to be wired as per the drawing
i will add wire numbers later and a propper easy to follow drawing
this is my work in progress as i havnot yet finished this i am building it as i write this
Posts: 1,833
Threads: 91
Joined: Dec 2011
Reputation:
12
Location: Wrexham
Car Model/Spec: 306 D Turbo
Thanks: 0
Given 0 thank(s) in 0 post(s)
Woa! Nice one cully, may have a go at this myself! My p2 has no alarm at all, is there still a trigger wire for the indicators and could I add a siren do you think?
Supercharged XUD Project - Dead
Posts: 7,825
Threads: 465
Joined: Dec 2011
Reputation:
114
Location: Cullompton Devon
Car Model/Spec: Vauxhall


Thanks: 1
Given 98 thank(s) in 92 post(s)
(22-08-2013, 08:05 PM)londondan86 Wrote: Woa! Nice one cully, may have a go at this myself! My p2 has no alarm at all, is there still a trigger wire for the indicators and could I add a siren do you think?
as for the trigger wires for the indicators the main rear light loom runs in the O/s quater panel so you could pick wires up there
i have been a little busy tonight but i have looked at the wiring drawings
and have come up with my plan of attack
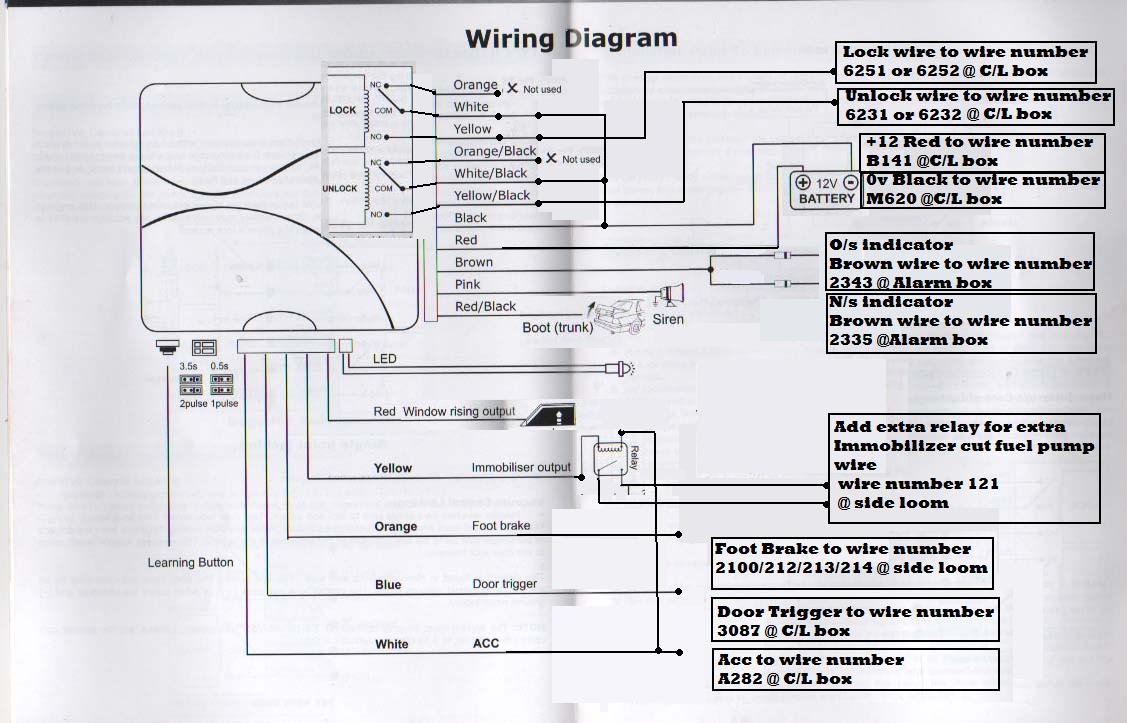
the drawing im about to post is a thinking out loud drawing which i will test and confirm it works with more pictures of the install
Posts: 5,847
Threads: 169
Joined: Dec 2011
Reputation:
91
Location: South London
Car Model/Spec: 2003 Jaguar S-Type Sport 3.0V6
Thanks: 1
Given 1 thank(s) in 1 post(s)
Awesome work here cully.
Revolutionising PH2 central locking FTMFW!

![[Image: car-1.jpg]](http://i1117.photobucket.com/albums/k591/grant-306/car-1.jpg)
Member of the 99% warning or you're nothing club
2000 Moonstone 1.8 Meridian - Sold
2000 China 3dr XS - Dead
1998 Diablo 3dr XSI
Posts: 7,825
Threads: 465
Joined: Dec 2011
Reputation:
114
Location: Cullompton Devon
Car Model/Spec: Vauxhall


Thanks: 1
Given 98 thank(s) in 92 post(s)
as you can see most of the wires that are needed will be in the central locking box,
the immobiliser output relay and fuel pump cut is not needed its an option i have added,
the footbrake is needed for auto locking and some sort of programming
at the moment im not going to be using Pink/redblack or the red for the window rising and the yellow for the immo output
Posts: 3,377
Threads: 96
Joined: Dec 2011
Reputation:
7
Location: Brizzel
Car Model/Spec: 306 tractor
Thanks: 0
Given 0 thank(s) in 0 post(s)
I guess cullys very happy...
![[Image: siggy1.jpg]](http://i653.photobucket.com/albums/uu252/crissy_boy/Cars/siggy1.jpg) the smokey old bus that sounds like a tractor...
the smokey old bus that sounds like a tractor...
Posts: 7,825
Threads: 465
Joined: Dec 2011
Reputation:
114
Location: Cullompton Devon
Car Model/Spec: Vauxhall


Thanks: 1
Given 98 thank(s) in 92 post(s)
23-08-2013, 04:35 PM
(This post was last modified: 23-08-2013, 05:03 PM by cully.)
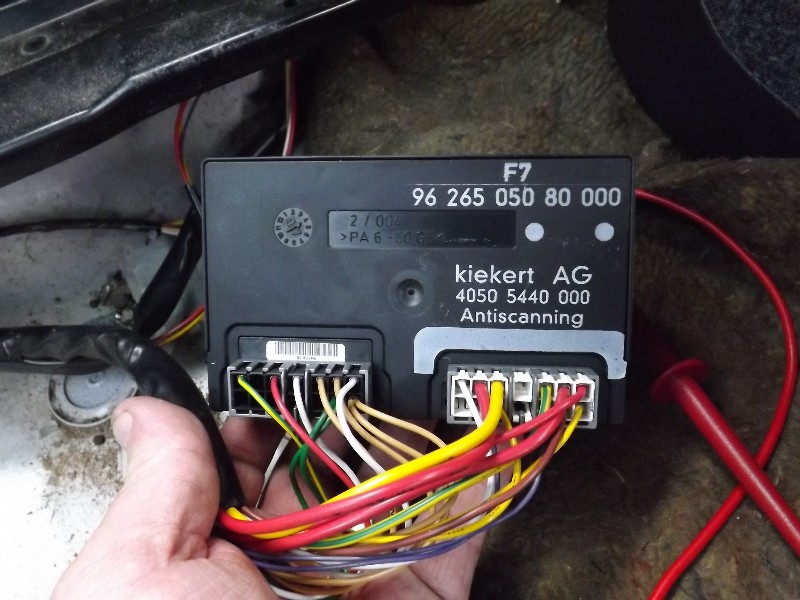
this set of pictures are the wire pinout of the centrallocking box
with an explanation of each wire
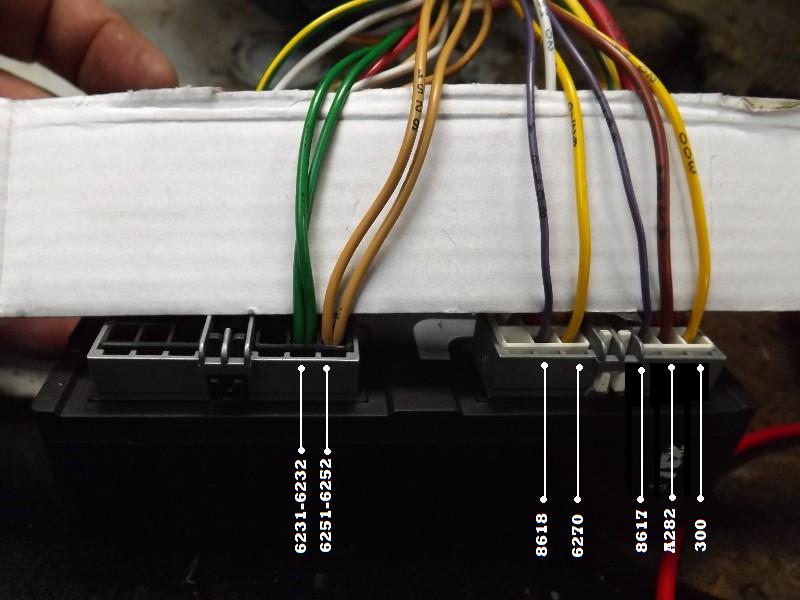
6231-6232 = Unlock wire
6251-6252 = Lock wire
8618 = alarm unit connection wire
6270 = infra red door locking receiver connection wire
8617 = alarm unit connection wire
A282 = ACC 12v
300 = front interior lamp control
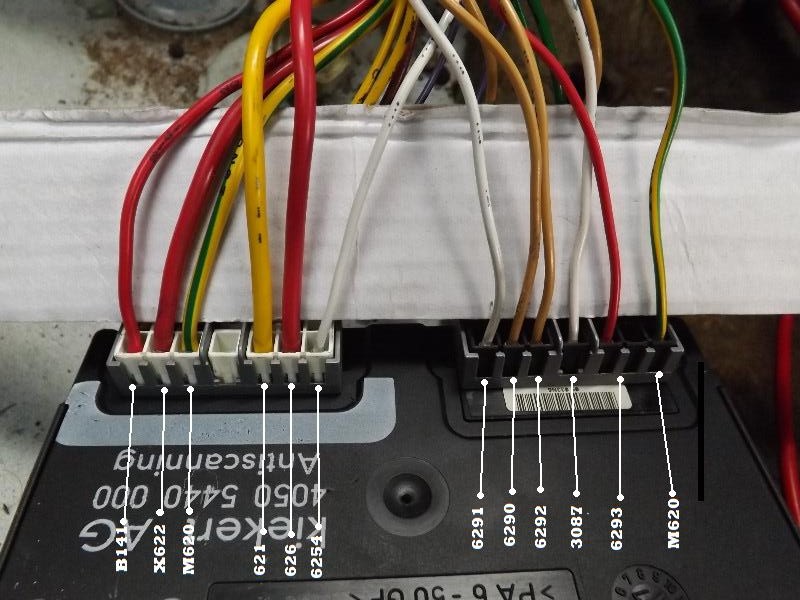
B141 = 12v unswitched
X622 = lock motor wire
M620 = Earth/Ground
621 = lock motor wire
626 = lock motor wire
6245 = Diagnostics plug wire link
6291 = Left-hand front lock locking info
6290 = Left-hand front lock unlocking info
6292 = Right-hand front lock unlocking info
3087 = Door pin trigger
6293 = Right-hand front lock locking info
M620 = Earth/Ground
Posts: 7,825
Threads: 465
Joined: Dec 2011
Reputation:
114
Location: Cullompton Devon
Car Model/Spec: Vauxhall


Thanks: 1
Given 98 thank(s) in 92 post(s)
next set of pictures ar of the alarm control box
with an explanation of each wire
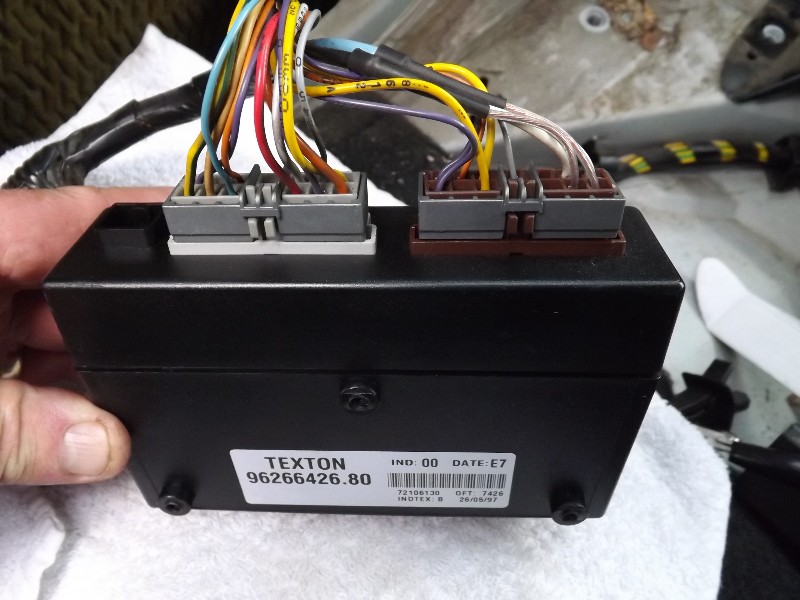
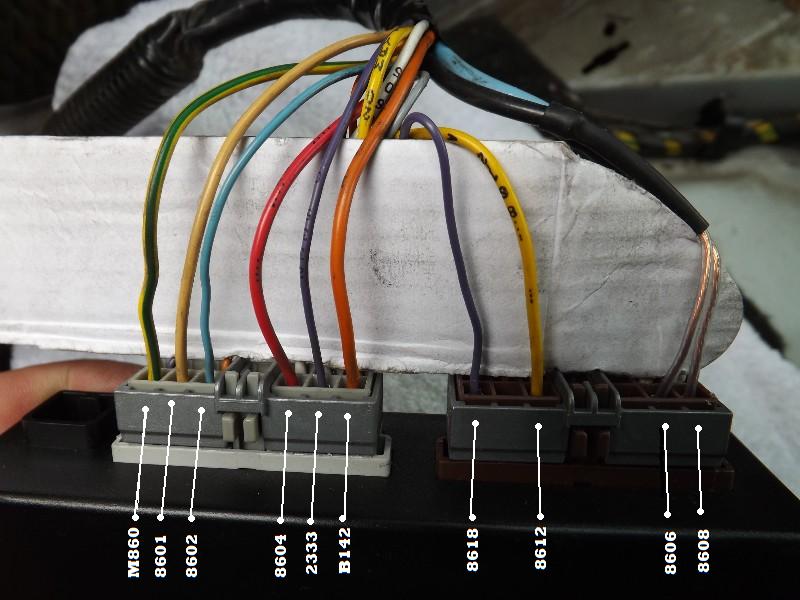
M860 : Ground/Earth
8601 : Bonnet open info
8602 : Theft protection alarm command
8604 : anti-theft alarm siren control
2333 : rear right direction indicator ????????
B142 : 12v
8618 : Connection to central locking controller
8612 : Right-hand front door open info
8606 : L Ultrasonic sensor
8608 : R Ultrasonic sensor
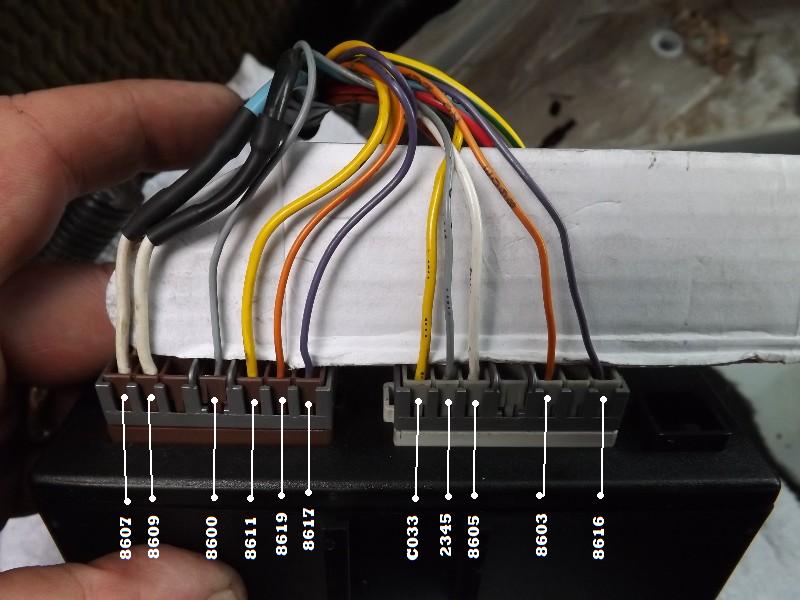
8607 : L Ultrasonic sensor
8609 : R Ultrasonic sensor
8600 : Dipped headlight relay command
8611 : Left-hand front door open info
8619 : Interior protection neutralisation info
8617 : Connection to central locking controller
C033 : ACC 12v IGN
2345 : rear left direction indicator
8605 : Theft protection alarm siren info
8603 : Theft protection alarm cut-off command
8616 : Boot open info
Posts: 7,825
Threads: 465
Joined: Dec 2011
Reputation:
114
Location: Cullompton Devon
Car Model/Spec: Vauxhall


Thanks: 1
Given 98 thank(s) in 92 post(s)
24-08-2013, 10:15 AM
(This post was last modified: 24-08-2013, 07:52 PM by cully.)
the next set of pictures are the install
write up will follow shortly.....
now i had a drawing to work to and knew were the wires were, i set about tracing them in the car, i marked eack wire once i found it with tape.
to find the R/indicator L/indicator and brake light wire i set the hazard lights and or pressed brake pedal so the lights pulsed, then started probing wires on the wheel arch till i found the three that were pulsing,
to do this i used a multimeter set to volts one lead clipped to ground and the other clipped to a pin which i pushed into the insulastion
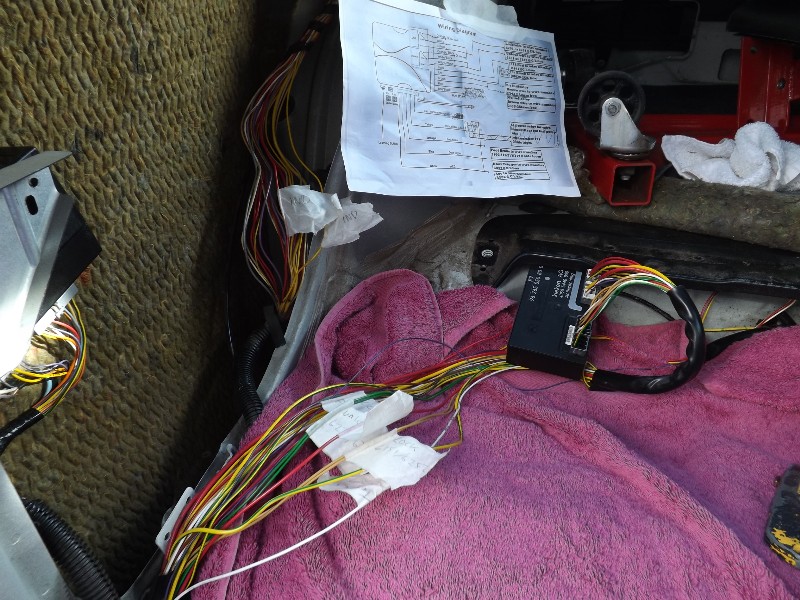
find somewhere secure to mount the reciever box note the arial recieving wire clipped to the sound insulation
beware of the cable runs for length and watch the french tin as its bloody sharp
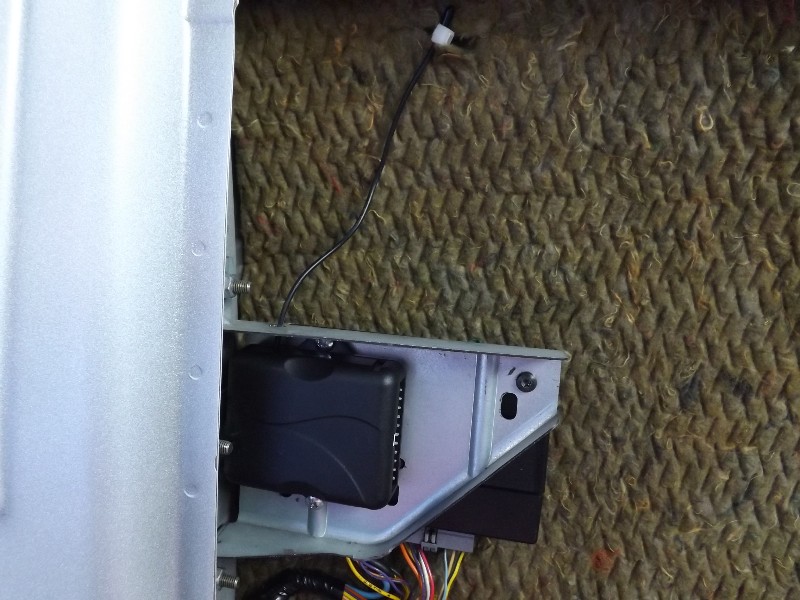
The art of a good install is to not see you have been there, a roll of black tape and a knife and you can create a new loom that grafts into the old and looks like original fitment
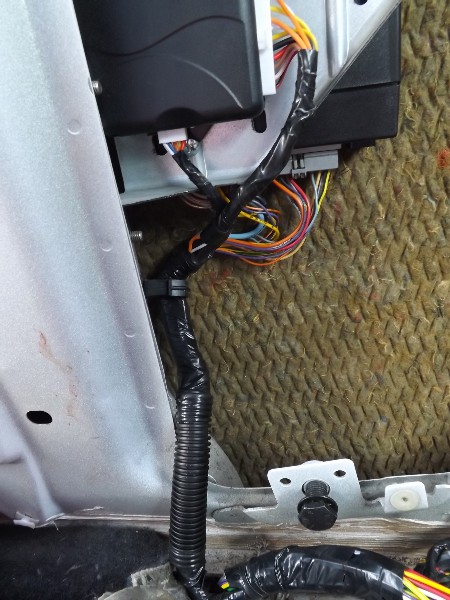
The kit came with scotch locks i hate these things! soldered heatshrinked joints are mor reliable and less prone to breaking with vibrations from the car
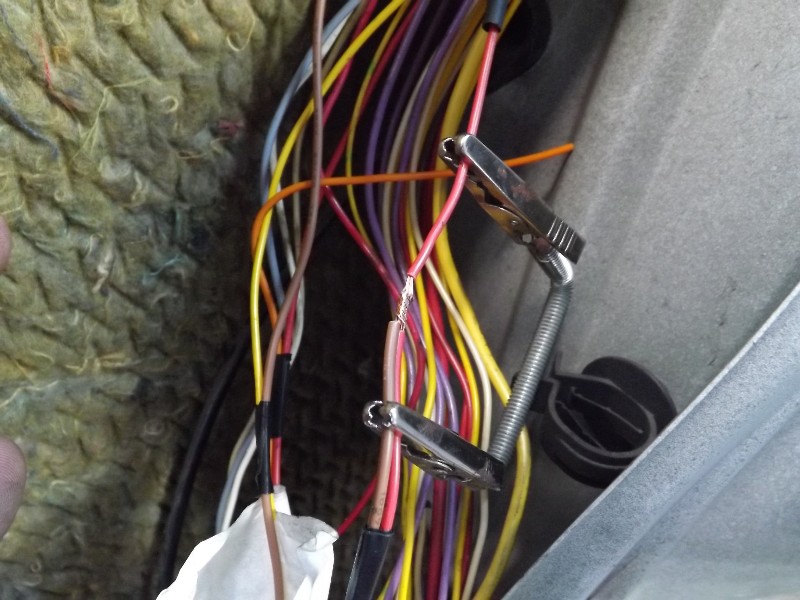
tidying up as you go making good the arch loom you have opened

Posts: 7,825
Threads: 465
Joined: Dec 2011
Reputation:
114
Location: Cullompton Devon
Car Model/Spec: Vauxhall


Thanks: 1
Given 98 thank(s) in 92 post(s)
Posts: 7,825
Threads: 465
Joined: Dec 2011
Reputation:
114
Location: Cullompton Devon
Car Model/Spec: Vauxhall


Thanks: 1
Given 98 thank(s) in 92 post(s)
24-08-2013, 01:38 PM
(This post was last modified: 24-08-2013, 07:43 PM by cully.)
i Have got this working now 
had to alter the original wiring drawing a little
so this drawing is as it is now
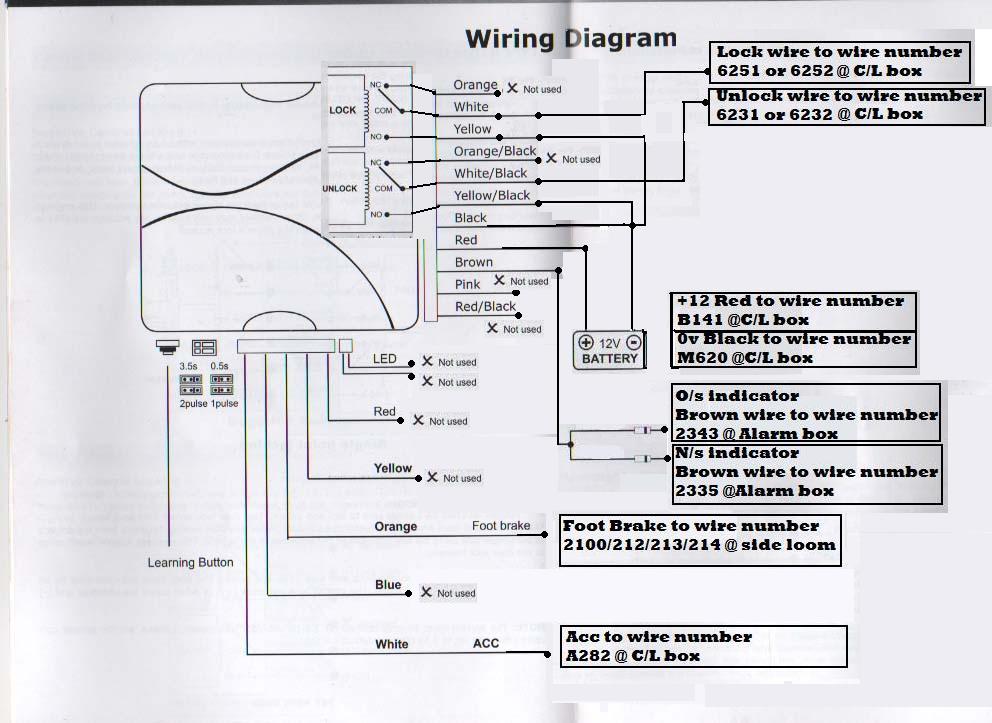
this drawing connections gives you RF central deadlocking and auto door locking while driving.
the auto door locking can be turned off by instructions in the manual as this is a fuction option
i sacked off the LED as it looked shit,
also the alarm function is disabled by not fitting blue wire to the door trigger, this was giving me a head ack as the signal is the wrong way round on the pug so its binned
also i have changed the wiring on the lock/unlock wires at the new box this is because the wires were too short so i just reversed the switch to the longer cables  but remember if you are doing this you need to add the ground link between (black/yellow/yellowblack) or the locking/unlocking wont work
option time
if you want normal locking leave the jumper selection as standrd
if you want dead locking you have to alter the jumper to 3.5second one pulse
other things to remember
peugeot didnt print the cable numbers all along the cable they only printed at the ends,
dont relly on a colour being the same colour at different parts of the loom they change sometimes
your numbers in your car might be different
i still have my IR system fuctioning as normal but i also have an RF system
things left to do
get keys cut
source an immo chip
Posts: 15,646
Threads: 541
Joined: Dec 2011
Reputation:
124
Location: Aylesbury
Car Model/Spec: 320bhp Impreza WRX
Thanks: 7
Given 59 thank(s) in 58 post(s)
God that looks complicated but useful.
Tempting mind.
Posts: 5,902
Threads: 142
Joined: Dec 2011
Reputation:
58
Location: Hastings, East Sussex
Car Model/Spec: E46 BMW 320d

Thanks: 17
Given 28 thank(s) in 28 post(s)
So tempting in fact, that when i can afford all the bits, and the time, i will be doing this myself. The range on the IR system is tragic.
Cully, you sir, are a leg-end. Rep your way for the guide. 
Posts: 1,833
Threads: 91
Joined: Dec 2011
Reputation:
12
Location: Wrexham
Car Model/Spec: 306 D Turbo
Thanks: 0
Given 0 thank(s) in 0 post(s)
Well done chap! I'll be having a go at some point too! This needs moving to the guide section or at least a sticky!
Supercharged XUD Project - Dead
Posts: 7,825
Threads: 465
Joined: Dec 2011
Reputation:
114
Location: Cullompton Devon
Car Model/Spec: Vauxhall


Thanks: 1
Given 98 thank(s) in 92 post(s)
Just to finish this off
today i have had a immo chip cloned
at Timpson's key cutters, they also cut the two key blanks for me, there charge was £35 for the immo clone and he did the key blanks for free
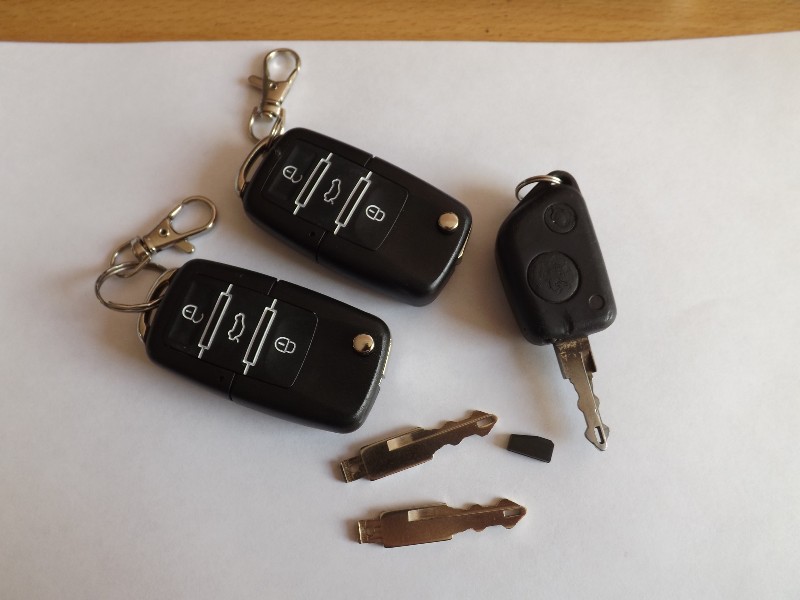
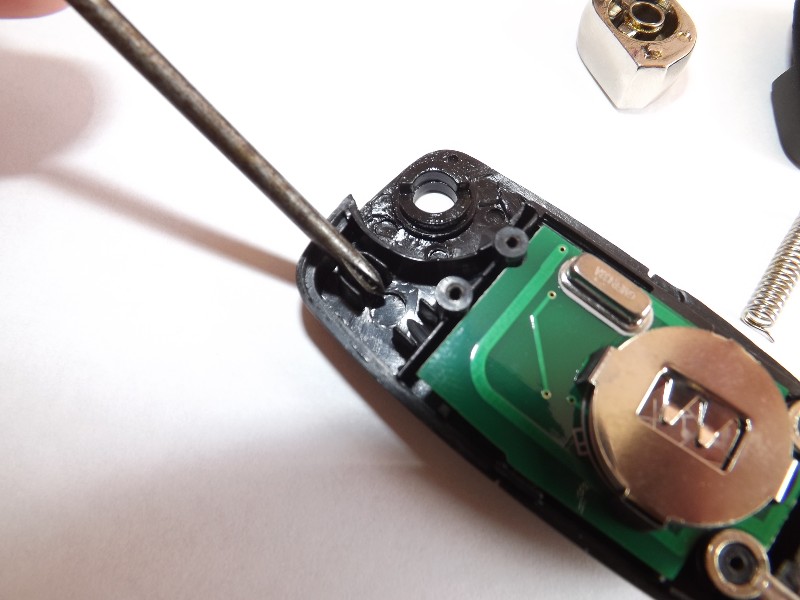
to fit the immo chip into the fob you need to take it to bits and insert it into the chip compartment
then its a case of reassembling the fob and testing it in the car
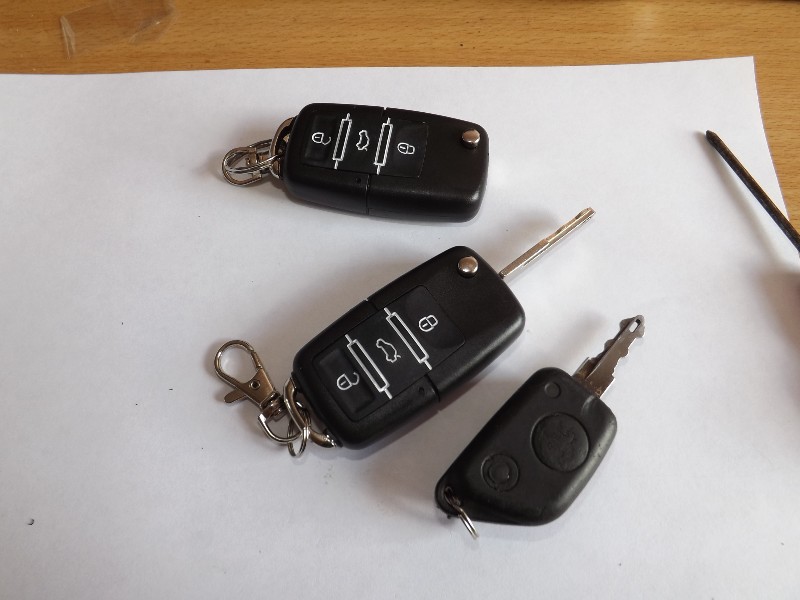
so now i have
1 original key working immo with IR dead locking
1 flip key working immo with RF dead locking
1 flip key working RF Locking less immo chip
i could take the immo chip out the original key and fit it to the new fob
happy days all working as i wanted it too

Posts: 265
Threads: 35
Joined: Dec 2012
Reputation:
0
Location: Wrexham
Thanks: 0
Given 0 thank(s) in 0 post(s)
Did your key come with the slit at the end of it already in. ![[Image: gype4y4e.jpg]](http://img.tapatalk.com/d/13/08/31/gype4y4e.jpg)
These don't have it. If so do you remember the code for that style key. ![[Image: ezuve2an.jpg]](http://img.tapatalk.com/d/13/08/31/ezuve2an.jpg)
NO SMOKE NO POKE
Posts: 7,825
Threads: 465
Joined: Dec 2011
Reputation:
114
Location: Cullompton Devon
Car Model/Spec: Vauxhall


Thanks: 1
Given 98 thank(s) in 92 post(s)
this is the note i added to the paypal payment so they supplyed the correct blanks
Note:
Key blank type PG206, Key Logo Type Peugeot, wiring instructions for 1998 peugeot 306 GTI6 Phase2 with Infrared (IR) remote locking
if you click on the peugeot symble on the page it opens up another window with those key blank codes
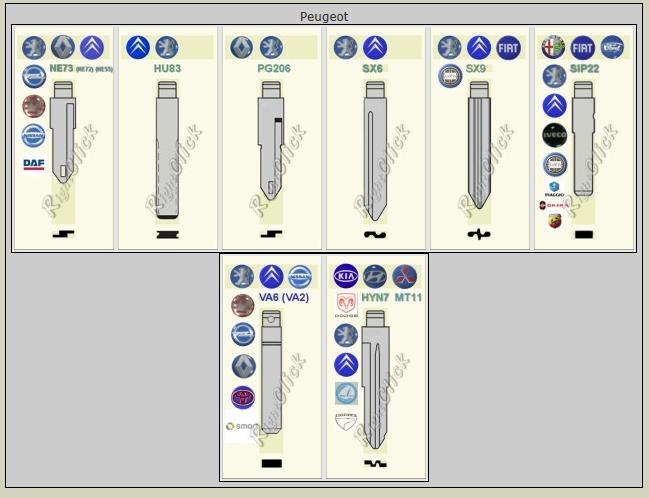
Posts: 265
Threads: 35
Joined: Dec 2012
Reputation:
0
Location: Wrexham
Thanks: 0
Given 0 thank(s) in 0 post(s)
(31-08-2013, 01:10 PM)cully Wrote: this is the note i added to the paypal payment so they supplyed the correct blanks
Note:
Key blank type PG206, Key Logo Type Peugeot, wiring instructions for 1998 peugeot 306 GTI6 Phase2 with Infrared (IR) remote locking
if you click on the peugeot symble on the page it opens up another window with those key blank codes
Thanks
NO SMOKE NO POKE
Posts: 2,490
Threads: 164
Joined: Jun 2012
Reputation:
25
Location: Honiton
Car Model/Spec: Gti6
Thanks: 0
Given 4 thank(s) in 4 post(s)
Any idea if this would work with a non functioning standard unit cully ?
Posts: 7,825
Threads: 465
Joined: Dec 2011
Reputation:
114
Location: Cullompton Devon
Car Model/Spec: Vauxhall


Thanks: 1
Given 98 thank(s) in 92 post(s)
31-08-2013, 02:59 PM
(This post was last modified: 31-08-2013, 03:00 PM by cully.)
(31-08-2013, 02:27 PM)rocker8742 Wrote: Any idea if this would work with a non functioning standard unit cully ?
if you can lock the car via the key and all the locks work then yes
as this works off the key lock system not the IR system
but i supose it depends on how your system is broken
but it would be easy to check though before you bought the lock kit 
Posts: 2,490
Threads: 164
Joined: Jun 2012
Reputation:
25
Location: Honiton
Car Model/Spec: Gti6
Thanks: 0
Given 4 thank(s) in 4 post(s)
Tbh I don't know which part of the system is the problem only that it doesn't appear to be a problem with the key
All the locks work but only from using the key in the door
Posts: 7,825
Threads: 465
Joined: Dec 2011
Reputation:
114
Location: Cullompton Devon
Car Model/Spec: Vauxhall


Thanks: 1
Given 98 thank(s) in 92 post(s)
too test if this kit will work on your not working system
find the C/l box
expose the plugs so you can link some wires
sit in the car with all the doors/boot closed
link ground to the lock wire 6251-6252 = Lock wire for 3 seconds, doors should lock then dead lock
then
link ground to the unlock wire wire6231-6232 = Unlock wire the doors should unlock
if both actions work ok then the replacment unit will work ok 
Posts: 2,490
Threads: 164
Joined: Jun 2012
Reputation:
25
Location: Honiton
Car Model/Spec: Gti6
Thanks: 0
Given 4 thank(s) in 4 post(s)
Nice one mate will have a go later on
Posts: 127
Threads: 38
Joined: May 2012
Reputation:
0
Location: norfolk
Car Model/Spec: d turbo s
Thanks: 0
Given 0 thank(s) in 0 post(s)
Posts: 345
Threads: 35
Joined: Dec 2011
Reputation:
3
Location: Preston
Thanks: 0
Given 1 thank(s) in 1 post(s)
This looks amazing! Wish I could understand any of it though!
![[Image: 65613_10200761612710317_1548698655_n_zps68c27004.jpg]](http://i799.photobucket.com/albums/yy275/martyn992/65613_10200761612710317_1548698655_n_zps68c27004.jpg)
CONVOI EXCEPTIONNEL
Posts: 14,208
Threads: 448
Joined: Dec 2011
Reputation:
51
Location: isle of wight
Car Model/Spec: Pov. Spec White '6
Thanks: 17
Given 18 thank(s) in 18 post(s)
Need this sorting on my car! The ph2 proximity is shocking. I literally have to have my key against the glass to unlock it lol
![[Image: 20A1806D-891D-40FB-BD52-AD519177A607-734...391753.jpg]](http://i35.photobucket.com/albums/d196/mattbush/20A1806D-891D-40FB-BD52-AD519177A607-7340-0000058F46391753.jpg) TEAM CONROD SHITTING RALLYE!
TEAM CONROD SHITTING RALLYE!
Posts: 310
Threads: 19
Joined: Jan 2012
Reputation:
1
Location: Aberdeen
Car Model/Spec: Xantia HDi shed
Thanks: 2
Given 1 thank(s) in 1 post(s)
Hmmm...
My ph3 only has the one key. Could I get one of these keys as a spare?
Posts: 7,825
Threads: 465
Joined: Dec 2011
Reputation:
114
Location: Cullompton Devon
Car Model/Spec: Vauxhall


Thanks: 1
Given 98 thank(s) in 92 post(s)
(05-09-2013, 11:58 AM)me-tm Wrote: Hmmm...
My ph3 only has the one key. Could I get one of these keys as a spare?
yes you could the wires to pick up for the lock and unlock will be on the unit above the astray (bsi) and the others well guess away not looked into this yet
be warnd
the Ph2 immo chip is a ID 33 (T5) chip
the PH3 immo chip is a ID46 chip i belive
Posts: 310
Threads: 19
Joined: Jan 2012
Reputation:
1
Location: Aberdeen
Car Model/Spec: Xantia HDi shed
Thanks: 2
Given 1 thank(s) in 1 post(s)
So one of these keys won't just work with a stock ph3 then...? It uses its own unit that piggybacks onto the main one?
|


![[Image: car-1.jpg]](http://i1117.photobucket.com/albums/k591/grant-306/car-1.jpg)
![[Image: siggy1.jpg]](http://i653.photobucket.com/albums/uu252/crissy_boy/Cars/siggy1.jpg)

 but remember if you are doing this you need to add the ground link between (black/yellow/yellowblack) or the locking/unlocking wont work
![[Image: P1060836_zpsz3xgxt7q.jpg]](http://i1101.photobucket.com/albums/g427/wingnutz2/P1060836_zpsz3xgxt7q.jpg)

![[Image: gype4y4e.jpg]](http://img.tapatalk.com/d/13/08/31/gype4y4e.jpg)
![[Image: ezuve2an.jpg]](http://img.tapatalk.com/d/13/08/31/ezuve2an.jpg)
![[Image: sig2_zps5d67efb7.jpg]](http://i1133.photobucket.com/albums/m598/rocker8742/sig2_zps5d67efb7.jpg)
![[Image: 65613_10200761612710317_1548698655_n_zps68c27004.jpg]](http://i799.photobucket.com/albums/yy275/martyn992/65613_10200761612710317_1548698655_n_zps68c27004.jpg)
![[Image: 20A1806D-891D-40FB-BD52-AD519177A607-734...391753.jpg]](http://i35.photobucket.com/albums/d196/mattbush/20A1806D-891D-40FB-BD52-AD519177A607-7340-0000058F46391753.jpg)
![[Image: MIRKxNP.jpg]](http://i.imgur.com/MIRKxNP.jpg)