Posts: 7,825
Threads: 465
Joined: Dec 2011
Reputation:
114
Location: Cullompton Devon
Car Model/Spec: Vauxhall


Thanks: 1
Given 98 thank(s) in 92 post(s)
02-03-2013, 05:02 PM
(This post was last modified: 02-03-2013, 09:47 PM by cully.)
Have been having problems with my electric windows and the electric mirrors, i noticed that opening closing the drivers door sometimes made things work
so i was fairly certain the drivers door loom had broken wires in the flexible bit between the door and A pillar
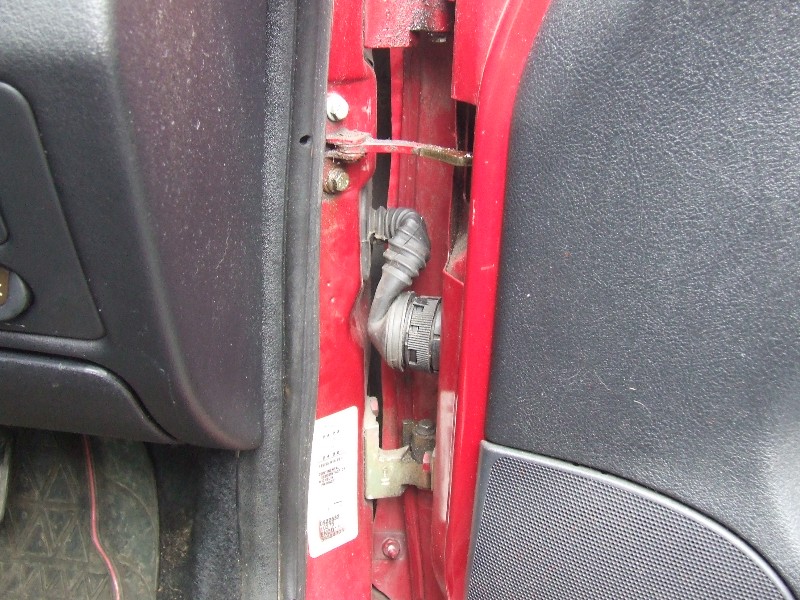
this is a guide on how i went about repairing my loom.
Choices i made before starting
Do i repair my current loom?
No as i only wanted to repair this once as it would take 2-3 hours
Do i use second hand parts?
the answer to me was to use new parts
the reasoning behind this is my car is a 2002 last of the 306's so any second hand parts would probably be in worse state than my loom
Do i use New parts?
Yes as i could justify the expense because i was saving on the labour cost by doing it myself
So a new repair door loom with plug was ordered from Peugeot
part no 6542 VQ Price £97+VAT retail i paid £79 total
today was the day i would set about my repair
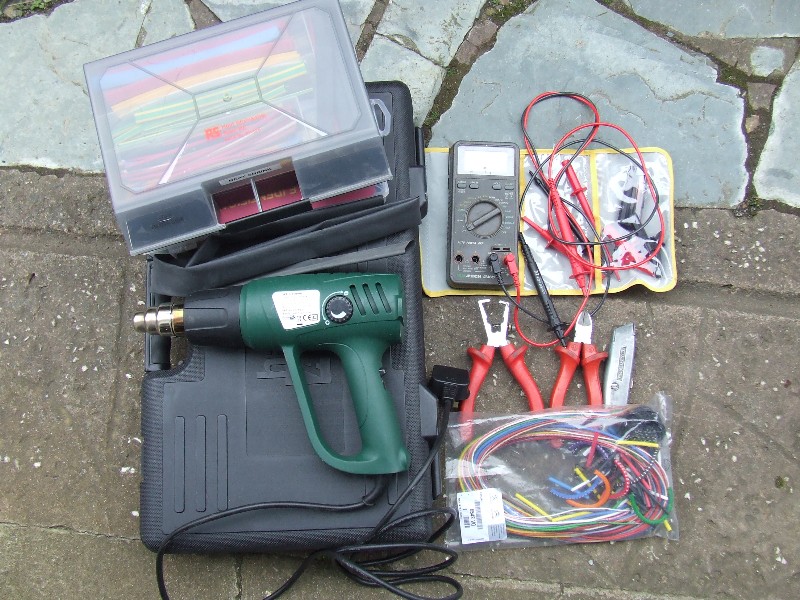
Tools
Wire cutters
Wire strippers
Multimeter
Heat gun
Soldering Iron
Screw driver
Torch
Solder
Heat shrink
Cable markers
Spanners
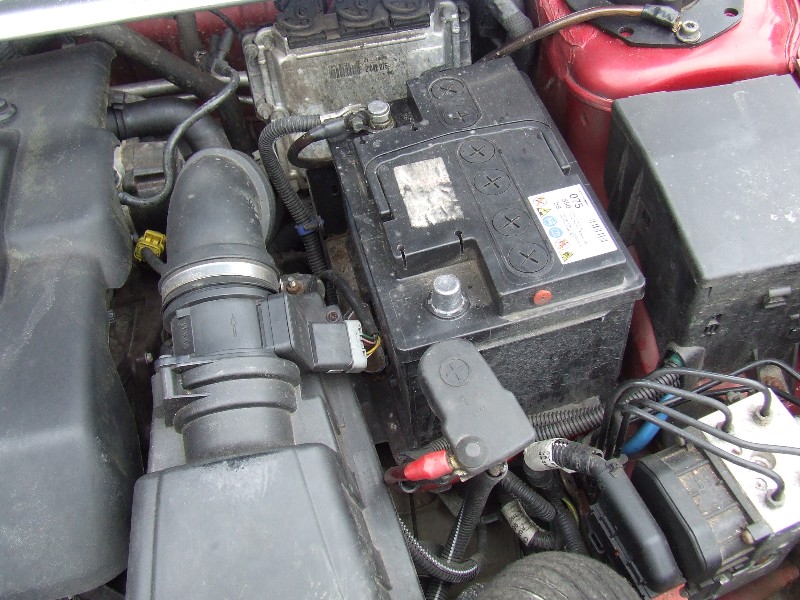
first off i opened the drivers window opened the Bonnet closed the door and waited for the BSI to go into sleep mode then i disconnected the battery
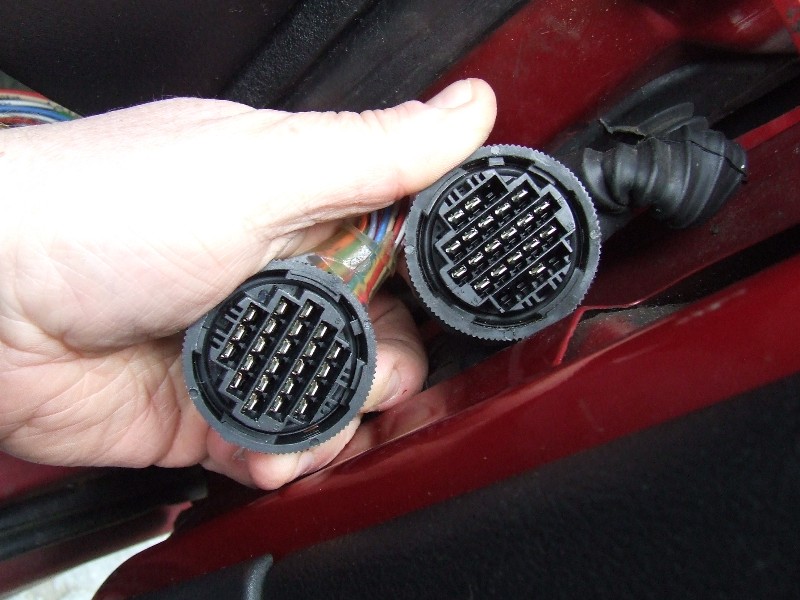
unplug the door loom plug and compare it to one you are replacing it with
make sure you have the same pins or more
now to remove the door to gain easier access to the plug n wires,
unbolt the check strap and remove the 2 centre hinge bolts the door will stay unsupported,
try not to push the check strap into the door this will save you strugaling later
now hold door via internal handle and window frame and lift the door will lift off the hinge, place door down on soft ground to save paint damage

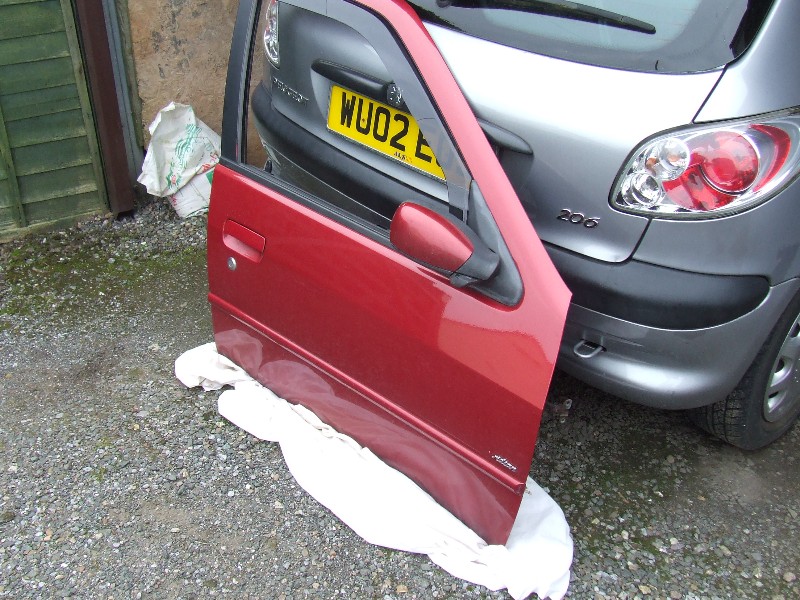
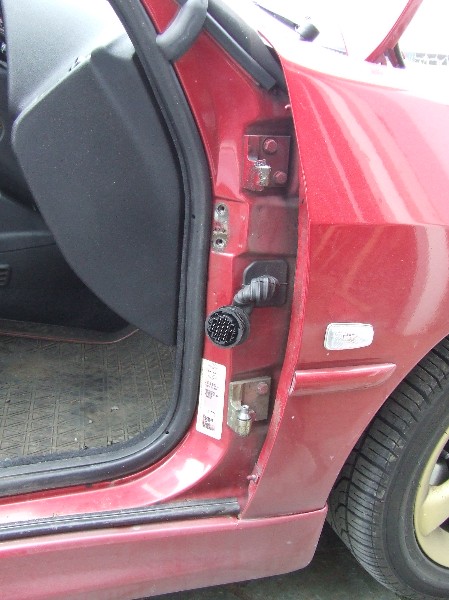
now you have easy access to the plug and grommet
Posts: 7,825
Threads: 465
Joined: Dec 2011
Reputation:
114
Location: Cullompton Devon
Car Model/Spec: Vauxhall


Thanks: 1
Given 98 thank(s) in 92 post(s)
gently prise out the grommet you will find it is a double grommet and the internal section has the rear water squirter pipe going through it,
you will need to cut the inner grommet to release the water pipe
note the Apillar bulkhead is 3 skins!

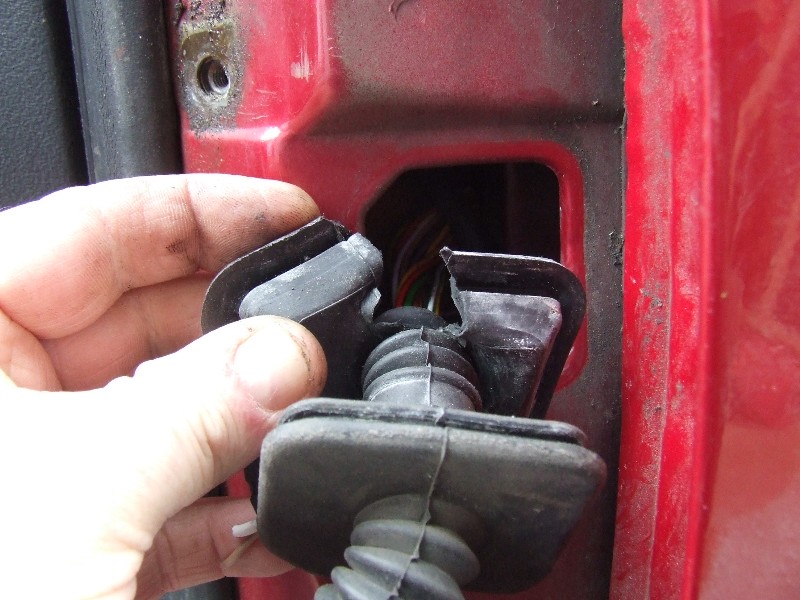
once i had freed both ends of the grommet i could then see my broken wires
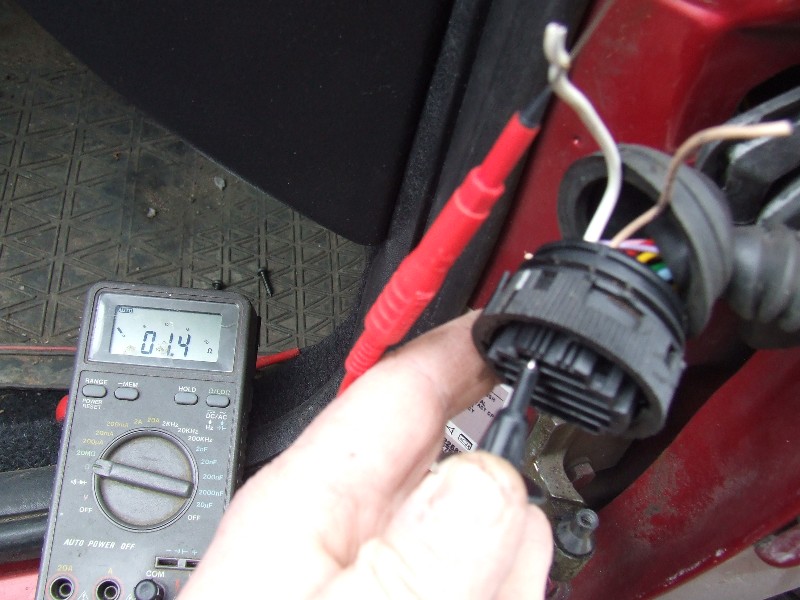
as i was replacing the complete plug i removed each wire in tern and labled it with the plug pin position
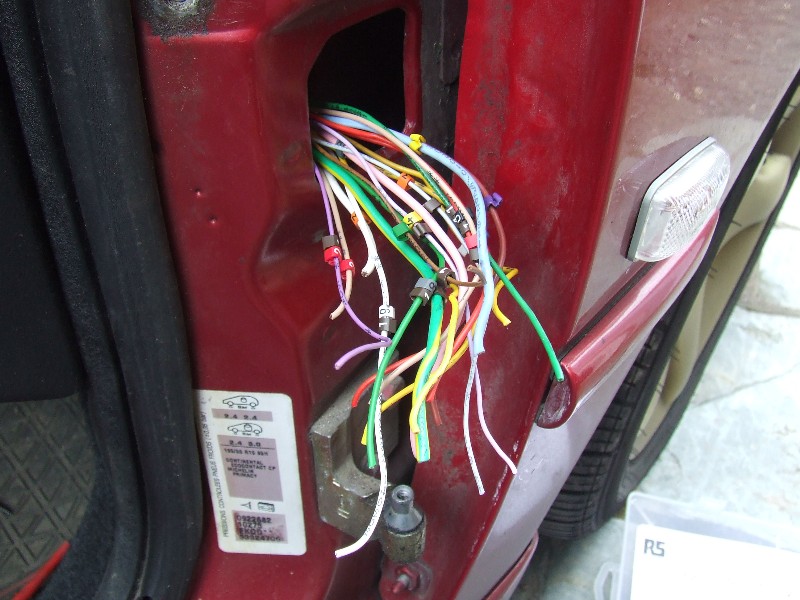
now you end up with a scrap plug and the grommet which you need to thread onto the new plug n loom
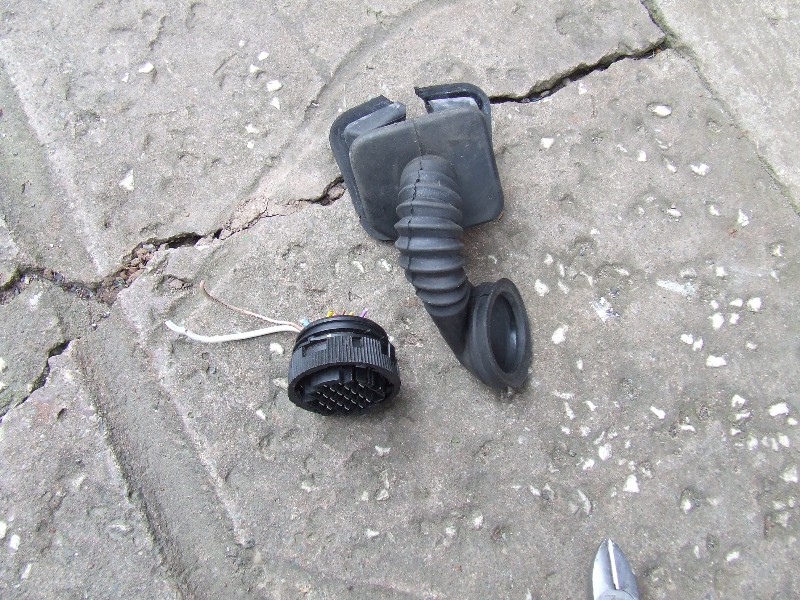

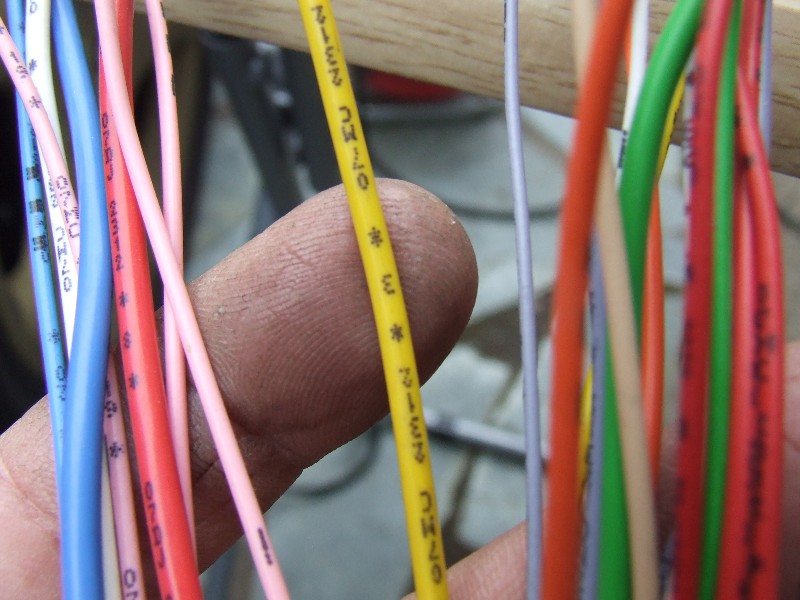
good thing about a new loom plug is you dont need to lable the pins to wires as it is already done for you
see in the picture the wire numbers the number between the * is the pin number
ie: yellow wire *3* THE 3 IS THE PIN NUMBER
Posts: 7,825
Threads: 465
Joined: Dec 2011
Reputation:
114
Location: Cullompton Devon
Car Model/Spec: Vauxhall


Thanks: 1
Given 98 thank(s) in 92 post(s)
Now its time to get busy with the soldering Iron
But dont forget to thread the heatshrink on first!!
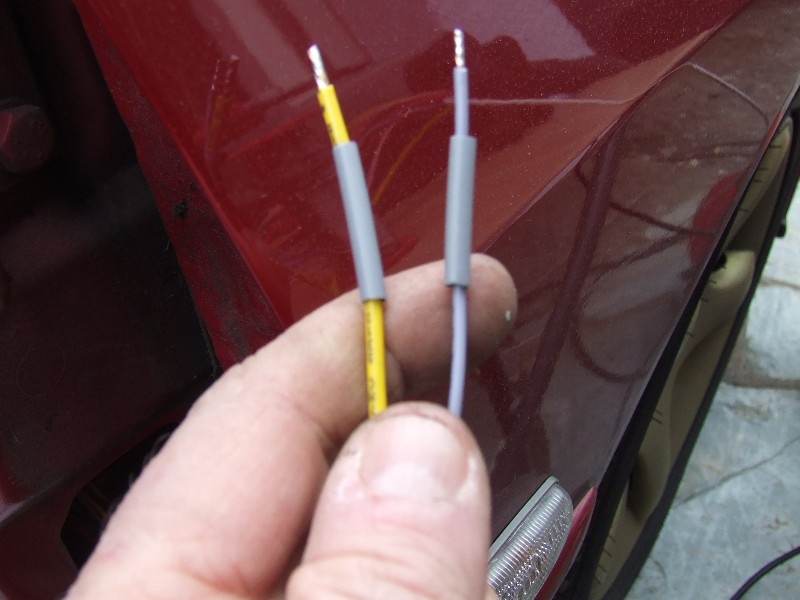 TOP TIP!!!!!
you need 3 hands for inline soldering get yourself some crocodile clips and make a 3rd hand!
now you can aline the joint hold the solder and apply heat
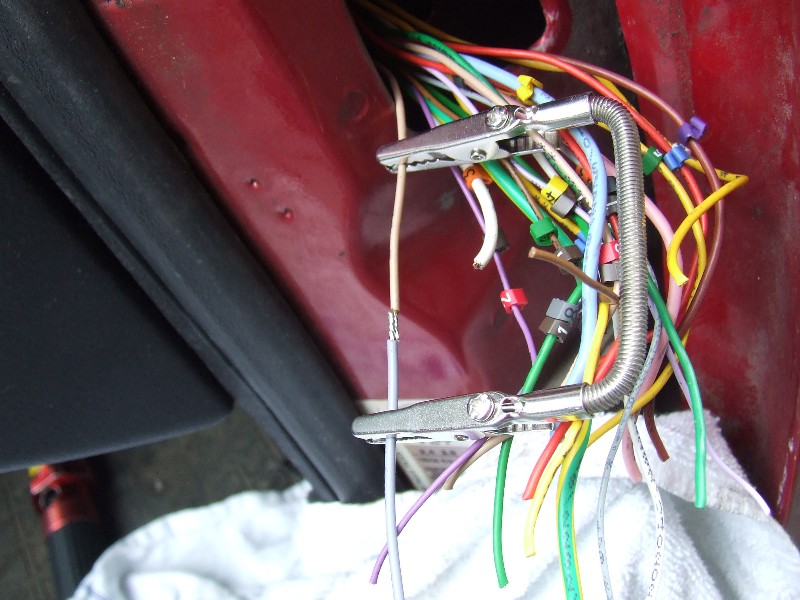
Heatshrink as you go
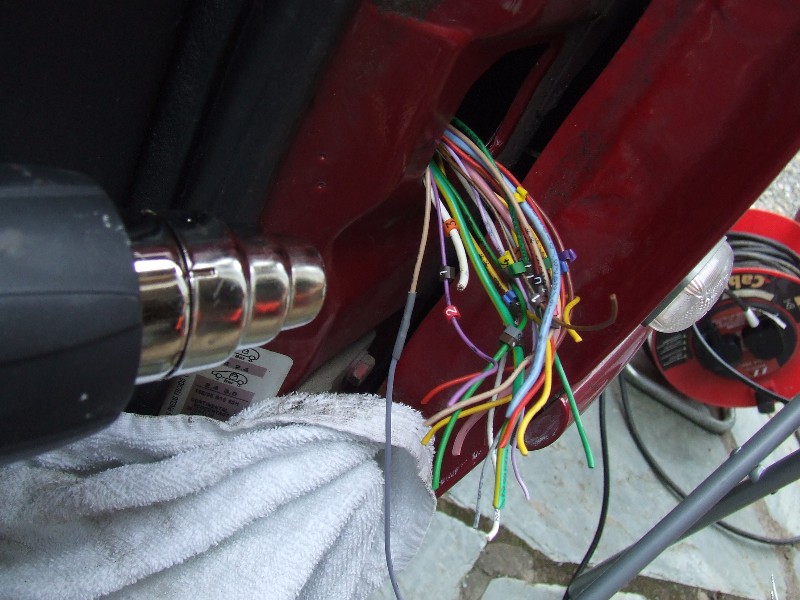
soldering larger cables
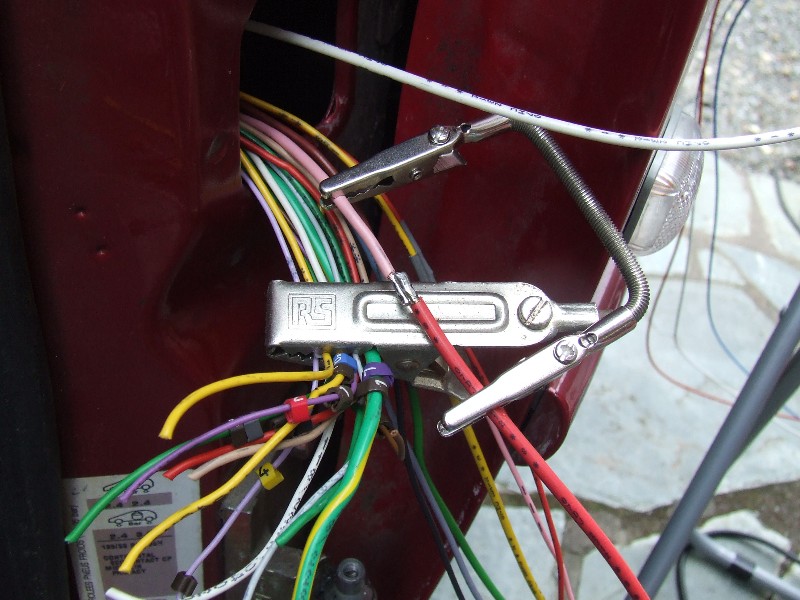
all done!
Tidy job 
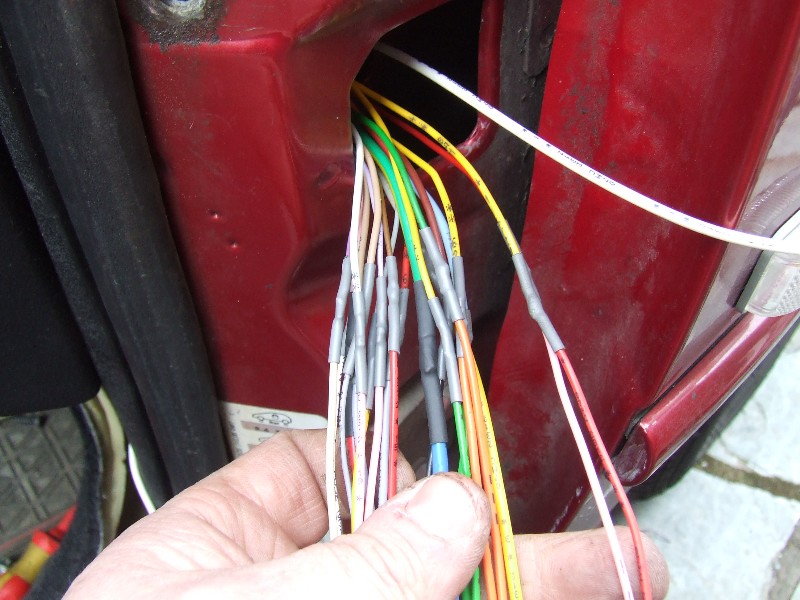
dont forget to insulate the unused wires as you dont know if they are connected in the door side

Posts: 7,825
Threads: 465
Joined: Dec 2011
Reputation:
114
Location: Cullompton Devon
Car Model/Spec: Vauxhall


Thanks: 1
Given 98 thank(s) in 92 post(s)
02-03-2013, 06:26 PM
(This post was last modified: 02-03-2013, 06:41 PM by cully.)
now you have finished the soldering you might want to test your handywork
to see if you have fixed or caused more issus ! 
i brought the door to the car and plugged in the new plug as it was on a long lead
just to test and it all worked!
now you have to pull the cables back into the car and refit the grommet,
you might have to release the carpet on the A piller to enable you to pull the cables through, i also had to use a wire hook to reach up and pull them in as i couldnt reach the hole

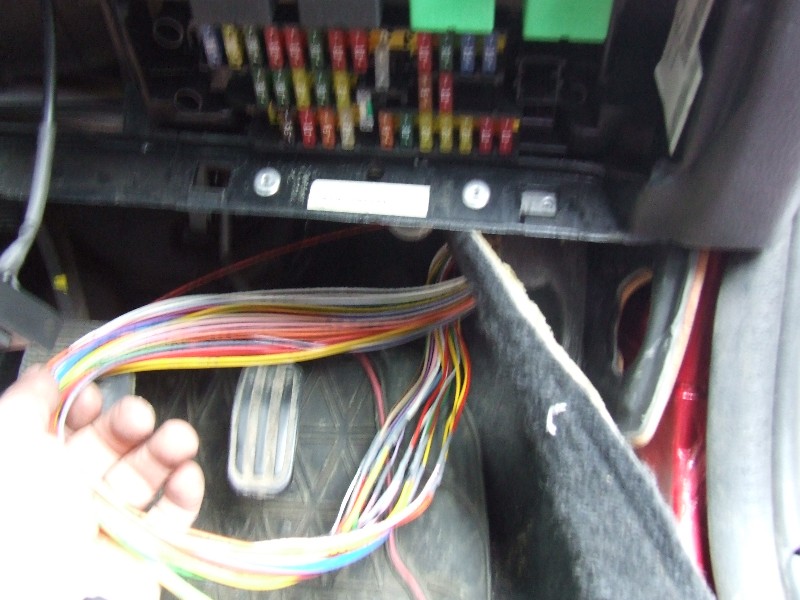

now its just a case of refitting the door plugging in the plug and tidying up the wiring inside the car so you dont get your feet tied up
few extra pictures of the notes i made just incase the numbers fell off i put on
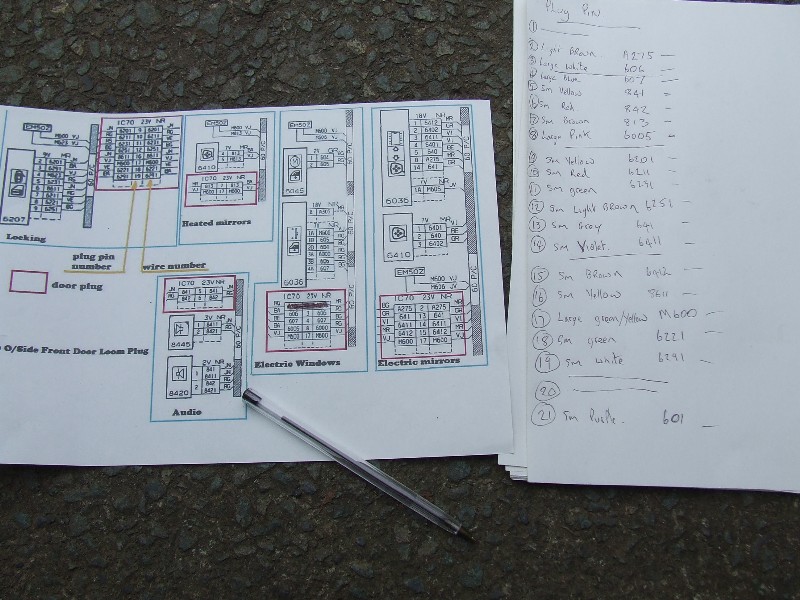
the drawing i had were 99% correct with just one wire number incorrect
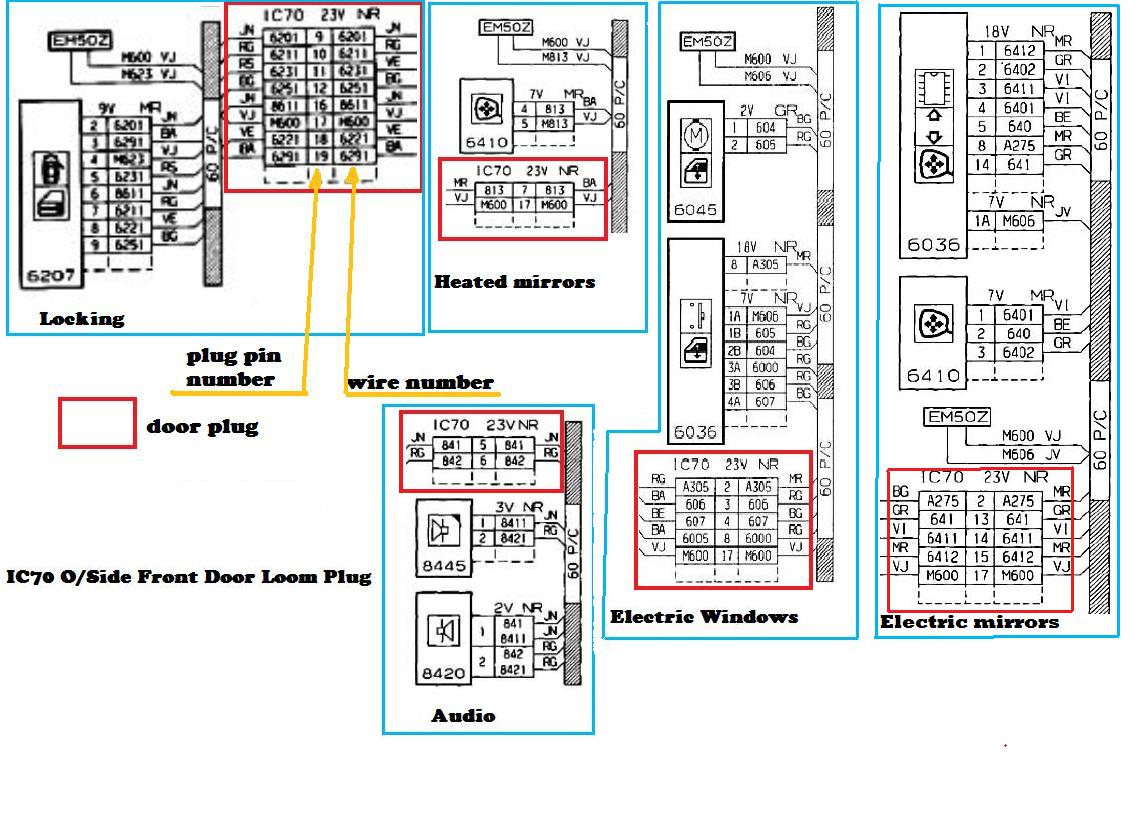
to sum up!
the job took me about 3 1/2 hours in total
im glad i bought the new bits i wouldnt want to struggle with short secondhand cut offs,
would i do it again??? Yes I own a French car with crap electrics so i will probably have to!
if this guide helps anyone it was worth me doing it for you
so a little rep go's a long way 
good luck to anyone that attempts this
Posts: 4,605
Threads: 90
Joined: Dec 2011
Reputation:
54
Location: Cornwall
Car Model/Spec: 1996 306 DT M-TDI/16


Thanks: 0
Given 20 thank(s) in 18 post(s)
*Tidied at cullys request*
| Dyno Power Runs & Steady State Facilities Available, Just Ask Anytime |
| #DervMafia |
![[Image: sigi-2.png]](http://i281.photobucket.com/albums/kk226/darrenjlobb/sigi-2.png)
Posts: 13,881
Threads: 476
Joined: Dec 2011
Reputation:
81
Location: Ipswich
Car Model/Spec: 306 Rallye
Thanks: 4
Given 104 thank(s) in 102 post(s)
waoohhh tidy as in merge the posts not delete everyones comments D:
Ill say it again:
Good guide Cully well done. Hope i dont have to use it!
Posts: 149
Threads: 11
Joined: Aug 2013
Reputation:
1
Location: Durham (ish)
Car Model/Spec: Ph3 Meridian HDI
Thanks: 0
Given 0 thank(s) in 0 post(s)
I need to do this to mine when I eventually get the time.
Have some rep!
Posts: 47
Threads: 14
Joined: Sep 2013
Location: hemel hempstead
Car Model/Spec: 306 2.l d turbo
Thanks: 0
Given 0 thank(s) in 0 post(s)
(02-03-2013, 06:26 PM)cully Wrote: now you have finished the soldering you might want to test your handywork
to see if you have fixed or caused more issus ! 
i brought the door to the car and plugged in the new plug as it was on a long lead
just to test and it all worked!
now you have to pull the cables back into the car and refit the grommet,
you might have to release the carpet on the A piller to enable you to pull the cables through, i also had to use a wire hook to reach up and pull them in as i couldnt reach the hole
now its just a case of refitting the door plugging in the plug and tidying up the wiring inside the car so you dont get your feet tied up
few extra pictures of the notes i made just incase the numbers fell off i put on
the drawing i had were 99% correct with just one wire number incorrect
to sum up!
the job took me about 3 1/2 hours in total
im glad i bought the new bits i wouldnt want to struggle with short secondhand cut offs,
would i do it again??? Yes I own a French car with crap electrics so i will probably have to!
if this guide helps anyone it was worth me doing it for you
so a little rep go's a long way 
good luck to anyone that attempts this Top tip dude, followed your guide and bingo, all done. Took me a little longer as had a siezed hinge! (Wondered why the door was so stiff)! Have a boat load of rep
Posts: 7,825
Threads: 465
Joined: Dec 2011
Reputation:
114
Location: Cullompton Devon
Car Model/Spec: Vauxhall


Thanks: 1
Given 98 thank(s) in 92 post(s)
glade i could help a few people 
Posts: 5,203
Threads: 110
Joined: Jan 2012
Reputation:
20
Location: Devon
Car Model/Spec: Estate, DT, GTI6 and 205


Thanks: 1
Given 30 thank(s) in 30 post(s)
I need to do my driver side now 
Did you find it easy enough to do by pulling the wires out a bit?
Posts: 7,825
Threads: 465
Joined: Dec 2011
Reputation:
114
Location: Cullompton Devon
Car Model/Spec: Vauxhall


Thanks: 1
Given 98 thank(s) in 92 post(s)
(06-10-2013, 12:37 AM)Frosty Wrote: I need to do my driver side now 
Did you find it easy enough to do by pulling the wires out a bit?
you wont pull any more wire out of the car as the loom it taped tight and runs up against the exit hole behind the fuse box on the A pilar
Posts: 166
Threads: 20
Joined: Dec 2011
Reputation:
1
Location: Cornwall
Car Model/Spec: GTi6
Thanks: 1
Given 3 thank(s) in 3 post(s)
brilliant, I need to do this soon!
Posts: 3,342
Threads: 151
Joined: Dec 2011
Reputation:
14
Location: Rotherham
Car Model/Spec: 306 D-turbo
Thanks: 1
Given 0 thank(s) in 0 post(s)
How would you go about doing it if the plug had already been cut off?
![[Image: image_zps45f2003b.jpg]](http://i39.photobucket.com/albums/e174/austinmini-2008/image_zps45f2003b.jpg)
Team Doesn't own a 306
Posts: 166
Threads: 20
Joined: Dec 2011
Reputation:
1
Location: Cornwall
Car Model/Spec: GTi6
Thanks: 1
Given 3 thank(s) in 3 post(s)
(07-10-2013, 07:52 AM)Danny2009 Wrote: How would you go about doing it if the plug had already been cut off?
probably by doing what I'm going to do, go to the scrappy and cut a plug from a donor car to repair
Posts: 3,342
Threads: 151
Joined: Dec 2011
Reputation:
14
Location: Rotherham
Car Model/Spec: 306 D-turbo
Thanks: 1
Given 0 thank(s) in 0 post(s)
But how would you know what wire coming from the car goes to what car on the plug?
![[Image: image_zps45f2003b.jpg]](http://i39.photobucket.com/albums/e174/austinmini-2008/image_zps45f2003b.jpg)
Team Doesn't own a 306
Posts: 7,825
Threads: 465
Joined: Dec 2011
Reputation:
114
Location: Cullompton Devon
Car Model/Spec: Vauxhall


Thanks: 1
Given 98 thank(s) in 92 post(s)
(07-10-2013, 08:59 PM)Danny2009 Wrote: But how would you know what wire coming from the car goes to what car on the plug?
check the wire numbers
failing that tracing out each wire which is long hard work
Posts: 3,342
Threads: 151
Joined: Dec 2011
Reputation:
14
Location: Rotherham
Car Model/Spec: 306 D-turbo
Thanks: 1
Given 0 thank(s) in 0 post(s)
There no numbers on the car there all worn off? Guess work it is then!
![[Image: image_zps45f2003b.jpg]](http://i39.photobucket.com/albums/e174/austinmini-2008/image_zps45f2003b.jpg)
Team Doesn't own a 306
Posts: 41
Threads: 6
Joined: Oct 2013
Location: Ayrshire, Scotland
Car Model/Spec: 306 Estate, Meridian 1.9td
Thanks: 0
Given 0 thank(s) in 0 post(s)
(26-10-2013, 06:43 PM)Danny2009 Wrote: There no numbers on the car there all worn off? Guess work it is then!
you could always hard wire them, i plan on doing that to mine next weekend, doing away with the plug, add a grommet and have everything on bullet connectors inside the door
Posts: 43
Threads: 5
Joined: Jan 2014
Thanks: 0
Given 0 thank(s) in 0 post(s)
where did you get the crocodile clip thing? Ive never seen two connected like this before, looks very handy and I wouldn't mind buying one myself!
Posts: 7,825
Threads: 465
Joined: Dec 2011
Reputation:
114
Location: Cullompton Devon
Car Model/Spec: Vauxhall


Thanks: 1
Given 98 thank(s) in 92 post(s)
(09-01-2014, 04:42 PM)L.J Wrote: where did you get the crocodile clip thing? Ive never seen two connected like this before, looks very handy and I wouldn't mind buying one myself!
make one two crock clips on a piece of 6mm bent stud bar
Posts: 43
Threads: 5
Joined: Jan 2014
Thanks: 0
Given 0 thank(s) in 0 post(s)
Cheers, and great guide. Ive repaired the loom in every 306 ive ever owned never went all out and replaced one like you . Fair play!
Posts: 4,605
Threads: 90
Joined: Dec 2011
Reputation:
54
Location: Cornwall
Car Model/Spec: 1996 306 DT M-TDI/16


Thanks: 0
Given 20 thank(s) in 18 post(s)
Got one of these to repair, have repaired the wires before so thought I would replace the loom, went to peugeot, but apprently they no longer make this loom? Are they talking **** or is this correct? Anyone check there local dealer / post me one? I cba to fit a used one itl only fail again in no time :S
| Dyno Power Runs & Steady State Facilities Available, Just Ask Anytime |
| #DervMafia |
![[Image: sigi-2.png]](http://i281.photobucket.com/albums/kk226/darrenjlobb/sigi-2.png)
Posts: 5,203
Threads: 110
Joined: Jan 2012
Reputation:
20
Location: Devon
Car Model/Spec: Estate, DT, GTI6 and 205


Thanks: 1
Given 30 thank(s) in 30 post(s)
Darren I do have a brand new 1 from Peugeot that I could poss sell or I do have some good 2nd hand 1s off scrapped cars. Drop me a message if you interested
Posts: 7,825
Threads: 465
Joined: Dec 2011
Reputation:
114
Location: Cullompton Devon
Car Model/Spec: Vauxhall


Thanks: 1
Given 98 thank(s) in 92 post(s)
oww interesting if they have discontinued it
rubs hands with glee as i made a good move buying two when i saw them for sale if thats the case 
Posts: 139
Threads: 11
Joined: Feb 2014
Reputation:
0
Location: Tunbridge Wells
Thanks: 1
Given 0 thank(s) in 0 post(s)
Have the same problem on the left door, i have to sort it out soon, but hope to get one second hand!
Regards
Posts: 1,897
Threads: 162
Joined: May 2012
Reputation:
21
Location: Dunstable
Car Model/Spec: 306 HDI Dturbo, Estate & GTI6
Thanks: 0
Given 23 thank(s) in 23 post(s)
Wish I'd seen this guide before I started the loom on the estate.
Last night I missed the number on two green cable's, lucky I didn't blow anything and I realised that something was amiss.
Thanks for your help Cully.
Posts: 5,902
Threads: 142
Joined: Dec 2011
Reputation:
58
Location: Hastings, East Sussex
Car Model/Spec: E46 BMW 320d

Thanks: 17
Given 28 thank(s) in 28 post(s)
Just looked on ebay, can get rear door looms for £9.99, but no sign of front looms...are these really a Dealer only part? Not sure im up for spending best part of £80 on a few bits of wire! 
Posts: 1
Threads: 0
Joined: Dec 2017
Reputation:
0
Location: Hobart
Car Model/Spec: 306 XSI
Thanks: 1
Given 0 thank(s) in 0 post(s)
Country: 
 09-12-2017, 12:31 AM
(02-03-2013, 06:26 PM)cully Wrote: now you have finished the soldering you might want to test your handywork
to see if you have fixed or caused more issus ! 
i brought the door to the car and plugged in the new plug as it was on a long lead
just to test and it all worked!
now you have to pull the cables back into the car and refit the grommet,
you might have to release the carpet on the A piller to enable you to pull the cables through, i also had to use a wire hook to reach up and pull them in as i couldnt reach the hole
now its just a case of refitting the door plugging in the plug and tidying up the wiring inside the car so you dont get your feet tied up
few extra pictures of the notes i made just incase the numbers fell off i put on
the drawing i had were 99% correct with just one wire number incorrect
to sum up!
the job took me about 3 1/2 hours in total
im glad i bought the new bits i wouldnt want to struggle with short secondhand cut offs,
would i do it again??? Yes I own a French car with crap electrics so i will probably have to!
if this guide helps anyone it was worth me doing it for you
so a little rep go's a long way 
good luck to anyone that attempts this
Thanks Cully your helpfulness has reached all the way to Australia!
Love pugs - hate wiring!
Stevegr
Posts: 875
Threads: 145
Joined: Mar 2014
Reputation:
5
Thanks: 54
Given 18 thank(s) in 17 post(s)
some thing tells me I may be doing this job very soon......will try an get a part number for your 306 phase 3 hdi estate v reg, different ecu to the one shown in the picture...
nice to know the door just lifts off......
|


![[Image: sigi-2.png]](http://i281.photobucket.com/albums/kk226/darrenjlobb/sigi-2.png)


![[Image: New%20GTi6%20Filmstrip%20sig2_zpsu8ocrldg.jpg]](http://img.photobucket.com/albums/v299/MCHSavage/New%20GTi6%20Filmstrip%20sig2_zpsu8ocrldg.jpg)
![[Image: image_zps45f2003b.jpg]](http://i39.photobucket.com/albums/e174/austinmini-2008/image_zps45f2003b.jpg)


![[Image: P1060836_zpsz3xgxt7q.jpg]](http://i1101.photobucket.com/albums/g427/wingnutz2/P1060836_zpsz3xgxt7q.jpg)
